Advertisement
Quick Links
- Cosmic Ampworks
Dear Customer,
Thank you for your interest in our Harley Benton GA 15 Ultimate Mod Kit!
Successfully implementing the modifications described in this manual will transform your GA-15 from an ugly
duckling among guitar amplifiers into the metaphorical swan – a great sounding tube amp! Hopefully, it will be
an enjoyable process too – the journey is the destination :)
Please be aware that some of the mods may be quite challenging to perform. Improper implementation of the
described changes may render your GA15 unusable and can even be dangerous! Opening up and changing
your GA15 is entirely for your own risk and should only be done by properly trained personnel. The
modifications described in this manual do not necessarily comply with any electronic safety standards.
Disclaimer: Cosmic Ampworks
the use, misuse or reliance on the information and content in this manual.
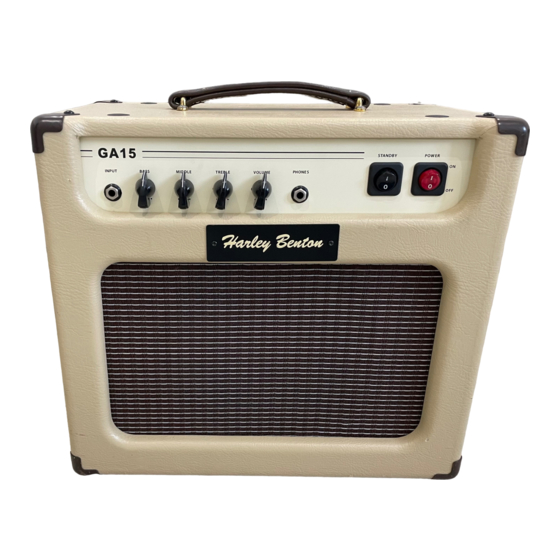
Figure 1. Modified Harley Benton GA15.
1. About the mods
The mods are described on our webpage
amplifier-the-ultimate-mod/). In the current manual, they have been re-arranged in order of increasing
complexity. So, before diving into the deep, there is still some room for learning by doing. It is advisable to
implement the mods one-by-one, and checking carefully whether your amp is still functioning properly after
each mod, before proceeding. Don't forget to listen to the sonic changes along the way! The manual starts out
with some pretty straightforward tweaks:
© 2020 -
www.cosmicampworks.com
- The Ultimate Harley Benton GA15 Mod Kit- Version 1.4 - 200127
®
assumes or undertakes NO LIABILITY for any damage suffered as a result of
®
(https://cosmicampworks.com/harley-benton-ga15-guitar-
1
Dedicated to the Advancement of Stellar Tone!
Advertisement

Related Manuals for Harley Benton GA 15 Ultimate Mod Kit


Summary of Contents for Harley Benton GA 15 Ultimate Mod Kit
- Page 1 ® Dear Customer, Thank you for your interest in our Harley Benton GA 15 Ultimate Mod Kit! Successfully implementing the modifications described in this manual will transform your GA-15 from an ugly duckling among guitar amplifiers into the metaphorical swan – a great sounding tube amp! Hopefully, it will be an enjoyable process too –...
- Page 2 - Cosmic Ampworks - The Ultimate Harley Benton GA15 Mod Kit- Version 1.4 - 200127 ® Adding a grid leak resistor to V2A (oddly, the first preamp tube is numbered V2 in the schematic (p.9, p.27) and on the circuit board; p.10), to make sure the correct bias is maintained at all times.
- Page 3 Figure 2. Filter capacitors and most parts of the HT (High Tension) section of the Harley Benton GA15 printed circuit board (seen from the back of the chassis).
- Page 4 - Cosmic Ampworks - The Ultimate Harley Benton GA15 Mod Kit- Version 1.4 - 200127 ® accidentally create a short circuit between two component legs with the red probe, cover the probe with insulating tape, leaving only the very tip exposed.
- Page 5 - Cosmic Ampworks - The Ultimate Harley Benton GA15 Mod Kit- Version 1.4 - 200127 ® 2.3 Where to check for remaining high voltages? The legs of the 3 HT filter caps themselves are inaccessible, as they are mounted flush with the board.
-
Page 6: Required Materials And Tools
- Cosmic Ampworks - The Ultimate Harley Benton GA15 Mod Kit- Version 1.4 - 200127 ® 3. Required materials and tools 3.1 Contents of The Ultimate Harley Benton GA 15 Mod Kit: This manual (full-color printout is optional); 2. De-soldering wire;... - Page 7 - Cosmic Ampworks - The Ultimate Harley Benton GA15 Mod Kit- Version 1.4 - 200127 ® 4. Preparations Remove the power chord. 2. Unscrew the 8 screws on the back panel of the amp’s cabinet and remove the panel. 3. Remove the tubes (2 x 12AX7 preamp tubes and 2 x EL84 power tubes) from underneath the chassis by carefully pulling and wiggling a bit if necessary.
- Page 8 ICs will be used to power the preamp tube heater filaments with DC, to reduce hum. Figure 7 shows the schematic of the stock Harley Benton. If you’re not so confident in your soldering and electronics skills yet, it may be best to start with removing only the parts that are replaced in mods 1.-4.
- Page 9 ® Figure 7 Schematic of the Harley Benton GA15 (credits of original schematic: DG, 2008). Parts that are to be removed for “the Ultimate Mod” are in the red fields. NOTE 1: If you’re not so confident in your soldering and electronics skills yet, it may be best to start with removing only the parts that are replaced in mods 1.-4.
- Page 10 - Cosmic Ampworks - The Ultimate Harley Benton GA15 Mod Kit- Version 1.4 - 200127 ® 6. Installing new components (wear safety goggles!) Solder a 1M grid leak resistor across the connections of the input jack (Figure 8). Figure 8. A grid leak resistor keeps the grid of triode 1 at DC ground potential, so that the correct bias is maintained.
- Page 11 - Cosmic Ampworks - The Ultimate Harley Benton GA15 Mod Kit- Version 1.4 - 200127 ® Negative! (R2) todo) Figure 10. A 22uF replacement for C4 has been installed here. Make sure to insert the negative pin (minus symbols on capacitor label) on the side of the vertical dash in the little round symbol on the circuit board.
- Page 12 - Cosmic Ampworks - The Ultimate Harley Benton GA15 Mod Kit- Version 1.4 - 200127 ® Right lug (wire 2) Left lug (wire 1) Center lug (wire 3) Figure 11. Connect the gain pot by soldering the input (Wire 1 in Figure 9) to the left lug, ground (Wire 3 in Figure 9) to the right lug and the output (Wire 2 in Figure 9) to the center (wiper) lug.
- Page 13 - Cosmic Ampworks - The Ultimate Harley Benton GA15 Mod Kit- Version 1.4 - 200127 ® 5. Assembling a James tonestack and volume control on the back of three potmeters and installing it. a. Solder a point-to-point James tonestack on the back of two potmeters (Figures 13, 14). First connect the two pots with R2 (180k);...
- Page 14 - Cosmic Ampworks - The Ultimate Harley Benton GA15 Mod Kit- Version 1.4 - 200127 ® c. Connect the volume control (1M, A = audio taper) to the tonestack: i. Solder the wire from the center (wiper) lug of the tonestack treble pot to the left lug of the volume pot ( NOTE: seen from the back, as in Figure 15, it’s the right lug...
-
Page 15: Ground Wire
- Cosmic Ampworks - The Ultimate Harley Benton GA15 Mod Kit- Version 1.4 - 200127 ® (Wire to tonestack) Figure 16. Solder a length of some 15 cm of wire to the rear hole of (the removed) R58. For now, ignore the diagonally mounted resistor and the other two wires (they are part of the - optional - presence control and modified phase inverter, see further down). - Page 16 - Cosmic Ampworks - The Ultimate Harley Benton GA15 Mod Kit- Version 1.4 - 200127 ® Drill some new holes in chassis for attaching the new potmeters (upside down) as indicated in the manual (the original ones were attached to the circuit board).
- Page 17 - Cosmic Ampworks - The Ultimate Harley Benton GA15 Mod Kit- Version 1.4 - 200127 ® e. Attach the L7912 to the heatsink with the little nut and bolt that are included and put some thermal grease on their contact surface.
- Page 18 - Cosmic Ampworks - The Ultimate Harley Benton GA15 Mod Kit- Version 1.4 - 200127 ® ii. Drill hole 4 just above the tube socket solder connections of pin 9 (Figures 23 and 24). Make sure not to accidentally damage the wire bridge on top of the board! Ideally, also interrupt the circuit board trace in go, because the heater traces spread hum throughout the circuit in their stock layout.
- Page 19 - Cosmic Ampworks - The Ultimate Harley Benton GA15 Mod Kit- Version 1.4 - 200127 ® Wire bridge on top of board, Fig. 22 (trace interrupted Hole 2 with drilling) (trace interrupted) (screw hole) Hole 1 (trace interrupted) Figure 21. Drill two holes near the second preamp tube: hole 1 right next to the tube socket connections to pins 4 and 5 (Figures 23 and 24);...
- Page 20 - Cosmic Ampworks - The Ultimate Harley Benton GA15 Mod Kit- Version 1.4 - 200127 ® Run a wire from the L7912 output (-12V DC) to the second preamp tube (V3) heater filaments: i. Cut some 12-13cm of wire and solder one end to the front hole of (the removed) wire bridge J20 (Figure 18 –...
- Page 21 - Cosmic Ampworks - The Ultimate Harley Benton GA15 Mod Kit- Version 1.4 - 200127 ® Ground wire Hole 3 Hole 2 Hole 4 Figure 24. Drill two holes near the first preamp tube: Drill hole 3 right next to the tube socket solder connections of pins 4 and 5;...
- Page 22 - Cosmic Ampworks - The Ultimate Harley Benton GA15 Mod Kit- Version 1.4 - 200127 ® To presence control – front hole of R28 (Wire to tonestack) 10k(*) To presence control – rear hole of J12 The tail resistor R28 of the phase inverter is replaced by mounting the included 10k resistor diagonally to the circuit board, with Figure 25 one leg in the rear hole of (the removed) R28 and the other leg in the front hole of R8.
- Page 23 - Cosmic Ampworks - The Ultimate Harley Benton GA15 Mod Kit- Version 1.4 - 200127 ® Figure 27. Negative feedback for the presence control (running to the center wiper of the 1M NFB potmeter; Figure 12) is taken from point P3, connected to the 8 Ohm output transformer speaker tap.
- Page 24 - Cosmic Ampworks - The Ultimate Harley Benton GA15 Mod Kit- Version 1.4 - 200127 ® Rear hole of (former) connector SCN1 Front hole of R58 Figure 29. Re-establish ground connection for components to the right of C15 with a wire between the front hole of (the former) R58 and the rear hole of the removed connector SCN1.
- Page 25 - Cosmic Ampworks - The Ultimate Harley Benton GA15 Mod Kit- Version 1.4 - 200127 ® Cut 2 Hole 2 Cut 1 Screw hole Power tube Power tube Hole 1 Hole 3 Figure 30. Cut the circuit board traces that conduct electricity to the power tube heaters (cuts encircled). Then drill three holes for the new heater supply wiring (6.3 V spade connectors marked with orange rectangles).
- Page 26 - Cosmic Ampworks - The Ultimate Harley Benton GA15 Mod Kit- Version 1.4 - 200127 ® Figure 32 A last look at the circuit board. …and that’s a wrap! Hopefully, modifying your amp has yielded satisfactory results and some agreeable hours! Please don’t hesitate to provide comments or feedback via...
- Page 27 - Cosmic Ampworks - The Ultimate Harley Benton GA15 Mod Kit- Version 1.4 - 200127 ® Figure 33 Schematic of the modified Harley Benton GA15 © 2020 - www.cosmicampworks.com Dedicated to the Advancement of Stellar Tone!
Need help?
Do you have a question about the GA 15 Ultimate Mod Kit and is the answer not in the manual?
Questions and answers