Table of Contents
Advertisement
Quick Links
Advertisement
Table of Contents

Subscribe to Our Youtube Channel
Related Manuals for Paul FOCUS 200 Base Series


Summary of Contents for Paul FOCUS 200 Base Series
- Page 1 Version: 1.1_03/2020...
- Page 2 The information contained in these documents is the property of PAUL Wärmerückgewinnung GmbH. Publication, as a whole or in parts, requires the written approval of PAUL Wärmerückgewinnung GmbH. In-house duplication, designated for the evaluation of the product or for proper use, is permitted and not subject to approval.
-
Page 3: Table Of Contents
Contents Preface ............................ 5 Validity ............................5 Target group and standard operation ..................5 Qualification of target group ..................... 5 0.2.1.1 Users ............................5 0.2.1.2 Qualified personnel ........................5 Standard operation of the unit ....................5 Introduction ..........................5 Proper use ..........................5 Ventilation unit.......................... - Page 4 Commissioning the FOCUS unit .................... 22 Readiness for operation ......................22 Adjusting the air volume flow ....................22 Adjusting the valves ....................... 23 Maintenance and repair by the qualified personnel ............... 23 Inspection and cleaning of heat exchanger ................23 Swapping the heat exchanger for the summer box ...............
-
Page 5: Preface
• FOCUS 200 Base series (Zehnder Focus 200 Base series) All the units in the FOCUS 200 Base series are referred to below using the generic product name FOCUS, except where it is necessary to distinguish between specific types. This manual deals with the various design variants of the FOCUS heat recovery unit. Possible accessories are only described to the extent necessary for appropriate operation of the unit. -
Page 6: Safety
Repair work under the terms of the warranty is only allowed to be carried out with the prior written approval of PAUL Wärmerückgewinnung GmbH. A warranty on spare parts is only then given if those parts have been delivered by the manufacturer and were installed by a specialist technician recognised by the manufacturer. -
Page 7: Liability
• The unit is used improperly • The defects occur as a consequence of an incorrect connection, improper use, or from system contamination • Unauthorised changes or modifications to the system are made Liability The FOCUS unit has been developed and produced for use in what are known as comfort ventilation systems. Every other form of use is deemed “improper use”... -
Page 8: Type Label
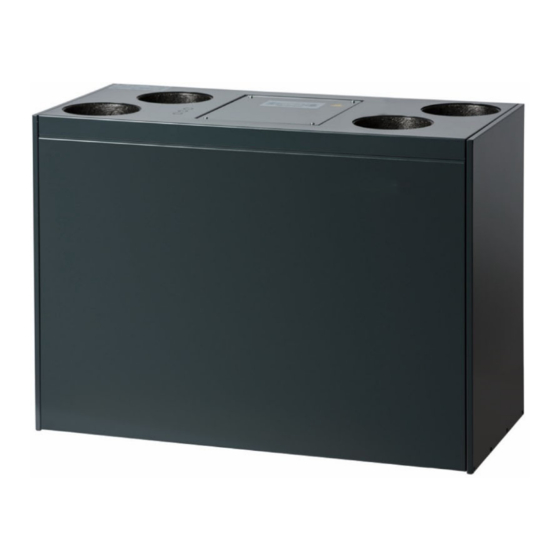
Fig. 1: Main components of the FOCUS heat recovery unit Item Description Fastening sheet Control cover plate Control board Filter (2x) Summer box – Module that keeps the airflows thermally separate Housing made from coated sheet steel EPP moulded parts Condensate drain screw connection Fans (2x) EPP foam cover for fan (2x) -
Page 9: Available Control Modules
reliant on indoor air and there is a risk of dangerous low pressure occurring during operation in the room where the fireplace is installed, the systems may only be operated together if there is a suitable safety feature (differential pressure sensor) installed or an alternative measure specific to the system. -
Page 10: Signals Used To Indicate Working/Maintenance Conditions
Boost ventilation Function button for boost ventilation mode: mode/reset filter Pressing this button activates boost ventilation for 15 minutes with an air volume flow running time button corresponding to the rotary knob being turned all the way to the right. At the end of the 15- minute boost ventilation time, the unit reverts to the previous air volume in the currently active mode. -
Page 11: Maintenance By The User
Maintenance by the user For the user, maintenance of the ventilation unit and system is limited to changing the filters periodically and cleaning the supply and extract air valves. The filters should be inspected every three months. Filter replacement should be carried out as necessary, but no later than once every six months. - Page 12 4. Use strap C to pull the EPP foam cover D for the filters and heat exchanger out of the EPP housing. To do this, grip the strap at one end and pull while using your other hand to support the unit. Fig.
-
Page 13: Resetting The Filter Running Time
Fig. 7: Inserting the new filters according to their direction of flow Depending on the unit type, filters with filter class ISO ePM1 ≥ 60% (F7) must be inserted into the filter compartment for the outdoor air connector in accordance with the type label. The outdoor air connector is indicated by the symbol on the air connections sticker. -
Page 14: Instructions For The Qualified Personnel
Instructions for the qualified personnel Installation requirements The following requirements must be assured for the correct installation: • Installation in accordance with the general and locally applicable safety and installation regulations of the electric and water utilities etc. and in accordance with the regulations stipulated in this manual •... - Page 15 Fig. 9: Fastening sheet for wall mounting Observe the minimum distance required in relation to the finished floor! Fig. 10: Distance from upper edge of finished floor for wall mounting (LEFT-hand version) 2. Stick one of the self-adhesive spacers supplied D in each corner on the rear of the unit. Fig.
-
Page 16: Mounting The Unit On The Floor Stand
Fig. 12: Hooking the unit into the fastening sheet Mounting the unit on the floor stand The dimensions of the floor stand are as follows: footprint = 620 x 292 mm; variable height adjustment = between 280 mm and 320 mm using adjustable feet. The floor stand consists of two long base parts (each with two adjustable feet) and two short base parts. - Page 17 Fig. 15: Fixing the two base parts 3. Now connect the other two base parts in the same way. Fig. 16: Two sets of base parts fixed together 4. Mount the fastening sheet C on the long base part with the lugs pointing upwards. To do this, screw the two Parker screws D into the holes provided E on the base part so that they go through the fastening sheet.
-
Page 18: Connecting The Ventilation Tubes
Fig. 18: Adjusting the floor bracket 6. Place the FOCUS unit on the floor stand so that the lugs of the fastening sheet hook into the slots in the lock seam at the bottom of the unit's rear cover. See Fig. 12. Connecting the ventilation tubes The following points must be observed when installing the ventilation tubes: •... -
Page 19: Connecting The Condensate Drain Hose
• If a silencer is fitted at the exhaust air connector, it must be routed upwards with a bend to prevent it being drenched by condensate running back from the exhaust air tube • If the exhaust air is routed above the roof, a double-walled or insulated roof passage must be installed. This prevents condensate from forming between the roof boards •... -
Page 20: Electrical Connections
Siphons can dry out. The siphon must always be topped up with water when: • The unit is commissioned • The siphon starts making (slurping/gurgling) noises We generally recommend using a waterless siphon. (No functional restrictions if it dries out, no need for a 2 siphon) Electrical connections... -
Page 21: Connecting The Connecting Cable To The Control Board
To open the control panel, proceed as follows: 1. Remove rotary knob 2. Fully unscrew and 3. Remove top section of 4. Access control panel remove fixing screw control panel connecting terminal Control panel connecting terminal Signal X.01 +12 V X.02 (supply fan control voltage) X.03... -
Page 22: Commissioning The Focus Unit
The optional electric pre-heater must take the form of the iso defroster heater DN 125 (Zehnder art. no. 527003450) with a thermal output of 700 W. X2 / X4b terminal on control board Wire of pre-heater cable X2.33 Wire 1 PE X4b.45 Wire 2 lvo X4b.46... -
Page 23: Adjusting The Valves
Adjusting the valves At the start of volume flow measurement, make sure that the supply air and extract air valves are open as wide as possible. • Set the fans to the nominal air volume flow • Adjust the valve orifices, throttle valves or throttle foam inserts •... - Page 24 Fig. 27: Opening the front panel Use strap C to pull the EPP foam cover D for the filters and heat exchanger out of the EPP housing. To do this, grip the strap at one end and pull while using your other hand to support the unit. Fig.
- Page 25 Fig. 29: Pulling out the filters 6. Holding it by the strap F, pull the heat exchanger G out of the EPP housing. Fig. 30: Removing the heat exchanger 7. Clean the heat exchanger. In doing so, proceed as follows: •...
-
Page 26: Swapping The Heat Exchanger For The Summer Box
Take care when installing the heat exchanger! On the bottom of the heat exchanger, there is a condensate tray with two cut-outs H. When sliding the heat exchanger into the unit, take care to ensure that both cut-outs in the condensate tray are pointing towards the condensate drain hose I! Fig. -
Page 27: Technical Description
Technical description Air connection design versions Version with air connections on LEFT Version with air connections on RIGHT Tab. 11: Overview of air connection design versions Technical specification General specifications Description / Value Heat exchanger type Cross-counterflow heat exchanger made from plastic Housing / Interior lining Galvanised sheet steel, powder-coated, free of thermal bridges;... - Page 28 p characteristic curve Note: The numerical values shown in the p characteristic curve diagram indicate the power consumption in [W] (without active iso defroster heater DN 125) for the respective operating points. Tab. 14: Diagram 3, p characteristic curve...
-
Page 29: Dimensions
Dimensions Fig. 32: Dimensional drawing... -
Page 30: Focus 200 Base Terminal Scheme
FOCUS 200 Base terminal scheme Fig. 33: FOCUS 200 Base terminal assignment... -
Page 31: Appendices
Appendices Checklist A Maintenance work for users Maintenance work Enter date in quarter 1. Change both filters in the HRU (filter replacement cycle 90 days) Quarter Year 20... 20... 20... 20... 20... 20... 20... 20... 20... 20... 2. Extract air supplementary filter / clean the filters in extract air valves (filter replacement cycle approx. 2 months) Quarter Year 20... -
Page 32: Checklist B Maintenance Work For Qualified Personnel
Checklist B Maintenance work for qualified personnel Maintenance work Enter result − The listed maintenance work must be carried out in accordance with the components actually present. − Inspection of ventilation system in accordance with DIN 1946-6 Appendix E (normative) and Appendix F (informative) −... -
Page 33: Commissioning And Handover Protocol
Commissioning and handover protocol Customer data Name: First name: Tel.: Street: Postcode: Town/city: Construction project: Unit type: Serial no.: Year of construction: Completeness Components Implementation Result - Design as planned yes / no Supply air duct - Cleaning option provided yes / no - Arrangement as planned yes / no... -
Page 34: Air Volume Protocol
Air volume protocol Customer data Name: First name: Tel.: Street: Postcode: Town/city: Construction project: Unit type: Serial no.: Year of construction: Measurement data Measuring instrument used: Faults during measurement: Indoor temperature: Outdoor temperature: Outdoor Extract Building moisture Filter status when measuring Fan speed ratio status: clean... -
Page 35: Product Data Sheet
Product data sheet... -
Page 37: Product Labels
Product labels Depending on the application, there are various product labels for the FOCUS unit. The product label applicable for the ventilation system is based on the installation of the system and the model identifier from the product data sheet. The product label shows the following details from the product data sheet: •... -
Page 38: Declaration Of Conformity
Declaration of Conformity PAUL Wärmerückgewinnung GmbH (Member of Zehnder Group) August-Horch-Straße 7 / 08141 Reinsdorf / Germany Tel.: +49(0)375 - 303505 - 0 Fax: +49(0)375 - 303505 – 55 Chemnitz commercial register 21371 EU DECLARATION OF CONFORMITY We hereby declare that the product/series described below conforms to the relevant fundamental health and safety requirements of the applicable European Union Directives as outlined herein –... - Page 39 PAUL Wärmerückgewinnung GmbH August-Horch-Str. 7 08141 Reinsdorf Germany Tel.: +49 (0) 375 - 30 35 05 0 Fax: +49 (0) 375 - 30 35 05 55 info@paul-lueftung.de www.paul-lueftung.de Version: 1.1_03/2020...
Need help?
Do you have a question about the FOCUS 200 Base Series and is the answer not in the manual?
Questions and answers