Table of Contents
Advertisement
Advertisement
Table of Contents

Related Manuals for Sportop U80


Summary of Contents for Sportop U80
- Page 1 MODEL : Owner’s Operating Manual ENGLISH...
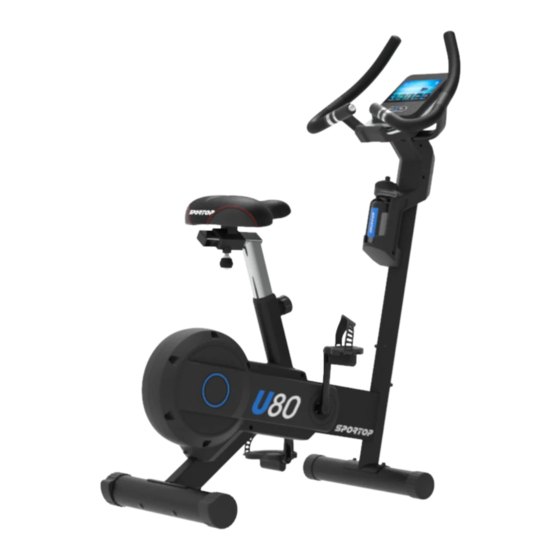
- Page 2 Handle bar Main frame Console Central supporting Rear stabilizer Saddle tube Front stabilizer Left pedal (K1) & Right pedal (K2) Water bottle Adaptor Knob Tool 6m/m 4m/m Saddle tube & Saddle basement...
- Page 3 FIGURE 1 : Rear Stabilizer Assembly Step 1. Remove the preassembled nut (J1), spring washers (J2), and washers (J3) from the rear stabilizer (C). Step 2. Attach the rear stabilizer (C) to the main frame (A) with nut (J1), spring washers (J2), and washers (J3).
- Page 4 FIGURE 3 : Central Supporting Tube Assembly Note: Additional assistance may be needed to help connect sensor wire and to stabilize central supporting tube (B). Step 1. First, remove the screws(J4), spring washers (J12) and washers(J5) from the main frame (A). Step 2.
- Page 5 FIGURE 5 : Console Assembly Step 1. Remove four screws (G1) on the back of the console (G). Step 2. Connect cable (M2, M4, M5) and the handle pulse sensor wires (M3) to the console (G). The handle pulse sensor wires (M3) can be interchangeable. Step 3.
- Page 6 FIGURE 8 : Saddle & Seat Tube Assembly Step 1. Remove nuts (H1) and washes (H2) on the back of the saddle (H). Step 2. Position seat (H) onto the seat basement (F2) and tighten it using nuts (H1) and washes (H2).
- Page 7 FIGURE 9 : Pedal Assembly Note: Locate the left & right pedals. There is a Left and Right mark on each pedal and each pedal strap to distinguishing them. Step 1. Tighten the left pedal (K1) counter-clockwise to left crank arm and the right pedal (K2) clockwise to right crank arm.
- Page 8 CONSOLE DISPLAY 7” TFT BUTTON FUNCTIONS QUICK START BUTTON A When the console is in SLEEP mode, the quick start button can wake it up. B When the console is in STAND BY mode, the button can quick start the console. TFT Panel operation All operations are performed on the TFT display.
- Page 9 DISPLAY FUNCTIONS 1.TIME: (1) Display range: 0:00~99:59 (2) Setting range:0~99(minutes) (Enter the value directly by using the numeric keypad) (3) Screen display BAR: Number of cells-10 cells (MAX=60 minutes, display full cells) (4) When there’s no setting value, the default setting is counting upward (after 99:59 it returns to 0:00) (5) When there’s setting value, the default setting is counting downward, to 0:00 the console pause, all the operational values are saved.
- Page 10 7.WATT: (1) Display range:0~999 (2) Setting range: not settable. (3) Screen display: Number of cells-10 cells (MAX=350 displays full cells each 350/10=35/cell) (4) According to RPM&LOAD cells display (WATT console) 8.LOAD: (1) Display range:1~16 (2) Setting range:1~16 (3) Screen display: Number of cells-16 cells (MAX=16 displays full cells) 9.USER: (1) Users: U0~U4 (2) U0 not saved after setting...
- Page 11 INSTRUCTIONS Power up 1. Console power up image , after about 30 seconds, enter STAND BY mode (image1), the function key panel will raise. "Time / Perpetual Calendar Box" QUICK START function factory mode image 1 COMMUNITY CENTER TARGET H.RATE MAUNAL WATT CONSTANT PROGRAM...
- Page 12 (1)WIFI Turn on the WIFI, and select the available network to connect. image 5 (2) BRIGHTNESS (3) VOLUME Slide the bar to adjust the brightness. Slide the bar to adjust the volume. image 7 image 6 (4) LANGUAGE Select the language you want from the list. Languages are available in English, German, French, Spanish, Portuguese, Russian, Traditional Chinese, Chinese, Czech, Slovak, Polish, and Hungarian.
- Page 13 (5) UNIT SWITCH Switch KM or ML. image 10 image 11 (6) ABOUT Console version will be showed on About area. When user presses APP MANAGE, it will automatically detect if there is the latest version. image 12 After console detecting, if APP is the latest version, the right side will show “Latest”; if APP is not the latest version, the right side will show “Update”, the user can click the button and follow the direction to update.
- Page 14 Quick start function Under STAND BY mode, press to enter QUICK START function, the console will enter the motion picture (image 14). image 14 1.When the RPM input is >15, SPEED DISTAN RPM CALORIES and every value will start loop counting. 2.Press to adjust LOAD , the matrix image will rise or decline, the matrix will DOWN...
- Page 15 COMMUNITY CENTER function 1.Under STAND BY mode, press COMMUNITY CENTER to enter said function (image 1 ), the multimedia function below will rise (image 1 ). image 1 image 1 2.Select any multimedia below to activate the multimedia function(image 3.After activating the multimedia, slide the left arrow from left to right and it will display the HOME / QUICK START key (image 4.If there is no movement within 3 seconds, the lightness will fade to 50%, you can press “...
- Page 16 8. Press HOME, the WORKOUT data will display and press EXIT to return to homepage, or press CONTINUE to keep training. ( Training time is less than 30 seconds and WORKOUT data will not be displayed) image 2 MANUAL function 1.Under STAND BY mode, press MANUAL to enter said function (image 2 ).
- Page 17 10.Press to enter pause mode, the word PAUSE will be shown on the LCD display, the PAUSE console will pause, and the SPEED&RPM returns to 0. The motor returns to LOAD1(image 29), press to resume console activating motion picture. CONTINUE Under PAUSE mode, user can choose multimedia (YouTube Netfilx Spotity Chrome), press the i t l l l i...
- Page 18 5.Under STANDBY mode, user can choose multimedia (YouTube Netfilx Spotity Chrome), press the multimedia that you want it will light up, and press to start the multimedia START 6.During the setting, press EXIT, the console returns to the home page. 7.Press START to start the work out, the console will enter the motion picture, the console value will count upward, the matrix will display the chosen work out image, LOAD PULSE WATT SPEED DISTANCE RPM CALORIES displays work out value.
- Page 19 WATT CONSTANT function 1.Under STAND BY mode, press WATT CONSTANT to enter said function (image 38). 2.You can press WATT to set WATT value (Default value :125W). 3.You can press U0~U4 to switch between users, the user information below will also be displayed accordingly.
- Page 20 10.During the work out, press to enter RECOVERY function. When counting down to 0, RECOVERY it will show the result and press any position on the screen to return to homepage. 11. During the work out, press HOME, the WORKOUT data will display and press to return to EXIT homepage.(image 43) ( Training time is less than 30 seconds and WORKOUT data will not be displayed)
- Page 21 9. When the heartbeat value does not exceed the set value, increase the LEVEL to LEVEL maximum value in units of time 30 seconds. When the heartbeat exceeds the set value LEVEL, immediately drop one LEVEL, and decrease 1 LEVEL every 15 seconds (until LEVEL=1). If the heartbeat value continues to exceed 30 seconds when LEVEL=1, and the console automatically pauses to ensure user safety.
- Page 22 5.Prompt word (Outstanding) (Excellent) (Good) (Fair) (Below average) (Poor) NOTE: The console will enter SLEEP MODE (Energy saving mode) after without signal for 5 minutes. This console is a closed system, so if the app in COMMUNITY CENTER automatically jumps out of any update message, please DO NOT update.
Need help?
Do you have a question about the U80 and is the answer not in the manual?
Questions and answers