Lowrance Ghost Series Installation Manual
Hide thumbs
Also See for Ghost Series:
- Installation manual (32 pages) ,
- Operator's manual (32 pages) ,
- Operator's manual (25 pages)
Table of Contents
Advertisement
Advertisement
Table of Contents

Related Manuals for Lowrance Ghost Series


Summary of Contents for Lowrance Ghost Series
- Page 1 Ghost Series Installation Manual ENGLISH lowrance.com...
- Page 3 • Reorient or relocate the receiving antenna. Preface | Ghost Series Installation Manual...
- Page 4 Level 2 devices of the Radiocommunications (Electromagnetic Compatibility) standard 2017. • Radiocommunications (Short Range Devices) Standards 2014. Trademarks • Navico® is a registered trademark of Navico Holding AS. • Lowrance® is a registered trademark of Navico Holding AS. Preface | Ghost Series Installation Manual...
-
Page 5: Table Of Contents
Stow and deploy assist spring Stabilizer Propeller Foot pedal Trolling motor compass (TMC-1) Wiring Wiring guidelines Wiring overview Power Trolling motor compass (TMC-1) NMEA 2000 Sonar Setup and commissioning Power the trolling motor ON or OFF Configuration Contents | Ghost Series Installation Manual... -
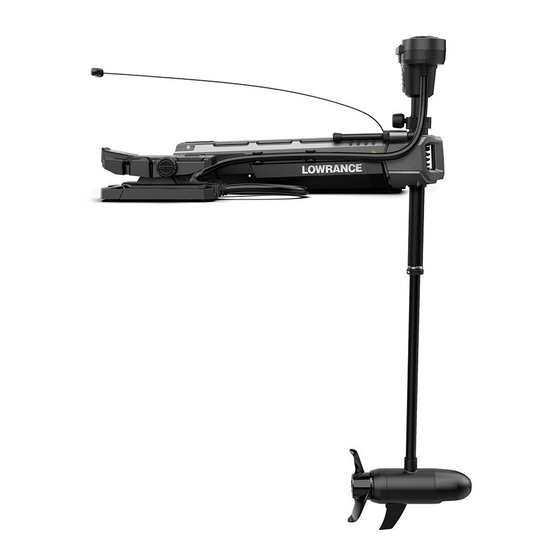
Page 6: Introduction
Reduces the force needed to stow and deploy the trolling motor. HDI Nose cone transducer Propeller Foot pedal Direction indicator Braided stainless steel pull cable and handle Used when stowing and deploying the trolling motor. The trolling motor is latched in both Introduction | Ghost Series Installation Manual... - Page 7 When loosened, the lower unit depth can be adjusted. Motor mount Stow strap Lower unit Foot pedal Toe end Momentary switch Mode and action keys Heel end Power key and battery capacity indicator Speed adjustment knob Introduction | Ghost Series Installation Manual...
-
Page 8: Parts Included
Stow and deploy assist spring kit Gas spring 1/4”-20 x 5/16” Philips screw Washers 5/16” binding barrel Stabilizer kit Top cap Jam nut 3/4”-10 Stabilizer Foot cap NMEA 2000 T-connector Propeller kit M10 Nylock nut Washer Propeller Introduction | Ghost Series Installation Manual... -
Page 9: Opening And Closing The Mount
¼ Note: The mount can be damaged if slammed shut without pushing the safety latch. While holding the safety latch (A) down, slowly close the mount while allowing the front latch to lock into place. Introduction | Ghost Series Installation Manual... -
Page 10: Installation
Open the mount, refer to “Opening and closing the mount” on page 9. Install the cable management clips to the mount. It should be possible to rotate the cable management clips when the screws and binding barrels are fully tightened. 10 | Installation | Ghost Series Installation Manual... -
Page 11: Attach The Motor To The Mount
9. Torque the screws to 19 Nm +/- 2 Nm (14 ft lbs +/- 1.5 ft lbs). Secure the trolling motor cable in the cable management clips (D). Cable ties can be used with the clips to provide additional cable retention if needed. | 11 Installation | Ghost Series Installation Manual... -
Page 12: Mount The Trolling Motor On The Boat
Test that the hold stow strap can be used to secure the trolling motor shaft when in stowed position. 12 | Installation | Ghost Series Installation Manual... - Page 13 Make sure that the stow strap is located between the second and third set of bolt holes from the bow of the boat. Double check that it can close around the Mount when the trolling motor is in the stowed position. | 13 Installation | Ghost Series Installation Manual...
-
Page 14: Stow And Deploy Assist Spring
Parts required Item Description stow and deploy assist spring 1/4”-20 x 5/16” Philips screw 5/16” binding barrel washers Tools required • 2x Philips screwdriver #3 14 | Installation | Ghost Series Installation Manual... - Page 15 Raise the motor until the stow and deploy assist spring reaches the upper bracket. Place the two washers inside the bracket and secure the upper arm of the stow and deploy assist spring. | 15 Installation | Ghost Series Installation Manual...
-
Page 16: Stabilizer
Cut the rod. Remove any sharp edges around the cut. Attach the foot cap and screw down the jam nut on the stabilizer rod. Install the stabilizer rod into the adapter located on the 360 breakaway. 16 | Installation | Ghost Series Installation Manual... - Page 17 ! Warning: Incorrect installation could cause the mount to open in rough conditions. Install the top cap if there are threads exposed above the adapter. | 17 Installation | Ghost Series Installation Manual...
-
Page 18: Propeller
¼ Note: Mounting hardware is not supplied. Obtain mounting hardware that suits your boat and installation. Use screws with a diameter of 3.17 - 4.76 mm (1/8” - 3/16”). 18 | Installation | Ghost Series Installation Manual... - Page 19 Remove the lock screw (A) that secures the cover plate (B). Press the locking tab (C) upwards and slide the cover plate (B) forward until it is free. Remove the screws (D) that secure the FlipSwitch assembly. | 19 Installation | Ghost Series Installation Manual...
- Page 20 Turn the FlipSwitch assembly (E) 1800 and fasten the screws that secure the FlipSwitch assembly. Slide the cover plate (B) back in place and fasten the lock screw (A). 20 | Installation | Ghost Series Installation Manual...
-
Page 21: Trolling Motor Compass (Tmc-1)
Drill 3 mm (0.12”) pilot holes. Insert the compass gasket into the compass body. Screw the compass to the boat. Transducer For transducer installation, refer to separate documentation supplied with your transducer. | 21 Installation | Ghost Series Installation Manual... -
Page 22: Wiring
The positive supply wire (red) should always be connected to (+) DC with a fuse or a circuit breaker (closest available to fuse rating). Wiring overview All wiring is made to and from the foot pedal. 22 | Wiring | Ghost Series Installation Manual... -
Page 23: Power
DC positive 24 V DC / 36 V DC to foot pedal, Red Trolling motor compass (TMC-1) Foot pedal compass (TMC-1) input, 5 pin female connector Compass (TMC-1) connector, 5 pin male connector | 23 Wiring | Ghost Series Installation Manual... -
Page 24: Nmea 2000
Display unit with regular 9-pin transducer connector Display unit with regular 7-pin transducer connector Foot pedal transducer cable, mini 9-pin male connector mini 9-pin to regular 9-pin adapter 9-pin to 7-pin adapter cable (sold separately) 24 | Wiring | Ghost Series Installation Manual... -
Page 25: Setup And Commissioning
Simultaneously press and hold Configurable key 2 and Configurable key 3 until an audible tone is heard. The Power LEDs will start blinking. You will need to exit configuration mode once you have completed the procedures. | 25 Setup and commissioning | Ghost Series Installation Manual... - Page 26 Press and hold Configurable key 1 and Configurable key 2. Wait for an audible confirmation and the trolling motor will restart. All settings and calibrations are now set to factory defaults. 26 | Setup and commissioning | Ghost Series Installation Manual...
Need help?
Do you have a question about the Ghost Series and is the answer not in the manual?
Questions and answers
The anchor function on my foot pedal stopped working yesterday; when I push that with my foot nothing happens; how do I diagnose and fix this?
To diagnose an anchor function issue on your Lowrance Ghost Series foot pedal, check for error indicators:
1. Listen for Beeps and Check LED Flashes
- 3 short beeps, 2 short flashes: Missing GPS signal.
- 4 short beeps: Invalid heading data, check compass connection.
- 5 long flashes: Battery level low, unit will shut off.
- Fast double flashes: Hardware error, perform a power cycle.
2. Perform a Power Cycle
- Turn off the unit, wait a few seconds, then turn it back on.
3. Check Compass Connection
- Ensure all cables and connectors are properly attached.
4. Force a Software Upgrade (if needed)
- If experiencing a software mismatch, enter user configuration mode, then hold the Anchor key and Configurable key 3 to initiate an upgrade.
If the issue persists, contact a service center.
This answer is automatically generated