
Related Manuals for Tim Sistem RITTIUM CTP


Summary of Contents for Tim Sistem RITTIUM CTP
- Page 1 RITTIUM CTP, SAVVA C Wood pellet stove Owner’s manual OPERATING AND MAINTENANCE INSTRUCTION EN 14785:2006 V1/04.20...
-
Page 2: Table Of Contents
3. TECHNICAL CHARACTERISTICS ...................... 6 3.1 1 STOVE DIMENSION ........................7 4. BASIC FEATURES OF THE STOVE....................8 4.1 PELLET STOVE "RITTIUM CTP" ....................8 4.2 PELLET STOVE "SAVVA C" ......................9 5. INSTALATION OF THE STOVE ......................10 6. DISPLAY AND A REMOTE CONTROL ....................13 6.1. -
Page 3: About Pellet
1. ABOUT PELLET Pellet is an energy fuel with high energy efficiency, which is produced in special technological process of milling, drying and pressing of various materials of biological origin. As raw materials for its production can be used wood from forestry waste, firewood, sawdust and other wood waste (Wood pellets);... -
Page 4: Remarks Before Operating The Stove
2. REMARKS BEFORE OPERATING THE STOVE Always follow the references given in this chapter. The manufacturer doesn’t take a responsibility for consequences in opposite cases. Not respecting the instructions of use and maintenance, cause loss of your right to an warranty. ... - Page 5 you will automatically lose rights to a warranty and any further repairs by an authorized service will be charged. NOTE: Each stove before packing requires the operation and safety control. Therefore, it’s possible to find some burning remains in the firebox. It is also possible to find a small amount of pellets in the hoper.
-
Page 6: Technical Characteristics
3. TECHNICAL CHARACTERISTICS Technical characteristics of RITTIUM CTP / SAVVA C are presented in table below: Heat output / Power 6 kW 8 kW 10 kW Dimension (W x L x H) RITTIUM CTP 457 x 570 x 1017 Dimension (W x L x H) SAVVA C... -
Page 7: Stove Dimension
3.1 1 STOVE DIMENSION: Image 1. is presenting RITTIUM CTP and SAVVA C dimensions. RITTIUM CTP SAVVA C Image 1. -
Page 8: Basic Features Of The Stove
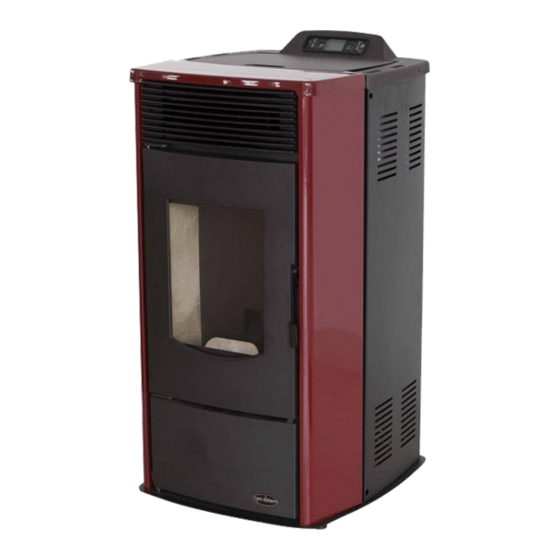
4. BASIC FEATURES OF THE STOVE 4.1 PELLET STOVE "RITTIUM CTP" Image 2a. Image 2a presenting basic features and basic parts of RITTIUM CTP pellet stove. 1. Firebox doors 11. Storage cover 2. Door handle 12. Storage 3. Door glass 13. -
Page 9: Pellet Stove "Savva C
4.2 PELLET STOVE "SAVVA C" Image 2b. Image 2b. is presenting basic features and basic parts of SAVVA C pellet stove. 1. Firebox doors 11. Storage cover 2. Door handle Display with commands 3. Door glass 13. Rear side 4. Ashtray doors 14. -
Page 10: Instalation Of The Stove
5. INSTALATION OF THE STOVE With a stove you will get the user’s manual, remote control and power cable. These accessories, included with the stove are presented on an Image 3. Image 3. Before you start installation of the stove, you must read carefully instructions for use and maintenance get to know well a regional regulations and legislation, in order to apply them. - Page 11 When connecting the stove with smoke drain and flue tubes, check carefully if all connections are well sealed, so that gases do not to enter the room where the stove is located. Flue pipe must not be too drawn into the chimney. There is a power cord included with stove.
- Page 12 CONNECTING TO EXTERNAL AIR INLET External air inlet connector in diameter of Ø50mm is positioned on the rear side of the stove. If use of external air inlet is not possible, it is absolutely obligatory to provide fresh air in the room where stove is situated.
-
Page 13: Display And A Remote Control
6. DISPLAY AND A REMOTE CONTROL On display there are 6 keys which are being used for managing different functions of the stove. In the middle, there is a screen which shows basic information related stove operation. Image 7. present a display appearance and content. Image 7. -
Page 14: Remote Control
Timer indicator (turning the on and off according to a selected program) Heater indicator for burning the pellet Auger Exhaust fan indicator Room fan indicator Water pump indicator (optional and related only to a stoves for central heating) Alarm indicator Table 2. - Page 15 Table below is presenting detailed commands which can be executed by pressing 1-6. Description Mode Action Adjust/increase the value in the selected menu Programming Increase Increase the temperature value of the room temperature ON / OFF thermostat Tuning / decreasing value in selected menu Programming Decrease Decrease the temperature value of the room...
-
Page 16: Using The Stove
7. USING THE STOVE Follow this Manual always, so that the stove remains in good condition as long as possible and to avoid unnecessary costs. Before initializing the stove, check to see if the stove is well connected to the power source and the chimney. 7.1. - Page 17 Image 11. Stove will automatically insert the quantity of pellet which is needed for kindling and screen will show PELLET LOAD (Image 12). Auger indicator will light on only in moment when auger is active. Image 12. Screen will show text LOAD PELLET and FLAME WAIT alternately (Image 13), till temperature of exhaust gasses get over 40...
- Page 18 After the flame is formed in the burning pot, stove is turning igniter off. When temperature reach value which is determined by technical parameters, convection fan is starting on. OPERATING MODE After period which is determined by technical parameters, stove is entering operating mode Operating mode is presented with text WORK (Image 15).
-
Page 19: Temperature And Mode Settings
Image 17. 7.2. Temperature and mode settings Temperature setting is done by pressing keys 1 or 2. Stove will be heated to a certain temperature and then maintain the same one. Command is done by pressing the key 1 or 2 briefly. After that, push the same Keys to set the temperature up or down. -
Page 20: Settings - Users Menu
8. SETTINGS – USERS MENU To access Menu, press Key 3. Menu is formed in several levels and sub levels. The following table briefly describes the menu structure, specifically the settings available to the user. Level 1 Level 2 Level 3 Value 01 –... - Page 21 17 - friday prog 2 on/off 18 - saturday prog 2 on/off 19 - sunday prog 2 Time 20 - start prog 3 Time 21 - stop prog 3 on/off 22 - monday prog 3 on/off 23 - tuesday prog 3 on/off 24 - wednesday prog 3 on/off...
-
Page 22: Menu 01 - Setting Clock
8.1. MENU 01 – Setting clock The pellet stove has the ability to turn on and off during the day which is regulated by programs. To program the stove, you must first set the clock and date on the display of the control unit. -
Page 23: Menu 02 - Set Timer
8.2. MENU 02 – Set timer There are three types of timer settings: Daily - allows the oven to switch on and off twice a day Weekly - allows the furnace to be programmed so that it can be switched on and off 4 times a day for seven days a week ... - Page 24 Image 23. After the timer is switched on, the screen will turn on illuminating indicators that indicate which type of programming is activated (daily, weekly, weekend) as well as an indicator next to the clock symbol indicating that the timer is on. The screen layout and indicator labels are shown in the following Image.
-
Page 25: Menu 02-02 Daily Program
8.2.2. MENU 02-02 Daily program NOTE: During programming, the start-up and shut-down times of the stove must not overlap. At least 30 minutes must elapse between switching off and on! During daily programming, it is possible to set two starts and two shutdowns of the stove. - Page 26 MENU Setting options Izgled ekrana M-2-2-01 CHRONO DAY off/on M-2-2-02 START 1 DAY off/00:00-23:50 M-2-2-03 STOP 1 DAY off/00:00-23:50 M-2-2-04 START 2 DAY off/00:00-23:50 M-2-2-05 STOP 2 DAY off/00:00-23:50 To exit settings, press Key 4. twice. EXAMPLE OF ADJUSTMENT: The stove switches on at 8 o'clock and switches off at 17 o'clock, and the second switch-on is at 20 o'clock and off at 23 o'clock and 30 minutes.
-
Page 27: Menu 02-03 Weekly Program
8.3.3. MENU 02-03 Weekly program NOTE: During programming, the start-up and shut-down times of the stove must not overlap. At least 30 minutes must elapse between switching off and on! Weekly program contains 4 independent programs that can be combined during the week. Programs can be combined in such a way that either of them is active or not (OFF or ON). - Page 28 PROGRAM 1 PROGRAM 2 Menu Possible Menu Possible Selection Selection level values level values 02-03-02 START PROG 1 Time /off 02-03-11 START PROG 2 Time /off 02-03-03 STOP PROG 1 Time off 02-03-12 STOP PROG 2 Time off 02-03-04 MONDAY PROG 1 on/off 02-03-13 MONDAY PROG 2...
-
Page 29: Menu 02-04 Program Week-End
M-2-3-01 CHRONO WEEKLY - ON PROGRAM 1 PROGRAM 2 Menu Possible Menu Possible Selection Selection level values level values 02-03-02 START PROG 1 06:00 02-03-11 START PROG 2 05:30 02-03-03 STOP PROG 1 08:00 02-03-12 STOP PROG 2 10:00 02-03-04 MONDAY PROG 1 02-03-13 MONDAY PROG 2... - Page 30 Image 28. Press key 3 (set) again and the screen will display OFF m-2-3-01 CHRONO WEEKEND. Use keys 1 and 2 switch to ON and to keep the weekend timer on (Figure 28b). Use keys 5 and 6 to move through the menus, while keys 1 and 2 change parameters. The programming is done in the same way as in the previous cases (daily and weekly).
-
Page 31: Menu 03 - Language Selection
8.3. MENU 03 – Language selection There are four available languages: English, Italian, French and German. The languages are set by pressing Key 3 (set), after which the message MENU 01 SET CLOCK will be displayed. Press Key 5 twice, followed by MENU 03 SELECT LANGUAGE. By pressing Key 3 (set) enter the language setting menu, which will display the language you are currently in, for example MENU 03 ENGLISH. -
Page 32: Menu 05 - Set Sound-Alert
When the stove enters STAND-BY mode, the screen will show the text as in Image 30. Image 30. After reaching a temperature that is 2 C higher than the set room temperature, the stove enters the shutting off phase. In Stand-by mode, when the room temperature drops 2 below the set temperature, the furnace automatically enters the ignition phase. -
Page 33: Menu 06 - Initial Loading
8.6. MENU 06 – Initial loading When the all pellet is used, the dozer will be emptied also so that even when the pellet is put into the warehouse, it will take some time for the feeder to be filled before the furnace can start. - Page 34 Image 33. By pressing the Key 3 (set), you enter the menu for displaying the stove status text. The text will alternate and show basic information on the operation of the stove. Ambient temperature Pressure in boiler (optional) Operation interval (fixed) Period till operation is finished (count down) Period from problem detection...
-
Page 35: Technical Calibration
8.8. Technical calibration IMPORTANT!!! This menu is reserved for qualified personnel trained in setting the stove, as well as the service technician. Any parameter changes made without the knowledge of authorized person or repairers will entail a loss of warranty. If you have a problem with overloading the pellet in a cup or poor combustion, call a qualified technician for instructions. - Page 36 1. ALARM - EXHAUST GAS TEMPERATURE SENSOR Reason: This alarm will be triggered if the exhaust probe breaks down. An alarm will sound and the corresponding LED lights up. The following message "ALARM FLUE PROBE" will be displayed and the stove will go off. What to do? Check that the exhaust gas temperature probe is connected securely and not accidentally broken.
- Page 37 Malfunction of lighter can be observed when there are no sparks or hot pellets when starting the stove. Over time, the power of the lighter decreases and its deformation is possible. A deformed lighter touches the tube in which it is located and transfers some of its heat to it. Because of this, the lighter does not transfer enough temperature to the pellet and does not ignite.
- Page 38 7. THERMAL SAFETY ALARM (THERMOSTAT) The reason: The function of the safety thermostat is to prevent the pellets from burning inside the pellet storage due to the increased temperature in the pellet conveyor tube. An alarm will sound if the safety thermostat shows a temperature higher than that required to start the stove.
-
Page 39: Cleaning And Maintenance
10. CLEANING AND MAINTENANCE During the daily and weekly cleaning turn off the stove at the main switch, set the switch in position “0”. When the stove is being completely cleaned you must shut it off from the power source. Stove can be cleaned at least 30 minutes after the cessation of work, in order to avoid burns in contact with hot parts of the stove. - Page 40 Weekly cleaning In addition to daily cleaning, it is necessary to empty the ash pan at least once a week if you’re using more pellets. Periodically, check the rope on the ashtray because it’s condition is very important for stove proper operation. In case that ashtray is not sealed perfectly and air is passing through in to the stove, change of rope is recommended.
- Page 41 TIM SISTEM is obliged to provide spare parts in due time after the stove is no longer produced. This warranty does not cover damage caused by: ...
- Page 42 __________________________________________________ __________________________________________________ __________________________________________________ __________________________________________________ __________________________________________________ __________________________________________________ __________________________________________________ __________________________________________________ __________________________________________________ __________________________________________________ __________________________________________________ __________________________________________________ __________________________________________________ __________________________________________________ __________________________________________________ __________________________________________________ __________________________________________________ __________________________________________________ __________________________________________________ __________________________________________________ __________________________________________________ __________________________________________________ __________________________________________________ __________________________________________________ __________________________________________________ __________________________________________________ __________________________________________________ __________________________________________________ __________________________________________________ __________________________________________________ __________________________________________________ __________________________________________________...
- Page 43 __________________________________________________ __________________________________________________ __________________________________________________ __________________________________________________ __________________________________________________ __________________________________________________ __________________________________________________ __________________________________________________ __________________________________________________ __________________________________________________ __________________________________________________ __________________________________________________ __________________________________________________ __________________________________________________ __________________________________________________ __________________________________________________ __________________________________________________ __________________________________________________ __________________________________________________ __________________________________________________ __________________________________________________ __________________________________________________ __________________________________________________ __________________________________________________ __________________________________________________ __________________________________________________ __________________________________________________ __________________________________________________ __________________________________________________ __________________________________________________ __________________________________________________ __________________________________________________...
- Page 44 OBLIGATORY! READ MANUAL BEFORE STARTING THE STOVE. TIM SISTEM d.o.o. ul.Prva industrijska br. 9 22 330 Nova Pazova, Srbija tel/fax: +381 22 32 80 76 e-mail:servis@timsistem.rs www.timsistem.rs...
Need help?
Do you have a question about the RITTIUM CTP and is the answer not in the manual?
Questions and answers