
Related Manuals for WILSON AUDIO Chronosonic XVX


Summary of Contents for WILSON AUDIO Chronosonic XVX
- Page 1 n s t a l l a t I o n a n d a r e u I d e — e c t i o n W i l s o n A u d i o S p e c i a l t i e s...
- Page 2 C h r o n o s o n i c XVX I n s t a l l a t i o n G u i d e a b l e o f o n t e n t s ontents 1 —...
- Page 3 C h r o n o s o n i c XVX I n s t a l l a t i o n G u i d e a b l e o f o n t e n t s �...
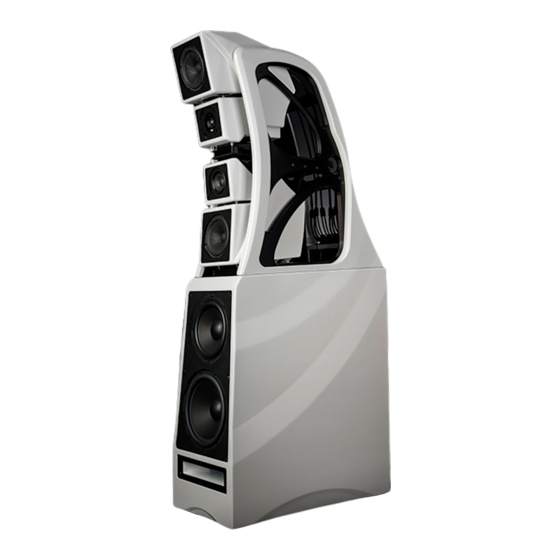
- Page 4 1 — C e C t I o n o n t e n t s a n d t a G I n G W i l s o n A u d i o S p e c i a l t i e s...
- Page 5 Section 1.1—Chronosonic X VX Crate Content elry such as rings, watches, necklaces, and bracelets during this process. Please take the time before you attempt to set up your Chronosonic XVX to Organize the Modules by Channel review the contents of your Chronosonic XVX tool and spike kit. Set these items It is extremely impor tant the XVX be assembled with elements assigned to in an accessible area as you will need them during the setup process.
- Page 6 The proper positioning of your determining the Zone of Neutrality. new Chronosonic XVX within your room is critical in order to extract its formida- The following is a simple method to locate the Zone of Neutrality within ble per formance envelope.
- Page 7 C h r o n o s o n i c XVX I n s t a l l a t i o n G u i d e 1 � 3 —Wa s P e C t I o n At some point during your progression for ward into the room, the intended speaker location.
- Page 8 This can cause out- of-phase cancellations, or comb filtering, which will cancel some frequencies and change the tonal balance of the music. Adhering to the Wilson Audio Setup Procedure outlined in the previous section is the best method with which to position your loudspeakers.
- Page 9 2 — a e C t I o n s s e M b l y W i l s o n A u d i o S p e c i a l t i e s...
- Page 10 XVX Micrometer system. These two sub- modules are, in turn, attached to the XVX Micrometer truck mechanism via a The Chronosonic XVX’s Upper Array uses the combination of captive ball-head and captive slot system. The ball-head hardware is attached into the spikes, ball posts, and aspherical time -alignment stepped blocks.
- Page 11 This indicates the position of the upper submodule in the Gan- floor below your ear to the base of the loudspeaker. tr y as adjusted by the Chronosonic XVX Micrometer. There are four char ts for the lower submodule, which consist of settings for both the Lower Midrange Module and the 4-Inch Mid- Section 2.3—Configuring the Lower Submodule...
- Page 12 If The right spike track on the top sur face of the Lower Midrange there is a number in the converging box, the Chronosonic XVX Module contains calibrated numbers for this process. It is nec- Lower Midrange Module requires a spike.
- Page 13 Section 2.5—Installing the Gantr y Onto the Woofer Module Tighten to secure, but take care not to over tighten. Note: The Chronosonic XVX Gantry is extremely heavy. Ideally, four installers should be present for the safe installation of the Gantry to the Woofer Module.
- Page 14 The light features two rechargeable batteries. Withing each batter y is a mini-USB por t for charging. Using the provided Y The Chronosonic XVX features a lighting system to aid in the accurate adapter, plug the adapter into any USB charger. Ensure the bat- installation and setup of the upper modules.
- Page 15 The lower Micrometer adjustment knob faces upward in the rear of the Gantr y. Using the knob, move the Chronosonic XVX If required, return to Wilson Audio Specialties Inc. for disposal Micrometer Lower Module assembly as far for ward (toward the or recycling.
- Page 16 I n t o t h e a n t r y sition your assistant to the rear of the Chronosonic XVX. Have Once you’ve properly set the Micrometer position, use the two your assistant reach through the Gantr y assembly and suppor t...
- Page 17 Position your assistant to the rear of the Chronosonic XVX. Have your assistant prepare to balance the module and guide the ball- Ensuring the Tweeter Module remains in the most for ward posi-...
- Page 18 3 — C e C t I o n o n n e C t I n G t h e o d u l e s W i l s o n A u d i o S p e c i a l t i e s...
- Page 19 The Chronosonic XVX features two spring loaded cable -dressing fix- Star ting with the Lower Midrange Module, feed the cable ex- tures located on the rear of the two cross braces. The two fixtures face the...
- Page 20 C h r o n o s o n i c XVX I n s t a l l a t i o n G u i d e 3 � 1—d e C t I o n r e s s I n G t h e a b l e s ture, ensuring the cable remains in the circular slot.
- Page 21 4 — f e C t I o n I n a l e t u P W i l s o n A u d i o S p e c i a l t i e s...
- Page 22 Chronosonic XVX by turning the bolt clockwise. Section 4.2—Using the Wilson Lift to Install Spikes After the front of the Chronosonic XVX is high enough (you will Note: This is a t wo person job. Do not attempt this by yourself. The Chrono -...
- Page 23 Leveling the Chronosonic XVX Section 4.3—Removing the Protective Film It is not necessar y to use the jack to level the Chronosonic XVX. To protect the finish of the Chronosonic XVX during final manufacture, There is precision bubble level installed on the rear of the up-...
- Page 24 Woofer Module of your Chronosonic XVX, you may gain access to the resistor of protective film over the finish. We recommend that this film be left in place plate.
- Page 25 Resistor Fine Tuning star t with the Chronosonic XVX’s por t in the rear firing configuration. In systems where the Chronosonic XVX is replacing an Alexandria X-2, X-1...
- Page 26 8.5 feet if the attenuator is left at full level—turned entirely clock- The Chronosonic XVX ships with the por t plug installed in the front of the wise. At its lowest setting—with the attenuator in the further counter-clockwise woofer enclosure for a rear-firing por t configuration.
- Page 27 5 — s e C t I o n P e C I f I C a t I o n s W i l s o n A u d i o S p e c i a l t i e s...
- Page 28 C h r o n o s o n i c XVX I n s t a l l a t i o n G u i d e 5 � 2 — G e C t I o n r a P h I C a l I M e n s I o n s Section 5.1—Specifications...
- Page 29 C h r o n o s o n i c XVX I n s t a l l a t i o n G u i d e 5 � 4 —I e C t I o n M P e d a n C e a G n I t u d e Section 5.3—Impedance Phase Section 5.4—Impedance Magnitude...
- Page 30 6 — t e C t I o n I M e l I G n M e n t h a r t s W i l s o n A u d i o S p e c i a l t i e s...
- Page 31 C h r o n o s o n i c XVX I n s t a l l a t i o n G u i d e I M e l I G n M e n t h a r t s XVX Lower Chronosonic Micrometer XVX Lower 7"...
- Page 32 C h r o n o s o n i c XVX I n s t a l l a t i o n G u i d e I M e l I G n M e n t h a r t s XVX Tweeter Spike Length XVX Upper Chronosonic Micrometer Position...
- Page 33 7 — W e C t I o n a r r a n t y W i l s o n A u d i o S p e c i a l t i e s...
- Page 34 A RETURNED PRODUC T MUST BE ACCOMPANIED Alternatively, the warranty may be filled out on-line. BY A WRIT TEN DESCRIPTION OF THE DEFEC T. Wilson Audio reser ves the right to Requirement No. 2. The product must have been professionally installed by the modify the design of any product without obligation to purchasers of previously Wilson Audio dealer that sold the product to the customer.
- Page 35 (2) if purchaser has timely sought ser vice or repair and the correctly packed and returned to Wilson Audio by the dealer at dealer ’s sole product cannot be ser viced or repaired by the Dealer, then purchaser may ob- expense.
- Page 36 C h r o n o s o n i c XVX I n s t a l l a t i o n G u i d e or an exclusion or limitation of incidental or consequential damages, so the above limitations or exclusions may not apply to you.
Need help?
Do you have a question about the Chronosonic XVX and is the answer not in the manual?
Questions and answers