Table of Contents
Advertisement
Available languages
Available languages
Quick Links
Advertisement
Chapters
Table of Contents

Related Manuals for EuroLite LED SPACE BALL 35


Summary of Contents for EuroLite LED SPACE BALL 35
- Page 3 Erschaffen Sie völlig neue Beleuchtungskonzepte in Diskotheken, Clubs, Hotels, Museen und Freizeitparks mit dieser Effektbeleuchtung. Sowohl Farbe und Intensität als auch die Bewegung kann per DMX gesteuert werden.
-
Page 4: Table Of Contents
DMX-Startadresse einstellen ........12 TESTLAUF ............. 13 REINIGUNG UND PFLEGE ........15 Sicherungswechsel ..........15 TECHNISCHE DATEN ........... 16 LED Space Ball 35 MK2 ......... 16 HST-150 Hebezug ..........16 Zubehör ..............16 D00128666, Version 1.0, Stand 06/04/2020 Produkt-Updates, Dokumentation, Software und Support erhalten Sie unter www.eurolite.de. -
Page 5: Einführung
Wenn Sie nachfolgende Hinweise beachten, sind wir sicher, dass Sie über viele Updates, Support und Jahre Freude an Ihrem Kauf haben werden. Diese Bedienungsanleitung zeigt News zur Marke. Sie Ihnen, wie Sie Ihr neues Produkt von Eurolite installieren, in Betrieb nehmen finden all das und vieles und nutzen. mehr auf unserer Website. -
Page 6: Wichtige Sicherheitshinweise
WICHTIGE SICHERHEITSHINWEISE WARNUNG! Lesen Sie aufmerksam die Sicherheitshinweise und benutzen Sie das Produkt nur wie in dieser Anleitung beschrieben, damit es nicht versehentlich zu Verletzungen oder Schäden kommt. Verwendungszweck • Der LED-Ball mit Hebemotor dient zur Erzeugung von Lichteffekten in Innenräumen. Das Produkt ist für professionelle Anwendungen im Bereich der Veranstaltungstechnik vorgesehen (z. - Page 7 Gefahr durch Elektrizität • Das Gerät ist nur zur Verwendung im Innenbereich geeignet. Benutzen Sie es nicht im Freien. Setzen Sie es niemals Regen oder Feuchtigkeit aus. Bewahren Sie es nicht in feuchten Räumen auf. • Um Stromschläge zu vermeiden, niemals irgendeinen Teil des Produkts öffnen. Im Geräteinneren befinden sich keine vom Benutzer zu wartende Teile.
-
Page 8: Gerätebeschreibung
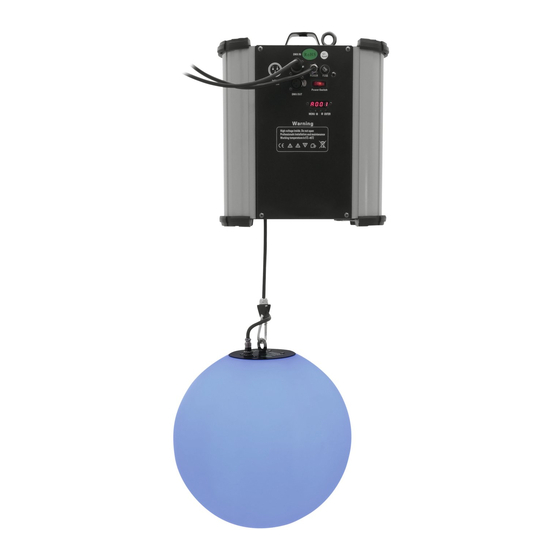
GERÄTE EBESCHR R EIBUNG G (1) Hebez (2) Monta agebügel (3) Fangs seilöse (4) Netza anschluss & S Sicherung (5) Netzs schalter (6) DMX- -Anschlüsse (IN/OUT) (7) Displa ay und Bedie entasten (8) Seilwi inde / Karab iner (9) Daten nkabel (10) Befes stigungsöse... -
Page 9: Montage
MONTAG WARNUNG Verlet tzungsgefah hr durch He erabfallen Der H Hebezug un nd der LED -Ball sind g genau aufein nander abge estimmt und d dürfen nu ur zusamme verwe endet werde en. Die Ger räte müssen n sicher, fa achgerecht u und außerh alb der Re... -
Page 10: Anschlüsse
NSCHLÜS as System lä ässt sich üb ber einen ha ndelsübliche en DMX-Con ntroller steue ern. Der Heb bezug verfü gt dazu übe er 8 euerkanäle. Für die DMX X-Verbindung g sind 3-polig ge XLR-Ansc chlüsse vorh anden. Gerä ät Gerät Gerät Startadre... -
Page 11: Bedienung
BEDIENUNG ACHTUNG! Betriebsbedingungen Schalten Sie den Hebezug nur ein, wenn der LED-Ball installiert ist. Schalten Sie den Hebezug nur ein, wenn er sich in der vertikalen Position befindet. Das eingebaute Windensystem setzt sich bei jedem Start selbst zurück. Wenn sich der Hebezug nicht in vertikaler Position befindet und/oder der LED-Ball nicht installiert ist, kann es zu einer Verdrehung des Kabels kommen, die zu einer Beschädigung des eingebauten Windensystems führen kann, und die Gewährleistung erlischt. -
Page 12: Anzahl Der Dmx-Kanäle Einstellen
Anzahl der DMX-Kanäle einstellen Der Hebezug verfügt über 8 Steuerkanäle. Er kann aber auch in einen Modus mit 7 Kanälen umgeschaltet werden, wenn die Funktion Hubgechwindigkeit nicht benötigt wird. Drücken Sie die Taste MENU, um den ersten Menüpunkt Addr anzuzeigen. Navigieren Sie mit den Tasten ▲ oder ▼... -
Page 13: Testlauf
TESTLAU Schritt 1 Leuchte et nach dem E Einschalten inkt bei fehlen ndem DMX-Sig gnal Zeigt d ie DMX-Adres Den LED-Ball befestigen, e einen DMX-Co ontroller ansc chließen und den Hebezug g einschalten n. Die Seilwind de fährt in ein efinierte Ausg gangsstellung Schritt 2... - Page 14 Schritt 4 Bspw. Wert 100. Die Seilwinde mit Kanalfader 8 entsichern. Andernfalls fährt diese immer wieder in die Ausgangsposition. Den Vorgang für alle Hebezüge wiederholen und prüfen, ob sich die LED-Bälle in der richtigen Ausgangsstellung befinden. Danach können Sie mit der Bedienung bzw.
-
Page 15: Reinigung Und Pflege
REINIGUNG UND PFLEGE Das Gerät sollte äußerlich in regelmäßigen Abständen von Verunreinigungen wie Staub usw. gereinigt werden. Trennen Sie das Gerät vom Netz und lassen Sie es abkühlen, bevor Sie mit der Reinigung beginnen. Reinigen Sie die Oberflächen mit einem fusselfreien, angefeuchteten Tuch. Verwenden Sie auf keinen Fall Alkohol oder irgendwelche Lösungsmittel, da sonst die Gehäuseoberflächen beschädigt werden könnten. -
Page 16: Technische Daten
Technische Daten können im Zuge der Weiterentwicklung des Produkts ohne vorherige Ankündigung geändert werden. Zubehör Best.-Nr. 59006856 EUROLITE TPC-10 Klammer, silber Best.-Nr. 58010364 EUROLITE Sicherungsseil AG-15 4x1000mm bis 15kg Best.-Nr. 3022785H EUROLITE DMX Kabel XLR 3pol 3m sw Best.-Nr. 30227810 PSSO DMX Kabel XLR 3pol 3m sw Neutrik 16 • DE... - Page 17 Create brand-new lighting concepts for discotheques, clubs, hotels, museums and amusement parks with this light effect. Color, intensity and movement can be controlled via DMX.
- Page 18 Setting the DMX starting address ......26 TEST RUN .............. 27 CLEANING AND CARE ......... 29 TECHNICAL SPECIFICATIONS ......30 LED Space Ball 35 MK2 ......... 30 D00128666, version 1.0, publ. 06/04/2020 For product updates, documentation, software and support please visit www.eurolite.de. You can find the latest version of this user manual in the product’s...
-
Page 19: Introduction
INTRODUCTION Welcome to Eurolite! Thank you for choosing one of our products. Eurolite is Experience Eurolite. your connection to the world of show with an unparalleled variety of products, Product videos, suitable both for professionals and beginners. accessories, firmware and... -
Page 20: Important Safety Instructions
IMPORTANT SAFETY INSTRUCTIONS WARNING! Please read the safety warnings carefully and only use the product as describe in this manual to avoid accidental injury or damage. Intended use • This LED ball with hoist motor is used to create decorative indoor lighting effects. The mirror ball is designed for professional use in the field of event technology, e.g. - Page 21 Danger due to electricity • The device is suitable for indoor use only. Do not use it outdoors. Never expose it to rain or moisture. Do not store it in rooms exposed to moisture. • To reduce the risk of electric shock, do not open any part of the device. There are no serviceable parts inside the device.
-
Page 22: Description Of The Device
DE ESCRIPTI ION OF T THE DEVICE (1) Hoist (2) Moun nting bracket (1) Safety y eyelet (3) Powe er supply & fu use holder (4) Powe er switch (2) DMX connectors ( (IN/OUT) (3) Displa ay and opera ating buttons (4) Winch h / carabiner (5) Data c... -
Page 23: Mounting The Space Ball
OUNTING G THE SP PACE BA WARNING! Risk o of injury cau used by fall ing objects The h hoist and the e space ball are perfectly y matched; o only use the m together. Mount the d devices safel and e expertly to av void acciden... -
Page 24: Connections
NNECTIO e system ca an be control lled via a co mmercial DM MX controlle er. The hoist is equipped with 8 DMX X channels. T vice provides s 3-pin XLR connectors f for the DMX connection. Devic ce 1 Device Device 3 Start Add... -
Page 25: Operation
OPERATION WARNING! Operating conditions Switch on the hoist only if the Space Ball is installed. Switch on the hoist in a vertical position only. The built-in winch system automatically resets with each start. When the hoist has not been installed in a vertical position or the Space Ball has not been installed, the cable could get entangled, causing damage to the winch system and rendering the warranty void. -
Page 26: Setting The Number Of Dmx Channels
Setting the number of DMX channels The hoist is equipped with 8 DMX channels. However, it can also be switched to a 7-channel mode if the function hoisting speed control is not required. 1 Press the MENU button; the display indicates the first menu item Addr. Use the buttons ▲ and ▼ to navigate to option ConF. -
Page 27: Test Run
TEST RUN Step 1 Lights s up after pow wer on ashes in case e of missing sig gnal Indicat es DMX addre nstall the Spa ace Ball, conn nect a DMX co ontroller and switch on the e hoist. The w winch moves t to a defined s starting... - Page 28 Step 4 e.g. value 100. Unlock the winch with channel fader 8. Otherwise it keeps moving back to its starting position. Repeat for all hoists and check if the starting position of the Space Balls is correct. If so, you can now start operation and create your show.
-
Page 29: Cleaning And Care
CLEANING AND CARE The outside of the device should be cleaned periodically to remove contaminants such as dust etc. The lenses, in particular, should be clean to ensure that light will be emitted at maximum brightness. Disconnect the device from power and allow it to cool before cleaning. Clean the surface with a soft lint-free and moistened cloth. -
Page 30: Technical Specifications
Accessories/Spare parts Item no. 59006856 EUROLITE TPC-10 Coupler, silver Item no. 58010364 EUROLITE Safety Bond AG-15 4x1000mm up to 15kg Item no. 3022785H EUROLITE DMX cable XLR 3pin 3m bk Item no. 30227810 PSSO DMX cable XLR 3pin 3m bk Neutrik... - Page 32 Eurolite is a brand of Steinigke Showtechnic GmbH · Andreas-Bauer-Str. 5 · 97297 Waldbüttelbrunn Germany D00128666 Version 1.0 Publ. 06/04/2020...
Need help?
Do you have a question about the LED SPACE BALL 35 and is the answer not in the manual?
Questions and answers