Advertisement
Quick Links
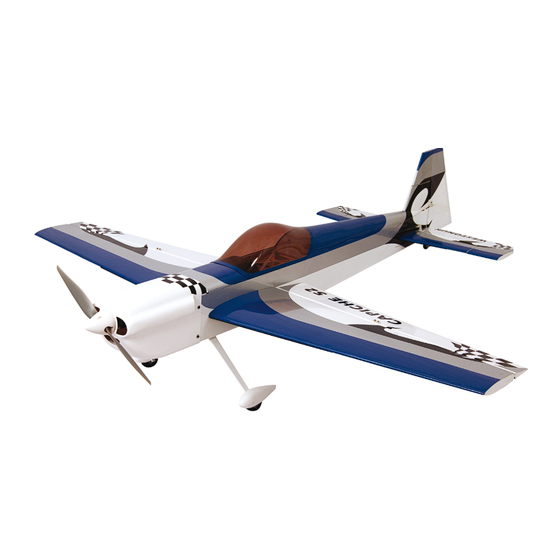
The latest in Weston UK's range of high performance ARTF kits to
provide the ultimate in freestyle and 3D performance.
READ THE INSTRUCTIONS FULLY BEFORE COMMENCING!
IF UNSURE ABOUT ANY STAGE OF ASSEMBLY PLEASE CONTACT WESTON UK.
MATERIALS REQUIRED FOR COMPLETION:
Motor (.52 size 2 stroke) recommended motor West Eurotech 52T1 + Genesis pipe
APC 13x4w / 12 1/4 x 3 3/4 Prop
4 stroke engine .80-90 (Tuned By West)
Electric West 590kv motor, West 85A bec control, APC 16x8E
4cell or 5 cell 3700/4700ma lipo
Weston UK thin, thick Cyano
Good quality tools and a very sharp blade.
WE RECOMMEND HITEC RADIO EQUIPMENT AS USED BY
THE WESTON UK DISPLAY TEAM.
Recommended servos:
Throttle HS 311
Elevator, Ailerons HS 5625MG
Rudder HS 5625MG
www.westonuk.co.uk
Advertisement

Summary of Contents for Weston CAPICHE 52
- Page 1 The latest in Weston UK's range of high performance ARTF kits to provide the ultimate in freestyle and 3D performance. READ THE INSTRUCTIONS FULLY BEFORE COMMENCING! IF UNSURE ABOUT ANY STAGE OF ASSEMBLY PLEASE CONTACT WESTON UK. MATERIALS REQUIRED FOR COMPLETION: Motor (.52 size 2 stroke) recommended motor West Eurotech 52T1 + Genesis pipe...
-
Page 2: Kit Contents
KIT CONTENTS BAG 2 BAG 3 BAG 1 1 x MOTOR BOX 1 X SPINNER 2 X WHEELS 4 X WASHERS 1 X TAIL WHEEL 4 X 3MM X 50MM BOLTS BAG 4 4 X VELCRO STRAPS 4 X 3MM NY-LOCK BOLTS 1 X U/C 4 X 3MM X 10MM BOLTS 1 X RECEIVER TRAY... - Page 3 Repeat procedure on other aileron. Ensure once assembled there are no gaps and no binding If any glue has run down the wing or aileron this can be removed with Cyano Wipe available from Weston uk.
- Page 4 AILERON SERVOS Install a small draw wire through the wing section very carefully ensuring you do not catch any ribs and draw the servo cable through the wing section to the exit point in the centre of the wing. Install the servo so the output arm is to the outer edge of the wing and screw into position.
-
Page 5: Elevator Servo
UNDERCARRIAGE/SPATS Insert 4mm bolt through the recessed side of the wheel then screw nylock nut onto bolt so that the bolt begins to make the thread into the nylon section of the nut. Once this is achieved take the nut back off the axle and turn it round so the nylon part of the nut goes onto the axle first. - Page 6 IC MOTOR INSTALATION MOTOR Using the supplied bolts, nuts and washers attach the engine mount to the firewall via the capture nuts pre installed as per picture. You will have to shave the corners off the engine mount where it hits against the projection box Mount your chosen motor (West 52T1 recommended) to the supplied mount ensuring that when you fit the cowling the prop drive protrudes past the cowling.
- Page 7 THROTTLE SERVO AND PUSH ROD Install throttle servo as shown in picture. Once in position mark the fire wall and drill a hole for the throttle push rod to pass through. Install clevis on the threaded end of the throttle control rod and pass through firewall. You will have to put a set in the control rod to ensure a good alignment with the throttle arm ensuring no metal to metal contact.
- Page 8 ELECTRIC MOTOR INSTALATION Before installing the electric motor box we recommend running medium or thick cyano around the inside of the motor box to ensure good security. The holes are pre-drilled for our west 590kv motor and mount so you may have to adjust if you are using something else.
- Page 9 Once all holes have been cut and you are happy that there is no interference install cowling with bolts and washers. CANOPY Install canopy to the hatch with Weston canopy glue or the self tappers provided. RX BATTERY INSTALLATION(IC VERSION) The battery installation will vary depending on engine used and C.G position require. A good starting point is just behind the tank but if you want extreme 3D then slowly move the battery pack back to achieve your flight characteristics.
Need help?
Do you have a question about the CAPICHE 52 and is the answer not in the manual?
Questions and answers