Advertisement
Advertisement
Table of Contents

Related Manuals for AIR GAP Fluidmaster 6000 Series

Summary of Contents for AIR GAP Fluidmaster 6000 Series
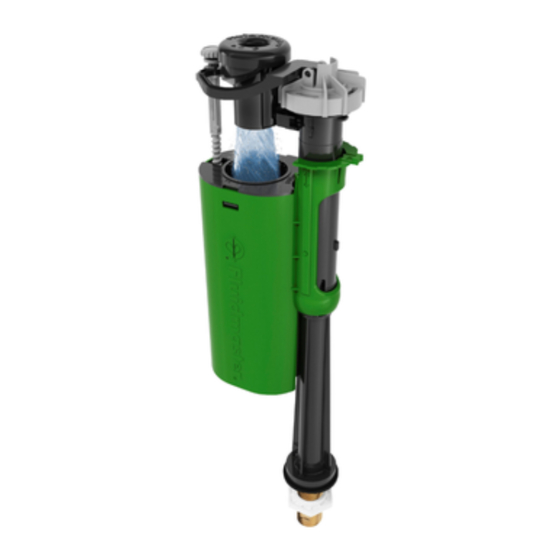
- Page 1 6000 Series AirGap™ Installation Guide Bottom entry valve assembly INSTALL WITH CONFIDENCE Float adjustment screw Anti-siphon vortex generator Float chamber & locking sleeve Washer 1/2” or 3/8” BSP threaded shank Pre-fitted flow controller and filter...
- Page 2 6000 Series AirGap™ Installation Guide Side entry valve assembly Float adjustment screw Anti-siphon vortex generator Float chamber Washer 1/2” or 3/8” BSP threaded shank Pre-fitted flow controller and filter...
- Page 3 6000 Series AirGap™ Installation Guide Fault-finding (Failure to Operate) Possible Cause Possible Solution Debris around diaphragm. Isolate water supply. Remove cap (1/8 turn counterclockwise). Remove diaphragm and clean in water or replace the diaphragm. Open isolation valves fully, inspect Insufficient water supply flow/pressure.
- Page 4 6000 Series AirGap™ Installation Guide Removing your old valve Step 1 Turn off the water supply to the toilet using isolation valve or mains stopcock. Step 2 Measure or mark the water level inside your cistern. Drain all water from the cistern and disconnect valve supply pipework.
-
Page 5: Preparing For Installation
6000 Series AirGap™ Installation Guide Preparing for installation Step 4 Most tank fed systems (<7m of vertical pipe) will benefit from the removal of the flow controller and filter. Mains water or pumped installations require the filter/restrictor to be fitted. Note: For side entry valve, ensure the flow controller and filter is fitted in the orientation as shown. -
Page 6: Installation
6000 Series AirGap™ Installation Guide Installation Step 6 Install the valve through the cistern fixing hole with the washer inside the cistern and the nut on the outside. Ensure the valve is not fouling on the cistern walls or flush mechanism. Step 7 Tighten the nut by hand and then by ½... -
Page 7: Water Level Adjustment
6000 Series AirGap™ Installation Guide Water level adjustment Step 9 Based on your reading taken in Step 2, fine tune the water level by turning the float adjustment screw. Flush to check the new level and readjust as necessary. Note: Clockwise rotation will raise the water level, counterclockwise rotation will decrease the water level. -
Page 8: Warranty & Contact Details
6000 Series AirGap™ Installation Guide Warranty & contact details WARRANTY This Fluidmaster product has a limited warranty for a period of 5 years. For complete warranty details, please visit our website at www.fluidmaster.com. Do not use in-cistern drop-in toilet bowl cleaners containing bleach or chlorine.
Need help?
Do you have a question about the Fluidmaster 6000 Series and is the answer not in the manual?
Questions and answers