Table of Contents
Advertisement
Quick Links
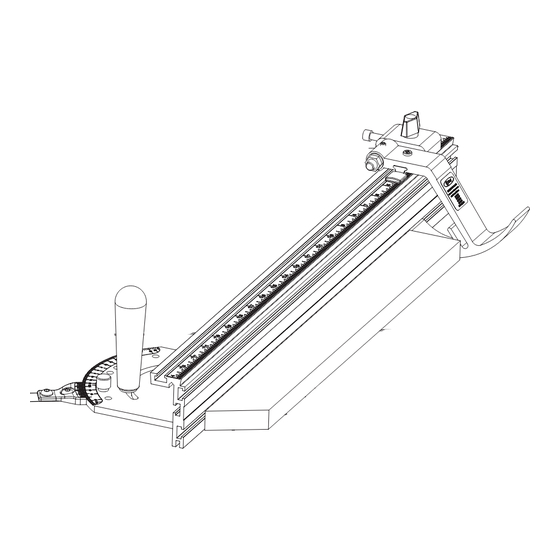
Precision
Miter Gauge
INSTRUCTIONAL MANUAL
��
���� �� ������ ����
�� ��� ������� �����
���� �������� �����
��
���� �� �������
���� �� ��� ������
����� ���� ��������
�����
��
The Blue Mark of Quality.
���� �� �����
�� ����� ����� ����
�������� ���������
��
���� �� �������
���� �� ��� ������
����� ���� �������
�����
��
���� �� �����
�� ����� ����� ��
�������� ��������
��
���� �� ����� �
���� ����� ���
�������� �������
Version 2005201
FT4032
Advertisement
Table of Contents

Related Manuals for Kreg Precision KMS7101


Summary of Contents for Kreg Precision KMS7101
- Page 1 ���� �� ������� ���� �� ��� ������ ����� ���� ������� ����� �� ���� �� ����� �� ����� ����� �� Precision �������� �������� Miter Gauge �� ���� �� ����� � ���� ����� ��� INSTRUCTIONAL MANUAL �������� ������� �� ���� �� ������ ���� ��...
-
Page 2: Table Of Contents
Table of Contents Congratulations on choosing a Kreg Precision Miter Gauge! We have designed this tool to be the finest miter gauge available. It sets a new standard for accuracy and ease of use. Be sure to read the instructions and the safety warnings completely before using this tool. -
Page 3: Safety Instructions
- Kreg components are fully guaranteed for one year from date of purchase. - Kreg will replace or repair, at no charge to the customer, any product that fails within the warranty period. - Kreg will service Kreg components beyond the warranty period at a reasonable cost to customer. - Page 4 Safety Guidelines Safety Guidelines To avoid injury, never adjust saw fence, drop stop, jig, fixture, or miter gauge while saw is running. Make sure blade comes to a complete stop before removing or securing workpiece, changing workpiece angle or changing the angle of the blade. Ground all tools.
-
Page 5: Parts Diagrams
�� ���� �� ������� ���� �� ��� ������ Parts Diagram ����� ���� �������� ����� �� Precision Miter Gauge ���� �� ����� �� ����� ����� ���� �������� ��������� - Part Number KMS7101 �� ���� �� ����� �� FT4029 ���� ����� ���� ��������... - Page 6 �� ���� �� ������� ���� �� ��� ������ Parts Diagram ����� ���� �������� ����� �� ���� �� ����� �� ����� ����� ���� �������� ��������� �� ���� �� ����� �� ���� ����� ���� �������� ��������� FT4204 FT4139 FT4047 FT4059 KMS7702 FT4203 FT4055 DK1504 DK1510...
-
Page 7: Adjust The Bar To The Slot
If your saw has a t-slot that uses a different washer, remove the washer from the miter gauge that came with the saw. Install the washer on the Kreg Precision Miter Gauge bar using the screw pro- FT4057 vided with the Kreg Precision Miter Gauge. -
Page 8: Attach The Auxiliary Fence
Setting-up the Miter Gauge 5) Keep repeating this process until the fit is correct. Remember, you want the plug to just “kiss” the miter bar slot without exerting any pressure. 6) When the first plug is adjusted correctly, slide the bar backwards to expose the second adjuster &... -
Page 9: Set The Cursor
Setting-up the Miter Gauge Install the scale 1) Make sure Auxiliary fence is clean & free of dirt & oil. 2) Begin peeling back the paper backing on the scale. Place the 1” mark on the end of the fence closest to the blade and stick the scale down. - Page 10 Setting-up the Miter Gauge Fine-tune the cursor setting by moving the miter gauge back to 0 deg. Then move the stop in about an inch and cut a board to length. Measure the cut board. Without moving the stop or the fence settings, loosen the cursor and adjust it to read this exact measurement.
-
Page 11: Preset Holes
The Kreg Precision Miter Gauge has preset holes drilled at 0 deg., 10 Diamonds - There are diamonds every 5 degrees. The diamonds deg., 22.5 deg., 30 deg., and 45 deg. -
Page 12: Setting The Cutting Angle
Setting the Cutting Angle Setting the Angle using the Scale To set an angle that is not preset, you need to use the scales. Just loosen the handle, line the desired angle up with the 0 mark on the Vernier side of the scale, and tighten the handle. 8 degree setting in example at right. -
Page 13: Resetting The Vernier Scale
Resetting the Vernier Scale The Vernier scale is set at the factory. However, if you knock it out of alignment, it can be easily reset. For the Vernier scale to read accurately, it needs to be both accurately aligned and correctly spaced from the degree scale on the miter gauge head. -
Page 14: Micro-Adjust Feature
Micro-Adjust Feature Reality Check Before taking the time to set the micro-adjust, do a reality check to see if the 1/100 deg. will really show. 1/100 deg. is a very fine adjust- ment and is seldom necessary on most woodworking projects. 1/100 deg. -
Page 15: Setting The Micro-Adjust
Micro-Adjust Feature Design Note Fence Extrusion The micro-adjust is designed so that the nylon screws line up with T-Slot the t-track slot. You have to turn the nylon screws a long way before they actually engage the auxiliary fence and start to change the angle. -
Page 16: Accessories
���� �� ������� ���� �� ��� ������ ����� ���� �������� ����� Accessories and Other Products �� ���� �� ����� �� ����� ����� ���� �������� ��������� �� ���� �� ����� �� ���� ����� ���� �������� ��������� �� ���� �� ������ ���� ��...
Need help?
Do you have a question about the Precision KMS7101 and is the answer not in the manual?
Questions and answers