Table of Contents
Advertisement
Available languages
Available languages
Quick Links
Forno a microonde
Microwave oven
Ho ld
:1 0
1
0%
De fr os t
:2 0
2
20 %
M ed iu m
:3 0
3
50 %
:4 5
4
M ed -H i
70 %
1: 00
5
Ti m e
En tr y
1: 30
6
X 2
2 :0 0
7
S to p
2 :3 0
8
Re se t
S ta rt
3 :0 0
9
3 :3 0
0
Libretto di istruzioni
Instruction manual
(Translation of original instructions)
(Istruzioni originali)
IT
EN
IT
EN
Advertisement
Table of Contents

Related Manuals for R.G.V. FD1025 NEW


Summary of Contents for R.G.V. FD1025 NEW
- Page 1 Forno a microonde Microwave oven Ho ld :1 0 De fr os t :2 0 20 % M ed iu m :3 0 50 % :4 5 M ed -H i 70 % 1: 00 Ti m e En tr y 1: 30 2 :0 0 S to p...
- Page 3 Indice Introduzione ..........................Pagina Caratteristiche tecniche ......................“ Istruzioni di sicurezza importanti ..................“ Precauzioni per evitare l’eventuale esposizione a quantità eccessiva di energia a microonde ......................“ Avvertenze d’uso ........................“ Avvertenze importanti ......................“ Per ridurre il rischio di lesioni alle persone ..............“...
-
Page 4: Caratteristiche Tecniche
Introduzione Gentile Cliente, la ringraziamo di aver scelto un nostro prodotto e confidiamo che questa scelta soddisfi a pieno le Sue aspettative. Prima di utilizzare questo apparecchio, La invitiamo a leggere attentamente il presente “libretto di istruzioni per l’uso” al fine di ottimizzarne le caratteristiche funzionali ed eliminare qualsiasi inconveniente che potrebbe insorgere da un uso errato o non conforme dello stesso. -
Page 5: Istruzioni Di Sicurezza Importanti
Istruzioni di sicurezza importanti Leggere attentamente le avvertenze contenute nelle presenti istruzioni in quanto forniscono importanti indicazioni riguardanti la sicurezza di installazione, uso e manutenzione. Conservare con cura questo libretto per ogni ulteriore consultazione. Prima di utilizzare il forno, leggere attentamente queste istruzioni. 1. - Page 6 2. NON posizionare alcun oggetto tra lo sportello e la parte frontale del forno. Evitare l’accumulo di residui di cibo o detergente sulle superfici di tenuta. Assicurarsi che lo sportello e le relative superfici di tenuta siano puliti. Dopo aver utilizzato l’apparecchiatura, pulire queste superfici con un panno umido, quindi asciugarle con un panno morbido e asciutto.
- Page 7 Il costruttore non può essere considerato responsabile per danni causati dalla mancanza di messa a terra. • Per la vostra sicurezza, si raccomanda di alimentare l’apparecchio attraverso un interruttore differenziale (RDC) con corrente d’intervento non superiore a 30 mA. • Non ostruire le griglie di raffreddamento durante il funzionamento dell’ap- parecchio. • Non immergere mai l’apparecchio, il cavo di alimen- OK!! tazione e la spina in acqua o in altri liquidi. • Evitare di scollegare elettricamente l’apparecchio tirando il cavo di alimentazione.
-
Page 8: Avvertenze Importanti
L’apparecchio DEVE essere verificato e/o riparato solo presso un rivenditore autorizzato. Qualunque intervento di riparazione effettuato sull’apparec- chio da personale non autorizzato invalida automaticamente la garanzia. Questo apparecchio dovrà essere destinato solo all’uso per il quale è stato espressamente concepito e cioè per la cottura, il riscaldamento e lo scongelamento di alimenti. - Page 9 Quando si riscaldano alimenti in contenitori di plastica o carta, tenere d’occhio il vano forno per evitare la possibile accensione dei contenitori. Se si nota del fumo, spegnere e scollegare l’apparecchio e tenere la porta chiusa per soffocare eventuali fiamme. Non cuocere troppo cibo contemporaneamente.
- Page 10 gas o su un piano non livellato. 23. Non spruzzare sostanze volatili come per esempio insetticida sulla superficie dell’apparecchio. 24. L’apparecchio non è inteso per l’installazione su veicoli, caravan o simili. 25. Non riporre materiali infiammabili all’interno del forno. Prestare particolare attenzione durante il riscaldamento di cibi o bevande contenenti sostanze alcoliche poiché...
- Page 11 Per ridurre il rischio di lesioni alle persone MESSA A TERRA Pericolo di scossa elettrica. Toccare alcuni dei componenti interni può provocare gravi lesioni personali o la morte. Non smontare l’apparecchio. • Questo apparecchio deve essere collegato a terra. In caso di un corto circu- ito elettrico, la messa a terra riduce il rischio di scosse elettriche fornendo un cavo di fuga per la corrente elettrica.
-
Page 12: Guida Ai Materiali Per La Cottura
Guida ai materiali per la cottura Durante la cottura, le microonde devono essere in grado di penetrare negli alimenti, senza essere riflesse o assorbite dal piatto. Per questo, è necessario prestare molta attenzione nella scelta dei materiali per la cottura. Se sui materiali per la cottura è... - Page 13 MATERIALI CHE SI POSSONO UTILIZZARE NEL FORNO A MICROONDE Utensile Osservazioni Stoviglie Solo per forno a microonde. Seguire le istruzioni del produttore. Non utilizzare piatti rotti o scheggiati. Vasetti di vetro Rimuovere sempre il coperchio. Utilizzo solo per riscaldare l’alimento. La maggior parte dei vasetti di vetro non resistono al calore e possono rompersi.
-
Page 14: Pannello Comandi
Pannello comandi FD1834 FD1025 NEW FD2134 Hol d Def rost Med ium Med -Hi 1:0 0 Tim e Ent ry 1:3 0 2:0 0 Sto p 2:3 0 Res et Sta rt 3:0 0 3:3 0 Tasti selezione potenza microonde... - Page 15 Installazione del forno Descrizione componenti • Rimuovere il forno dall’imballo. • Togliere tutti gli oggetti eventualmente presenti nel vano forno. • Rimuovere le pellicole di protezione dai pannelli laterali. A Pannello di controllo Oblò Sportello D Maniglia sportello Ganci di sicurezza sportello Vano forno G Piano in ceramica H Pannello posteriore vano forno Cerniere sportello Filtro Ho ld :1 0 De fro st :2 0 20 %...
-
Page 16: Operazioni Preliminari
Operazioni preliminari • Rimuovere tutto il materiale di imballaggio e gli accessori. • Esaminare il forno verificando la presenza di eventuali danni quali ammaccature, sportello danneggiato, oblò rotto, ecc. • Non installare il forno in presenza di danneggiamenti; rivolgersi al rivenditore. Installazione • Scegliere il luogo dove installare il forno considerando di avere una superficie piana e stabile, in grado di sostenere il peso dell’apparecchio (vedere “Caratteristiche tecniche”) e uno spazio sufficientemente aperto in grado di garantire la necessaria ventilazione. 30 cm 10 cm 10 cm... -
Page 17: Funzionamento
Per i modelli FD1834 - FD2134: • Il forno può essere installato sopra ad un altro apparecchio. L’altezza massima di sovrapposizione è due strati. • Per fissare correttamente i due apparecchi: - Rimuovere le due squadrette “A” dal retro degli apparecchi (figura “2a”). Riposizionare le viti nei fori. - Rimuovere le quattro viti “B” (figura “2a”). - Posizionare le squadrette “C”... - Page 18 3. Modalità READY (pronto) a. In questa modalità, il forno è pronto per iniziare un ciclo di cottura manuale o preimpostato. b. Dalla modalità READY il forno può passare a quasi tutte le altre modalità. 4. Sportello aperto (DOOR OPEN) a.
- Page 19 8. Modalità FINE CICLO a. Una volta scaduto il tempo impostato in modalità COTTURA MANUALE o COTTURA CON PROGRAMMA PREIMPOSTATO il forno entra in modalità FINE CICLO. b. Il display visualizza DONE e un beep avvisa che il ciclo è terminato. Se è...
- Page 20 11. Modalità di programmazione Questa modalità permette di assegnare ai singoli tasti numerici il tempo di cottura e il livello di potenza desiderato. a. Aprire lo sportello. b. Tenere premuto il tasto 1 per 5 secondi, un beep conferma l’accesso alla modalità di programmazione;...
- Page 21 12. Modalità X2 (doppia quantità) a. Con questa modalità è possibile aumentare facilmente il tempo di cottura del programma prescelto per soddisfare particolari esigenze di cottura. b. Premere il tasto (sul display si visualizza DOUBLE), quindi premere il tasto nu- merico corrispondente al programma desiderato.
- Page 22 DONE e un beep avvisa che il ciclo è terminato. o. Premendo il tasto Stop/Reset il forno entra in modalità PAUSA. Per il modello FD1025 NEW: Dopo aver impostato la potenza e il tempo per il primo stadio, premere il tasto Time Entry per impostare il secondo stadio.
- Page 23 Se dopo aver premuto il tasto 4 non si vuole resettare i conteggi, premere il tasto Stop/Reset . Il forno torna in modalità Sportello aperto (DOOR OPEN). Per il modello FD1025 NEW: a. Aprire lo sportello. b. Tenere premuto il tasto 3 per 5 secondi, un beep conferma l’accesso alla modalità e sul display si visualizza SErU.
- Page 24 - Prestare attenzione nell’utilizzo di questa funzione in quanto vengono cancellate tutte le impostazioni personalizzate tornando a quelle predefinite di fabbrica. Per il modello FD1025 NEW: Funzione di controllo potenza Durante la cottura a microonde, premere il tasto Time Entry per controllare il livello di po- tenza.
- Page 25 Tabella “B” - Elenco opzioni Per accedere alle opzioni operare come descritto nel punto “14” (Modalità OPZIONI) Opzione Impostazione Descrizione OP:10 Beep per 3 secondi OP:11 Beep continui Tono beep fine ciclo OP:12 2/5 beep ripetuti OP:20 Beep off OP:21 Volume basso Volume beep OP:22 Volume medio OP:23 Volume alto OP:30 Beep pressione tasti OFF Beep tasti ON/OFF OP:31...
-
Page 26: Istruzioni Per Lo Scongelamento Dei Cibi
Istruzioni per lo scongelamento dei cibi Tempi di riposo Singole porzioni di cibo possono essere cucinate quasi immediatamente dopo lo scongelamento. È normale che grandi porzioni di cibo restino congelate nel mezzo. Prima di cucinarle, lasciarle a temperatura ambiente per almeno un’ora. Durante il tempo di riposo, la temperatura si distribuirà... -
Page 27: Pulizia E Manutenzione
Pulizia e manutenzione Attenzione: Prima di procedere alla pulizia o alla ma- nutenzione dell’apparecchio scollegate la spina dalla presa di corrente. Attenzione: Non immergere mai l’apparecchio in acqua o altri liquidi. 1. Pulire lo sportello, il vetro di ispezione, la superficie di tenuta dello sportello e il vano di cottura con un panno umido. - Page 28 5. Pulizia vano forno Dopo l’uso assicurarsi di pulire eventuali residui di liquidi rovesciati, olio schizzato e ali- menti il più rapidamente possibile. Se il forno viene utilizzato senza aver pulito il vano di cottura, la presenza di sporcizia può causare cattivi odori. Pulire il vano di cottura con un panno imbevuto di acqua tiepida e detergente delicato per stoviglie.
- Page 29 Pulizia pannello blocco olio (Per i modelli FD1834 - FD2134) Attenzione: Prima di rimuovere e riposizionare il pannello di blocco olio as- sicurarsi di aver staccato la spina dalla presa di corrente e che il forno si sia raffreddato; • Pulire il pannello con acqua e detergente per stoviglie.
- Page 30 • • RIPOSIZIONARE IL PANNELLO • • c. Posizionare il pannello nel vano di cot- tura inserendo i 3 perni nelle rispettive sedi presenti nel pannello posteriore. d. Tenere il forno con una mano e con l’altra premere con forza il pannello nel punto indicato per inserirlo nell’apposi- ta sede.
- Page 31 Pulizia del filtro (Per i modelli FD1834 - FD2134) a. Per rimuovere il filtro (10) tirare i due pomelli (11). b. Rimuovere il filtro (10) e lavarlo con acqua e detergenti per stoviglie. Ho ld De fro st 20 % Me diu m 50 % Me d-H i...
-
Page 32: Risoluzione Dei Problemi
Risoluzione dei problemi Problemi Possibili cause Rimedi Il forno non si avvia Il cavo di alimentazione non Scollegare il cavo di alimen- è collegato correttamente. tazione. Ricollegarlo dopo 10 secondi. Il fusibile è bruciato o il circu- Sostituire il fusibile o resetta- ito elettrico è... - Page 33 Problemi Possibili cause Rimedi Luce del forno attenuata Durante la cottura a bassa potenza, la luce del forno a microonde si attenua. Que- sto è normale. Il vapore si accumula sullo Durante la cottura, il vapore sportello del forno a mi- può...
-
Page 34: Smaltimento Dell'apparecchio
Smaltimento dell’apparecchio Il simbolo del bidone barrato riportato sul prodotto e sulla documentazione di accompagnamento indica che il prodotto medesimo è soggetto alla Direttiva 2012/19/UE che disciplina la raccolta, la gestione, il trattamento e lo smaltimento dei rifiuti delle apparecchiature elettriche ed elettroniche (RAEE). Quando il prodotto raggiunge il termine della sua vita non deve pertanto essere smaltito come un normale rifiuto urbano misto ma deve essere assoggettato a raccolta differenziata presso centri di raccolta autorizzati. - Page 35 Avvertenze supplementari - Gli elementi dell’imballaggio (sacchetti in plastica, polistirolo espanso, chiodi, ecc.) non devono essere lasciati alla portata dei bambini in quanto potenziali fonti di pericolo. - Prima di collegare l’apparecchio accertarsi che i dati targa siano rispondenti a quelli della rete di distribuzione elettrica. La targa è situata sul fondo del corpo apparecchio.
- Page 36 Si raccomanda, inoltre, di rendere innocue quelle parti dell’apparecchio suscettibili di costituire un pericolo, specialmente per i bambini che po- trebbero servirsi dell’apparecchio fuori uso per i propri giochi. L’installazione deve essere effettuata secondo le istruzioni del costruttore. Un’installazione non corretta può causare danni a persone, animali o cose, nei confronti dei quali il costruttore non può...
- Page 37 Condizioni di garanzia convenzionale La presente Garanzia non pregiudica i diritti dell’acquirente stabiliti con D. Lgs. 02/022002, n. 24. Con la presente Garanzia, il produttore offre all’Acquirente che si rivolge direttamente ad un Punto Vendita il ripristino della conformità tecnica dell’apparecchio in modo rapido, sicuro e qualitativamente ineccepibile.
-
Page 38: Specifications
Introduction Dear customer, Thank you for choosing our product and we are confident that this choice will meet your expectations in full. Before using this equipment, please read carefully this “instruction manual” in order to optimize the functional characteristics and eliminate any problems that may arise from incorrect use. -
Page 39: Safety Information
Safety information Carefully read the instructions contained in this manual as they contain important information about safety, installation, operation and maintenance. Keep this manual for future reference. Read with attention this instruction before the use 1. Use this appliance only for its intended purpose as described in this instruction manual. Warnings and Important Safety In- structions in this manual do not cover all possible conditions and situations that may occur. - Page 40 clean by wiping after use first with a damp cloth and then with a soft dry cloth. 3. Do NOT operate the oven if it is damaged. It is particularly important that the oven door closes properly and that there is no damage to the: - Door (bent) - Door hinges (broken or loose) - Door seals and sealing surfaces 4.
- Page 41 • For your safety, it is recommended to supply power through a differential switch (RCD) with a tripping current not exceeding 30 mA. • Do not obstruct the cooling during opera- OK!! tion. • Never immerse the appliance, the power cord and plug in water or other liquids. • Do not disconnect the electrical appliance by pulling the power cord. NO!! • Do not use or store this appliance outdoors, in a wet environment or near water. • Do not leave the power cord in the reach of children. • Place the appliance on a horizontal supporting and firm plane whose surface is not sensitive (eg, lacquered furniture, table- cloths, etc..). Items such as caps, jars etc.. shall be placed on the apparatus.
-
Page 42: Important Warnings
The appliance MUST be checked and/ or repaired at an authorized dealer. Any repairs carried out on the device by unauthorized personnel will void the warranty automatically. This appliance must only be used for the purpose for which it was specifically designed, which is for cooking, heating and defrosting food. - Page 43 When heating food in plastic or paper containers, keep an eye on the oven due to the possibility of ignition. If smoke is observed, switch off and unplug the appliance and keep the door closed in order to stifle any flames. Do not overcook food. Do not use the oven cavity for storage purposes. Do not store items, such as bread, cookies, etc. inside the oven. 10. Remove wire twist-ties and metal handles from paper or plastic containers/bags before placing them in the oven.
- Page 44 22. Do not install this appliance; near heater, inflammable material; in a humid, oily or dusty location, in a location exposed to direct sunlight and water or where gas may leak; on un level ground. 23. Do not spray volatile material such as insecticide onto the surface of the oven.
-
Page 45: To Reduce The Risk Of Injury To Persons
To Reduce the risk of injury to persons GROUNDING INSTALLATION Electric Shock Hazard. Touching some of the internal components can cause serious personal injury or death. Do not disassemble this appliance. • This appliance must be grounded. In the event of an electrical short circuit, grounding reduces the risk of electric shock by providing an escape wire for the electric current. This appli- ance is equipped with a cord having a grounding wire with a grounding plug. -
Page 46: Cookware Guide
Cookware guide To cook food in the microwave oven, the microwaves must be able to penetrate the food, without being reflected or absorbed by the dish used. Care must therefore be taken when choosing the cookware. If the cookware is marked microwave-safe, you do not need to worry. The following table lists various types of cookware and indicates whether and how they should be used in a microwave oven. If in doubt, you can test the utensil in question following the procedure below: 1. Fill a microwave-safe container with 1 cup of cold water (250ml) along with the utensil. - Page 47 MATERIALS YOU CAN USE IN MICROWAVE OVEN Utensils Remarks Dinnerware Microwave-safe only. Follow manufacturer’s instructions. Do not use cracked or chipped dishes. Glass jars Always remove lid. Use only to heat food until just warm. Most glass jars are not heat resistant and may break. Glassware Heat-resistant oven glassware only. Make sure there is no metallic trim. Do not use cracked or chipped dishes. Oven cooking bags Follow manufacturer’s instructions. Do not close with metal tie. Make slits to allow steam to escape. Paper plates and cups Use for short–term cooking/warming only. Do not leave oven unattended while cooking. Paper tower Use to cover food for reheating and absorbing fat. Use with supervision for a short-term cooking only.
-
Page 48: Control Panel
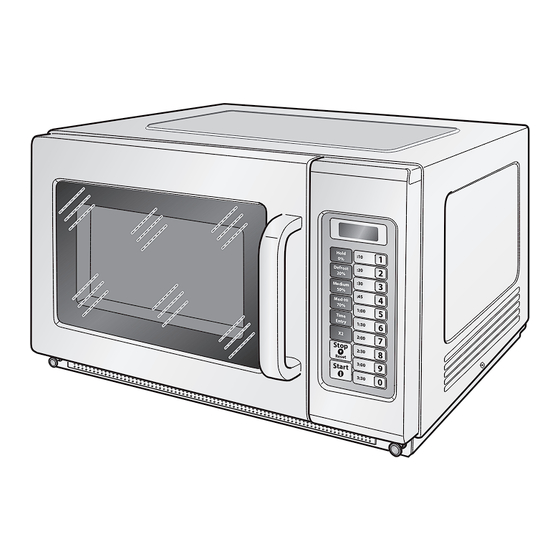
Control panel FD1834 FD1025 NEW FD2134 Hol d Def rost Med ium Med -Hi 1:0 0 Tim e Ent ry 1:3 0 2:0 0 Sto p 2:3 0 Res et Sta rt 3:0 0 3:3 0 Microwave power selection buttons Cooking time Time Entry button... -
Page 49: Oven Installation
Oven installation Component description • Remove the oven from the packaging. • Remove all the objects that may be present in the oven compartment. • Remove the film protecting the side panels. A Control panel Observation window Door assembly D Door handle Safety interlock system Oven compartment G Ceramic board H Back plate Door hinge Filter Ho ld :1 0 De fro st :2 0 20 % M ed iu m :3 0 50 %... -
Page 50: Preliminary Operations
Preliminary operations • Remove all packing material and accessories. • Examine the oven for any damage such as dents or broken door. • Do not install if oven is damaged, contact the retailer. Installation • Select the location for installing the oven, considering that a flat and stable surface is necessary that can support the weight of the appliance (see “Technical specifications”) as well as sufficient open space able to guarantee the necessary ventilation. 30 cm 10 cm 10 cm OPEN • A 10-cm spacing should be kept between the appliance and right and back walls, and a 30-cm spacing kept on the top. • Never dismantle the appliance’s feet ,nor block the air intake and exhaust opening. The left side must be open Attention: a) Blocking the intake and/or outlet openings can damage the oven. -
Page 51: Operation
For FD1834 - FD2134 models: • The appliance can be installed with a degree of overlap. The maximum overlap height is two layers. • To correctly fix the two appliances: - Remove the two brackets “A” from the rear of the appliance (figure “2a”). Reposition the screws in the holes. - Remove the four screws “B” (figure “2a”). - Position the brackets “C” as shown and tighten the four screws “B” (see figure “2b”). Operation 1. Start a. When the oven is powered electrically, the following appears on the display “- - - - - - -”. b. Pressing the Stop/Reset button switches the oven to standby mode. Note: No button can be pressed in standby mode. 2. - Page 52 3. READY mode a. In this mode, the oven is ready to start a manual or preset cooking cycle. b. From READY mode, the oven can switch to almost all the other modes. 4. Door open a. By opening the door, the oven enters door open mode. b. The display is off in this condition. The fan and the lamp in the oven compartment are on. If the option OP: 60 is selected (see table “B”) and the oven was operating with a manual or preset cooking cycle before opening the door, when the door is closed, the oven will enter PAUSE mode. If instead option OP: 61 was selected, when closing the door, all information about the current manual or preset program will be deleted. 5.
- Page 53 8. CYCLE END mode a. Once the time set in MANUAL COOKING or COOKING WITH PRESET PROGRAM mode has ended, the oven enters CYCLE END mode. b. DONE appears on the display and a beep indicates that the cycle has ended. If the option OP:11 or OP:12 is set, the oven will continue to beep until the door has been opened or closed or the Stop/Reset button is pressed. d.
- Page 54 11. Programming mode This mode is used to assign the desired cooking time and power level to the individual num- ber buttons. a. Open the door. b. Hold down the button 1 for 5 seconds, a beep confirms access to programming mode; PROGRAM appears on the display. c. Press the number button that corresponds to the preset program to be changed; the display will show the program number and the time currently set. d.
- Page 55 12. X2 mode (double quantity) a. With this mode, it is easy to increase the cooking time of the preselected program for certain baking needs. b. Press (DOUBLE will appear on the display), then press the number button corresponding to the desired program. The oven will begin cooking for the program time, increased by the percentage set in programming. Example: Program 5 (set time 1:00 and default CF value “CF:08”) e. Press the button b. Press the button 5 .
- Page 56 Pressing the Stop/Reset button switches the oven to PAUSE mode. For FD1025 NEW model: After setting the power and time for the first stage, press Time Entry to set the second stage.
- Page 57 If after pressing the button 4 you do not want to reset the counts, press the button Stop/Reset . The oven will return to DOOR OPEN mode. For FD1025 NEW model: a. Open the door. b. Hold down the button 3 for 5 seconds, a beep confirms access to the mode and SErU will appear on the display.
- Page 58 If do not press the button Start when the display 00, the setting will cancel. Note - Be careful in the operation as it will restore all configure to factory-default setting. For FD1025 NEW model: Inquiry Function During microwave cooking process, press Time Entry to check the power level. LED display the power for 3 seconds then turn back to previous state. It is available for multi-stage cooking.
- Page 59 Table “B” - Options list To access the options, proceed as described in point “14” (OPTIONS mode) Option Setting Description OP:10 3 seconds beep OP:11 Continuous beep EOC Tone OP:12 2/5 quick beeps,Repeating OP:20 Beeper Off OP:21 Beeper Volume OP:22 Medium OP:23 High OP:30 Keybeep Off Beeper On/Off OP:31 Keybeep On OP:40 15 seconds OP:41 30 seconds Keyboard Window OP:42 60 seconds OP:43...
-
Page 60: Defrosting Guidelines
Defrosting Guidelines Standing times Individual portions of food may be cooked almost immediately after defrosting. It is normal for large portions of food to be frozen in the centre. Before cooking, allow to stand for a minimum of one hour. During this standing time, the tempera- ture becomes evenly distributed and the food is defrosted by conduction. -
Page 61: Cleaning And Maintenance
Cleaning and maintenance Attention: Before starting with appliance cleaning or maintenance, dis- connect the plug from the power socket. Attention: Never immerse the appliance in water or other liquids. 1. Clean the door, the inspection window, the door sealing surface and the cooking com- partment with a moist cloth. Hol d Def ros t Hol d Me diu m Def ros t... - Page 62 5. Cleaning the oven compartment After use, make sure to clean any residuals of spilled liquids, splattered oil or food as soon as possible. If the oven is used without first having cleaned the cooking compartment, the presence of the residuals may cause unpleasant odours. Clean the cooking compartment using a cloth soaked in warm water and delicate dish detergent. Rinse with a moist cloth. Attention: Do not use abrasive or corrosive materials or detergents. Cleaning Tip For easier cleaning of the cavity walls that the food cooked can touch: - Place half a lemon in a bowl,...
- Page 63 Cleaning the oil block panel (For FD1834 - FD2134 models) Attention: Before removing and repositioning the oil block panel, make sure to have disconnected the plug from the pow- er socket and that the oven has cooled; • Clean the panel with water and dish detergent. • Dry it before repositioning it.
- Page 64 • • REPOSITION THE PANEL • • d. Hands to take the oil blockage, after alignment three cylinder of the oil blockage, inserting the three holes of the back plate. e. The left hand grasp the microwave, right thumb to press the arrow direc- tions and forced to push back.
-
Page 65: Cleaning The Filter
Cleaning the filter (For FD1834 - FD2134 models) a. To remove the filter (10) pull the two knobs (11). b. Remove the filter (10) and wash it with water and dish detergent. Ho ld De fro st 20 % Me diu m 50 % Me d-H i 70 % 1:0 0 Ti m e En try 1:3 0 2: 00 St op 2: 30 Re set... -
Page 66: Troubleshooting
Trouble shooting Trouble Possible cause Rimedy Oven can not be started. Power cord not plugged in Unplug. Then plug again af- tightly. ter 10 seconds. Fuse blowing or circuit Replace fuse or reset circuit breaker works. breaker (repaired by profes- sional personnel of our com- pany) Trouble with outlet. Test outlet with other electri- cal appliances. - Page 67 Trouble Possible cause Rimedy Steam accumulating In cooking, steam may come door, hot air out of vents. out of food. Most will get out from vents. But some may ac- cumulate on cool place like oven door. Oven started accidentally It is forbidden to run the unit Immediately, switch off the with no food in. without any food inside. It is oven ( Stop/Reset button).
-
Page 68: Disposal Of The Appliance
Disposal of the appliance The crossed-out wheeled bin symbol placed on the product and on the accompanying documentation indicates that the product itself is subject to Directive 2012/19/EU which regulates the collection, the management, the processing and the disposal of electrical and electronic equipment waste (WEEE). When the product reaches the end of its lifetime must therefore not be disposed of as a common mixed urban waste but it must be subject to sorted collection at authorized collection centers. - Page 69 We do not recommend the use of adapters, multiple sockets and / or extensions. When their use is absolutely necessary, you must use only simple or multiple adapters and extensions that comply with current safety standards, taking care not to exceed the range limit. The use of an electrical appliance requires the observance of some fundamental rules.
-
Page 70: How To Contact Technical Support
Conventional warranty conditions This Warranty does not affect your statutory rights under D. Lgs. 02/022002, n. 24. With this guarantee, the manufacturer suggests the Purchaser to address directly a Point of Sale which to comply with the restoration in a fast, safe and unquestionable quality. This Warranty is effective regardless of the evidence that the defect - resulting from manufac- turing defects present at the time of purchase of the device, except as provided in paragraph “d” of this text. a) Warranty duration: 12 months from date of purchase. During the first 12 months of warranty, the warranty on the unit will be managed by the Stores. - Page 71 FD1025 NEW FORNO A MICROONDE ATTENZIONE - WARNING MICROWAVE OVEN • MICROONDE E ALTA TENSIONE ALL’INTERNO DELL’APPARECCHIO. NON RIMUOVERE I PANNELLI LATERALI. • MODELLO: FD1025 NEW MICROWAVE AND HIGH VOLTAGE INSIDE. BE SURE NOT TO REMOVE ENCLOSURE MODEL • L’APPARECCHIO É DOTATO DI SPINA CON MESSA A TERRA. PER GARANTIRE LA VOSTRA • TENSIONE: 230 V~ SICUREZZA E PREVENIRE EVENTUALI SHOCK ELETTRICI, DEVE ESSERE COLLEGATA AD UNA RATED VOLTAGE PRESA DOTATA DI MESSA A TERRA. • FREQUENZA: 50 Hz THIS APPLIANCE IS EQUIPPED WITH A GROUNDED PLUG FOR YOUR PROTECTION AGAINST FREQUENCY POSSIBLE SHOCK HAZARDS AND SHOULD BE CONNECTED TO A PROPERLY GROUNDED OUT LET.
- Page 72 Stamp and Signature of the dealer: Stamp and Signature of the dealer: Compilare i campi sottostanti per la validità della Garanzia Complete the fields below for the validity of the Warranty Modello FD1025 NEW - Art. Code: 110439 Model FD1834 - Art. Code: 110434 FD2134 - Art.
Need help?
Do you have a question about the FD1025 NEW and is the answer not in the manual?
Questions and answers