
Related Manuals for ZyXEL Communications LTE2566-M634


Summary of Contents for ZyXEL Communications LTE2566-M634
- Page 1 User’s Guide LTE2566-M634 4G LTE-A Portable Router Default Login Details Version 1.0 Edition 1, 1/2020 LAN IP Address http: //192.168.1.1 Username admin Password 1234 Copyright © 2020 Zyxel Communications Corporation...
- Page 2 Every effort has been made to ensure that the information in this manual is accurate. Related Documentation • Quick Start Guide The Quick Start Guide shows how to connect and install the LTE2566-M634. • More Information Go to support.zyxel.com to find other information on the LTE2566-M634...
-
Page 3: Table Of Contents
Contents Overview Contents Overview Get to Know Your LTE2566-M634 ..........................11 User’s Guide ............................23 Web Configurator ..........................24 Setup Wizard ............................30 Tutorials ..............................34 Technical Reference ........................40 Status ..............................41 Monitor ..............................44 WAN ............................... 50 WLAN ..............................58 LAN ................................. -
Page 4: Table Of Contents
Chapter 1 Get to Know Your LTE2566-M634 ......................11 1.1 Overview ............................11 1.2 Applications ............................ 11 1.3 Ways to Manage the LTE2566-M634 .................... 12 1.4 Hardware Description ........................12 1.4.1 Power Button ......................... 14 1.4.2 Hardware Connections ......................14 1.4.3 Reset the LTE2566-M634 ......................15 1.5 LCD Screens ............................ - Page 5 Tutorials ...............................34 4.1 Overview ............................34 4.2 Set Up Your WiFi Network ....................... 34 4.3 Connect to the LTE2566-M634 WiFi Network ................35 4.4 Set Up a Wireless Network Using WPS ................... 37 4.5 Configure Data Usage and Statistics ................... 38 Chapter 5 Status ..............................41...
- Page 6 11.1.2 What You Need To Know ....................82 11.2 DHCP Server General Settings ....................82 11.3 Advanced DHCP Server Setting ....................84 11.4 DHCP Client List ..........................84 Chapter 12 DDNS ..............................86 12.1 Overview ............................86 12.2 General Settings ........................... 86 LTE2566-M634 User’s Guide...
- Page 7 MGMT Interface ..........................103 17.1 Overview ............................. 103 17.2 What You Can Do ........................103 17.3 What You Need To Know ......................103 17.3.1 System Timeout ........................103 17.4 Local MGMT ..........................103 17.5 Remote MGMT ..........................104 LTE2566-M634 User’s Guide...
- Page 8 Chapter 21 Troubleshooting..........................132 21.1 Overview ............................. 132 21.2 Power ............................132 21.3 LTE2566-M634 Access and Login ....................132 21.4 Internet Access ........................... 134 21.5 IP Address Setup ......................... 135 21.6 WiFi Connections ........................138 21.7 Getting More Troubleshooting Help ..................138...
- Page 9 Table of Contents Appendix A Customer Support ..................... 139 Appendix B Legal Information ....................... 145 LTE2566-M634 User’s Guide...
-
Page 10: Document Conventions
NAT sub menu and finally the Port Trigger tab to get to that screen. Icons Used in Figures Figures in this user guide may use the following generic icons. The LTE2566-M634 icon is not an exact representation of your device. -
Page 11: Get To Know Your Lte2566-M634
LTE2566-M634 1.1 Overview Your LTE2566-M634 (A) is a 4G LTE router that allows you to share Internet Access via WiFi anytime. The LTE2566-M634 supports 4G/3G multi-mode and complies with the IEEE 802.11a/b/g/n/ac standards. It can provide data rates of up to 300Mbps to up to 32 simultaneous WiFi clients. The LTE2566-M634’s slim design is easy to use anywhere anytime and leaves your smartphone’s bandwidth and battery free for... -
Page 12: Ways To Manage The Lte2566-M634
1.3 Ways to Manage the LTE2566-M634 • Navigation Buttons You can use the navigation buttons along with the LCD interface to manage the LTE2566-M634. • Web Configurator The Web Configurator is recommended for everyday management by using a supported web browser. - Page 13 Chapter 1 Get to Know Your LTE2566-M634 Figure 2 Menu Button • The Menu screen appears. Press the left or right button to scroll up and down and then press the center button to select an option. Figure 3 Menu Screen...
-
Page 14: Power Button
Micro SIM Card Slot Reset Button 1.4.1 Power Button Use the power button on the side panel to turn the LTE2566-M634 on or off. To turn on, press the power button for 3 seconds until the LCD screen displays ZYXEL. Power Off To turn the LTE2566-M634 off, press the power button once to wake up the LCD, then press for 3 seconds and release it when the LCD screen displays Shut down. -
Page 15: Reset The Lte2566-M634
WiFi SSID and password. 1.5 LCD Screens This section describes the labels or icons displayed on the LCD screen of your LTE2566-M634. When the LTE2566-M634 first turns on the following example screen displays. -
Page 16: Lcd Menu Screen
Use SSID & Password to allow a client device to find this SSID and enter the Password to connect wirelessly to the LTE2566-M634. If your client supports WPS, use WPS to connect wirelessly to the LTE2566-M634. Use SMS to check SMS messages. -
Page 17: Network Connection
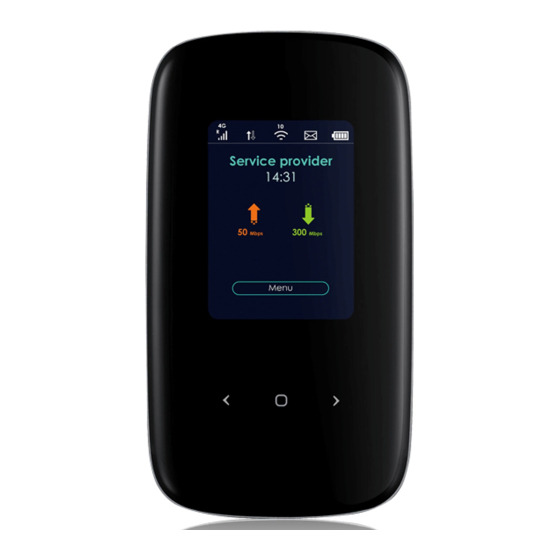
This displays the service provider’s name of your 3G/4G network (WAN). Mode This displays the current mode of your LTE2566-M634 (4G or 3G). Wan IP This displays the current IP address of the LTE2566-M634 in the WAN. DNS IP This displays the DNS server address assigned to the LTE2566-M634. Connect/Disconnect Click this button to enable/disable WAN network services. -
Page 18: Wifi Setting
Table 4 Data Usage Screen LABEL DESCRIPTION Usage This displays the mobile data used in total by your LTE2566-M634 in Kilobytes (KB), Megabytes (MB), or Gigabytes (GB). This displays the amount of data in KB/MB/GB currently uploaded by the LTE2566- M634. -
Page 19: Ssid & Password Setting
WPS activated. Then, the two devices connect and set up a secure network by themselves. You can use the LCD of the LTE2566-M634 to activate WPS in order to quickly set up a WiFi network with strong security. -
Page 20: Viewing Sms
SMS (Short Message Service) allows you to view the text messages that the LTE2566-M634 received from mobile devices or the service provider. When the SMS box is full the LTE2566-M634 will begin to store text messages in the SIM card. When the SIM card is full, the LTE2566-M634 will stop storing new SMS messages. -
Page 21: About Screen
You can only delete SMS messages using the Web Configurator. 1.5.8 About Screen To show the LTE2566-M634’s hardware/firmware information, press the left or right button to go to About and the center button to select it. LTE2566-M634 User’s Guide... - Page 22 192.168.1.1 to access the Web Configurator. Firmware This displays the present firmware version of your LTE2566-M634. This displays the serial number issued by the manufacturer for your LTE2566-M634. IMEI This displays the International Mobile Equipment Number (IMEI) which is the serial number of the built-in 3G/4G module.
-
Page 23: User's Guide
User’s Guide... -
Page 24: Web Configurator
• JavaScript (enabled by default). 2.2 Accessing the Web Configurator Use the included USB cable to connect your LTE2566-M634 to a computer (refer to the Quick Start Guide). Make sure your computer has an IP address in the same subnet as the LTE2566-M634. Your computer should have an IP address from 192.168.1.2 to 192.168.1.254. -
Page 25: Navigating The Web Configurator
The Status screen appears. Use this screen to view your device’s information and status, your mobile connection status and Internet traffic details. 2.3 Navigating the Web Configurator The following section summarizes how to navigate the Web Configurator starting from the Status screen. LTE2566-M634 User’s Guide... -
Page 26: Title Bar
The icons provide the following functions. Table 7 Title Bar: Web Configurator Icons LABEL DESCRIPTION This shows whether a SIM card is inserted in the LTE2566-M634. The icon shows if there is no SIM card inserted. Connected Devices This displays the number of devices currently connected to the LTE2566-M634. -
Page 27: The Main Window
Chapter 5 on page 41 for more information about the Status screen. 2.3.3 Navigation Panel: Main Menus Use the menu items in the navigation panel: main menus to open screens to configure LTE2566-M634 features. Figure 18 Navigation Panel: Main Menus 2.3.4 Navigation Panel: Sub-Menus Use plus and minus signs to expand and collapse the sub-menus in the navigation panel: sub-menus. - Page 28 The following table describe each menu item and icons. Table 8 Navigation Panel Summary LINK DESCRIPTION Status Use this screen to view the network status of the LTE2566-M634 and devices connected to it. Monitor View Log Use this screen to view the LTE2566-M634 system logs.
- Page 29 This screen allows you to reboot the LTE2566-M634 without turning the power off. Reset System Reset Use this screen to reset the LTE2566-M634 and return it to factory default settings. Wizard Click this to access the Wizard and configure the LTE2566-M634’s basic settings.
-
Page 30: Setup Wizard
Click the Wizard icon in the navigation panel of the Web Configurator to open the Wizard screen. Figure 20 Title Bar: Wizard Icon 3.3 Wizard Setup The first Wizard screen displays the Setup Time Zone screen. Select the location of the LTE2566-M634 from the drop-down menu and click Next. LTE2566-M634 User’s Guide... - Page 31 The Internet Configuration screen appears. Use this screen to configure the APN (Access Point Name) provided by your ISP (Internet Service Provider). Select Auto-Detection so the LTE2566-M634 can get the connection parameters automatically. Select Manual-Configuration to enter a connection profile provided by your ISP.
- Page 32 Chapter 3 Setup Wizard Figure 23 Wizard: Data Usage Use this screen to enable or disable the LTE2566-M634’s 2.4G wireless LAN, and enter the wireless network name (SSID). Select a channel or use Auto to have the LTE2566-M634 automatically determine a channel to use.
- Page 33 You are now ready to access the Internet and allow wireless clients to connect to your LTE2566- M634. For more information about Wireless LAN see Section 8.2 on page Figure 27 Wizard: Security Setup - 5G LTE2566-M634 User’s Guide...
-
Page 34: Tutorials
Use a password that is not easy to guess and that consists of different types of characters, such as numbers and letters. Go to the Configuration > Wiireless LAN > General screen to configure the LTE2566-M634 WiFi network settings. After changing the WiFi settings click Apply to save your changes. -
Page 35: Connect To The Lte2566-M634 Wifi Network
When your changes are applied you will be disconnected from the LTE2566-M634. Connect to the LTE2566-M634’s WiFi network once again with the new WiFi settings. 4.3 Connect to the LTE2566-M634 WiFi Network In this example, you have changed the LTE2566-M634’s wireless settings in the wizard to the following settings. SSID... - Page 36 Chapter 4 Tutorials The following screen displays if WPS is enabled on the LTE2566-M634 but you didn’t press the WPS button. Click Connect using a security key instead. Type the security key in the following screen. Click OK. Check the status of your wireless connection in the screen below.
-
Page 37: Set Up A Wireless Network Using Wps
Follow these steps to successfully connect your WPS compatible device with the LTE2566-M634. Make sure that your LTE2566-M634 is turned on. Make sure the wireless LAN is turned on, and that the LTE2566-M634 is placed within range of the device you want to connect. -
Page 38: Configure Data Usage And Statistics
15GB that will help them with directions and entertainment during their trip. Dani brought her LTE2566-M634 to share Internet wherever they go during their stay, whilst saving their phone’s battery for pictures and more. They cannot go over the purchased data package plan, because it will result in additional costs for them. - Page 39 Chapter 4 Tutorials LTE2566-M634 User’s Guide...
-
Page 40: Technical Reference
Technical Reference... -
Page 41: Status
Use the Status screen to check status information about the LTE2566-M634. 5.2 Status This screen is the first thing you see when you log into the LTE2566-M634. It also appears every time you click the Status icon in the navigation panel. The Status screen displays the LTE2566-M634’s connection mode, wireless LAN information and traffic statistics. - Page 42 System Status System Up Time This field displays how long the LTE2566-M634 has been running since it last started up. The Device starts up when you plug it in, when you restart it (Maintenance > Reboot), or when you reset it.
- Page 43 This displays whether the LTE2566-M634 is connected to another service provider’s mobile network using roaming. 2.4 WiFi Name This displays a descriptive name used to identify the LTE2566-M634 in the 2.4G wireless LAN. 2.4G Encryption This displays the level of 2.4G wireless security the LTE2566-M634 is using.
-
Page 44: Monitor
The Web Configurator allows you to look at all of the LTE2566-M634’s logs in one location. Use the Log screen to see the logged messages for the LTE2566-M634. The log wraps around and deletes the old entries after it fills. Click Refresh to renew the log screen. Click Clear Log to delete all the logs. -
Page 45: Dhcp Table
DHCP (Dynamic Host Configuration Protocol, RFC 2131 and RFC 2132) allows individual clients to obtain TCP/IP configuration at start-up from a server. You can configure the LTE2566-M634’s LAN as a DHCP server or disable it. When configured as a server, the LTE2566-M634 provides the TCP/IP configuration for the clients. -
Page 46: Arp Table
Refresh Click Refresh to update this screen. Apply Click Apply to save your changes back to the LTE2566-M634. 6.4 ARP Table Address Resolution Protocol (ARP) is a protocol for mapping an Internet Protocol address (IP address) to a physical machine address, also known as a Media Access Control or MAC address, on the local area network. -
Page 47: Packet Statistics
Table 12 Monitor > Packet Statistics LABEL DESCRIPTION This is the index number of the entry. Port This is the LTE2566-M634’s interface type. TxPkts This is the number of transmitted packets on this port. RxPkts This is the number of received packets on this port. - Page 48 This displays the name of the service provider. Cell Broadcast This displays whether the one-to-many messaging service is available. This displays the Mobile Country Code (MCC), which is used to identify the country of a mobile subscriber. LTE2566-M634 User’s Guide...
- Page 49 This displays the network type and the frequency band used by the mobile network to Band(SCC) which the LTE2566-M634 is connecting (Secondary Component Carrier). Service Type This displays the type of the mobile network to which the LTE2566-M634 is connecting. EARFCN(SCC) This displays E-UTRA Absolute Radio Frequency Channel Number of the Secondary Component Carrier.
-
Page 50: Wan
3G and 4G standards for the sending and receiving of voice, video, and data in a mobile environment. You can insert a 4G SIM card and set the LTE2566-M634 to use this 3G/4G connection as your WAN. Figure 35 LAN/Wireless LAN and Wireless WAN 7.1.1 What You Can Do in this Chapter... -
Page 51: What You Need To Know
If your ISP gives you DNS server addresses, manually enter them in the IPv6 DNS server fields. If your ISP dynamically assigns the DNS server IP addresses (along with the LTE2566-M634’s WAN IP address), set the DNS server fields to get the DNS server address from the ISP. -
Page 52: Wan Management
(1 ~ 10, A ~ F). Each block’s 16 bits are then represented by four hexadecimal characters. For example, FFFF:FFFF:FFFF:FFFF:FC00:0000:0000:0000. 7.2 WAN Management Use this screen to change your LTE2566-M634’s Internet access settings. Click Configuration > Network > WAN> WAN Management. The screen appears as shown next. Figure 36 Configuration > Network > WAN > WAN Management... - Page 53 Cellular WAN Network Type Select the type of the network (4G or 3G) to which you want the LTE2566-M634 to connect. Otherwise, select Auto to have the LTE2566-M634 connect to an available network using the default settings on the SIM card. If the currently registered mobile network is not available or the mobile network’s signal strength is too low, the...
-
Page 54: Plmn Selection
7.3 PLMN Selection This screen allows you to view available Public Land Mobile Networks (PLMNs) and select your preferred network when the LTE2566-M634 is outside the geographical coverage area of the network to which you are registered and roaming is enabled. -
Page 55: Ipv6
Chapter 7 WAN IPv6 Use this screen to configure the LTE2566-M634’s IPv6 settings. Click Configuration > Network > WAN > IPv6 from the Configuration menu. The screen appears as shown next. Figure 38 Configuration > Network > WAN > IPv6 The following table describes the labels in this screen. -
Page 56: Data Usage
LABEL DESCRIPTION PIN Operation Select Enable PIN to enter the PIN code every time the LTE2566-M634 reboots. To turn off PIN code authentication enter the PIN code and click Disable. PIN Code If you select Enable, enter a 4-digit PIN code (0000 for example) provided by your ISP for the inserted SIM card. - Page 57 Table 18 Configuration > Network > WAN > Data Usage LABEL DESCRIPTION Notify me when data usage Specify the percentage of data usage the LTE2566-M634 has to reach to send a notification. Reset Date Select the date of the month on which the LTE2566-M634 restarts calculating the amount of data per month.
-
Page 58: Wlan
• Use the General screen to enable the wireless LAN, enter the SSID and select the wireless security mode (Section 8.2 on page 60). • Use the Guest AP screen to set up multiple wireless networks on your LTE2566-M634 (Section 8.4 on page 66). -
Page 59: What You Need To Know
Some wireless devices, such as scanners, can detect wireless networks but cannot use wireless networks. These kinds of wireless devices might not have MAC addresses. Hexadecimal characters are 0, 1, 2, 3, 4, 5, 6, 7, 8, 9, A, B, C, D, E, and F. LTE2566-M634 User’s Guide... -
Page 60: The General Screen
Use this screen to enable the wireless LAN, enter the SSID and select the wireless security mode. Note: If you are configuring the LTE2566-M634 from a device connected to the wireless LAN and you change the LTE2566-M634’s SSID, channel or security settings, you will lose your wireless connection when you press Apply to confirm. - Page 61 Select Enable to activate the 2.4G / 5G wireless LAN. Select Disable to turn it off. You can also enable or disable the 2.4G/5G wireless LANs by using the WLAN/WPS button located on the side panel of the LTE2566-M634. Name (SSID) The SSID (Service Set IDentity) identifies the Service Set with which a wireless client is associated.
- Page 62 Auto Channel Selection is disabled. Auto Channel Select this check box for the LTE2566-M634 to automatically choose the channel with the least Selection interference. De-select this check box if you wish to manually select the channel using the Channel Selection field.
-
Page 63: Wireless Security
Select Open to allow wireless clients to communicate with the access points without any data encryption. Note: If you do not enable any wireless security on your LTE2566-M634, your network is accessible to any wireless networking device that is within range. - Page 64 The Group Key Update Timer is the rate at which the AP sends a new group key out to all Timer clients. The default is 3600 seconds (60 minutes). Apply Click Apply to save your changes back to the LTE2566-M634. LTE2566-M634 User’s Guide...
-
Page 65: Wpa-Psk / Wpa2-Psk
The Group Key Update Timer is the rate at which the AP sends a new group key out to all Timer clients. The default is 3600 seconds (60 minutes). Apply Click Apply to save your changes back to the LTE2566-M634. LTE2566-M634 User’s Guide... -
Page 66: Guest Ap
This screen allows you to enable and configure multiple wireless networks and guest wireless network settings on the LTE2566-M634. You can configure up to four SSIDs to enable multiple BSSs (Basic Service Sets) on the LTE2566-M634. This allows you to use one access point to provide several BSSs simultaneously. You can then assign varying security types to different SSIDs. -
Page 67: The Mac Filter Screen
00:A0:C5:00:00:02. You need to know the MAC addresses of the devices to configure this screen. Use this screen to view your LTE2566-M634’s MAC filter settings and add new MAC filter rules. Click Configuration > Network > Wireless LAN > MAC Filter. The screen appears as shown. -
Page 68: Wireless Lan Advanced Settings
Click Add to enter or change the MAC address of the wireless devices that are allowed or denied access to the LTE2566-M634 in this field. Enter the MAC addresses in a valid MAC address format, that is, six hexadecimal character pairs, for example, 12:34:56:78:9a:bc. -
Page 69: The Wps Setup Screen
IEEE 802.11 wireless clients associated with the LTE2566-M634 wireless network. Tx Power Set the output power of the LTE2566-M634 in this field. If there is a high density of APs in an area, decrease the output power of the LTE2566-M634 to reduce interference with other APs. -
Page 70: Wps Station
LABEL DESCRIPTION PIN Code Click Enable to activate WPS on the LTE2566-M634. PIN Number This field is available only when you set PIN Code to Enable. Select this option and enter the PIN of the device that you are setting up a WPS connection with and click Apply to authenticate and add the wireless device to your wireless network. - Page 71 Use this button when you use the PIN Configuration method to configure wireless station’s number wireless settings. Type the same PIN number generated in the wireless station’s utility. Then click Start to associate to each other and perform the wireless security information synchronization. LTE2566-M634 User’s Guide...
-
Page 72: Lan
The LAN screens can help you configure and manage IP address, and partition your physical network into logical networks. 9.1.1 What You Can Do • Use the IP screen to change the IP address for your LTE2566-M634 (Section 9.2 on page 73). -
Page 73: Lan Ip
Web Configurator help regarding what fields need to be configured. 9.2 LAN IP Use this screen to change the IP address for your LTE2566-M634. Click Configuration > Network > LAN. The screen appears as shown next. -
Page 74: Nat
192.168.1.35 to a third (C in the example). You assign the LAN IP addresses to the devices (A to D) connected to your LTE2566-M634. The ISP assigns the WAN IP address. The NAT network appears as a single host on the Internet. All traffic coming from A to D going out to the Internet use the IP address of the LTE2566-M634, which is 192.168.1.1. -
Page 75: What You Need To Know
10.1.2 What You Need to Know Inside/Outside Inside/outside denotes where a host is located relative to the LTE2566-M634, for example, the computers of your subscribers are the inside hosts, while the web servers on the Internet are the outside hosts. -
Page 76: Port Forwarding
If you are unsure, refer to your ISP. Port forwarding allows you to define the local servers to which the incoming services will be forwarded. To change your LTE2566-M634’s port forwarding settings, click Configuration > Network > NAT > Port Forwarding. The screen appears as shown. - Page 77 Port Range field. Modify Click the Edit icon to open the edit screen where you can modify an existing rule. Click the Delete icon to remove a rule. Click Add to save your changes back to the LTE2566-M634. LTE2566-M634 User’s Guide...
-
Page 78: Port Trigger
Type a port number or the ending port number in a range of port numbers. Trigger Port The trigger port is a port that causes (or triggers) the LTE2566-M634 to record the IP address of the LAN computer that sent the traffic to a server on the WAN. -
Page 79: Technical Reference
Chapter 10 NAT To enable and disable the SIP ALG in the LTE2566-M634, click Configuration > Network > NAT > ALG. The screen appears as shown. Figure 57 Configuration > Network > NAT > ALG The following table describes the labels in this screen. -
Page 80: Nat Port Forwarding Example
Trigger port forwarding solves this problem by allowing computers on the LAN to dynamically take turns using the service. The LTE2566-M634 records the IP address of a LAN computer that sends traffic to the WAN to request a service with a specific port number and protocol (a "trigger" port). When the LTE2566- M634's WAN port receives a response with a specific port number and protocol ("incoming"... -
Page 81: Two Points To Remember About Trigger Ports
Jane requests a file from the Real Audio server (port 7070). Port 7070 is a “trigger” port and causes the LTE2566-M634 to record Jane’s computer IP address. The LTE2566-M634 associates Jane's computer IP address with the "incoming" port range of 6970-7170. -
Page 82: Dhcp Server
DHCP (Dynamic Host Configuration Protocol, RFC 2131 and RFC 2132) allows individual clients to obtain TCP/IP configuration at start-up from a server. You can configure the LTE2566-M634’s WLAN as a DHCP server or disable it. When configured as a server, the LTE2566-M634 provides the TCP/IP configuration for the clients. - Page 83 Select Enable to activate DHCP for the VLAN group. DHCP Server IP Address Enter the LAN IP address you want to assign to your LTE2566-M634 in this VLAN group. IP Pool Starting Address Specify the first of the contiguous addresses in the IP address pool for LAN.
-
Page 84: Advanced Dhcp Server Setting
MAC addresses. You can also use this screen to configure the DNS server information that the LTE2566- M634 sends to the DHCP clients. To change your LTE2566-M634’s static DHCP settings, click Configuration > Network > DHCP Server > Advanced. The following screen displays. - Page 85 00:A0:C5:00:00:02. Reserve Select this if you want to reserve the IP address for this specific MAC address. Refresh Click this button to update the screen. Apply Click Apply to save your changes back to the LTE2566-M634. LTE2566-M634 User’s Guide...
-
Page 86: Ddns
Users can always use the same domain name instead of a different dynamic IP address that changes each time to connect to the LTE2566-M634 or a server in your network. Note: The LTE2566-M634 must have a public global IP address and you should have your registered DDNS account information on hand. - Page 87 “yourhost.mydomain.net”. You can specify up to two host names in the field separated by a comma (","). Username Enter your user name. Password Enter the password assigned to you. Apply Click Apply to save your changes back to the LTE2566-M634. LTE2566-M634 User’s Guide...
-
Page 88: Firewall
Firewall 13.1 Overview Use these screens to enable and configure the firewall that protects your LTE2566-M634 and your LAN from unwanted or malicious traffic. Enable the firewall to protect your LAN devices from attacks by hackers on the Internet and control access between the LAN and WAN. -
Page 89: General Setting
M634's purpose is to allow a private Local Area Network (LAN) to be securely connected to the Internet. The LTE2566-M634 can be used to prevent theft, destruction and modification of data, as well as log events, which may be important to the security of your network. -
Page 90: The Icmp Protection
Click Apply to save the settings. 13.3 The ICMP Protection If an outside user attempts to probe an unsupported port on LTE2566-M634, an ICMP response packet is automatically returned. This allows the outside user to know LTE2566-M634 exists. Use this screen to prevent the ICMP response packet from being sent. - Page 91 Select Ping from LAN to reply to incoming LAN Ping requests. Select Ping from WAN to reply to incoming WAN Ping requests. Otherwise select both Ping from LAN & WAN to reply to all incoming LAN and WAN Ping requests. Apply Click Apply to save the settings. LTE2566-M634 User’s Guide...
-
Page 92: Url Filtering
The file path is the characters that come after the first slash in the URL. For example, with the URL www.zyxel.com.tw/news/pressroom.php, the file path is news/pressroom.php. Since the LTE2566-M634 checks the URL’s domain name (or IP address) and file path separately, it will not find items that go across the two. For example, with the URL www.zyxel.com.tw/news/pressroom.php, the LTE2566-M634 would find “tw”... - Page 93 Click Apply to save your settings. Enable URL The LTE2566-M634 can block Web sites with URLs that contain certain keywords in the domain Keyword Blocking name or IP address. For example, if the keyword "bad" was enabled, all sites containing this keyword in the domain name or IP address will be blocked, e.g., URL http://...
-
Page 94: Ipv4 Filter
This chapter shows you how to enable and create IPv4 firewall rules to block unwanted IPv4 traffic. 15.2 IPv4 Firewall Click Configuration > Firewall > IPv4 Filter. The Service screen appears as shown. Figure 68 Configuration > Firewall > IPv4 Filter LTE2566-M634 User’s Guide... - Page 95 Source IP Enter the IPv4 address of the computer that initializes traffic for the application or service. The LTE2566-M634 applies the firewall rule to traffic initiating from this computer. Source Port Enter the port number/range of the source that defines the traffic type, for example TCP port 80 defines web traffic.
-
Page 96: Sms
16.1 Overview This chapter shows you how to view the text messages. SMS (Short Message Service) allows you to send and view the text messages that the LTE2566-M634 received from mobile devices or the service provider. 16.1.1 What You Can Do in this Chapter •... -
Page 97: New Sms
Figure 69 Configuration > Application > SMS > SMS Summary 16.3 New SMS Use this screen to send messages using the LTE2566-M634. To access this screen, click Configuration > Application > SMS > New SMS. Type a phone number in the Receivers field and enter the message content in Message. You can type up to 160 characters in one message. -
Page 98: Sms Inbox List
Click Delete to remove the message record. 16.5 SMS Draft Box Use this screen to view messages not yet sent from the LTE2566-M634. To access this screen, click Configuration > Application > SMS > SMS Draft Box. Note: Click the SMS Draft Box tab to view the Inbox messages stored in the LTE2566-M634. You can store an approximate total of 500 messages, which includes Inbox, Outbox, and Draft box altogether. -
Page 99: Sms Outbox List
Click Delete to remove the message record. 16.6 SMS Outbox List Use this screen to view messages sent from the LTE2566-M634. To access this screen, click Configuration > Application > SMS > SMS Outbox List. Note: Click the SMS Outbox List tab to view the Inbox messages stored in the LTE2566-M634. -
Page 100: The Ussd Screen
Use this screen to enter an Unstructured Supplementary Service Data (USSD) code. You can enter up to 182 alphanumeric characters in an USSD message. The LTE2566-M634 sends this code to request different services or features to the Internet service provider. Click Configuration > Application > USSD. -
Page 101: Phonebook
Phonebook users. You cannot send SMS messages to Phonebook groups at the time of writing. 16.8.1 The Phonebook Screen Use this screen to manage your phonebook on the LTE2566-M634. To access this screen, click Configuration > Application > Phonebook > Phonebook. Figure 74 Configuration > Application > Phonebook > Phonebook The following table describes the labels in this screen. -
Page 102: The Groups Screen
This field displays the number of the contacts in this group. Click Add to add a new group to the phonebook. Delete Select a group by selecting the check box of a row and then click Delete to remove it. LTE2566-M634 User’s Guide... -
Page 103: Mgmt Interface
This chapter explains how to configure the LTE2566-M634 remote management. Remote Management allows you to manage your LTE2566-M634 from a remote location. 17.2 What You Can Do • Use the Local MGMT screen to configure settings for HTTP or HTTPS access to the LTE2566-M634 (Section 17.4 on page 103). -
Page 104: Remote Mgmt
Click Apply to save your changes back to the LTE2566-M634. 17.5 Remote MGMT Use this screen to configure through which IP address the LTE2566-M634 can be accessed. Click Configuration > Management > MGMT Interface > Remote MGMT to open the following screen. - Page 105 This is the IP Address identifying the computer that can access the LTE2566-M634 using HTTP service. Trusted Client IP Netmask This is the subnet mask of the computer that can access the LTE2566-M634 using HTTP service. Apply Click Apply to save your changes back to the LTE2566-M634.
-
Page 106: Universal Plug-And-Play (Upnp)
18.2.2 Cautions With UPnP The automated nature of NAT traversal applications in establishing their own services and opening firewall may present network security issues. Network information and configuration may also be obtained and modified by users in some network environments. LTE2566-M634 User’s Guide... -
Page 107: Upnp Settings
This section shows you how to use the UPnP feature in Windows 7. UPnP server is installed in Windows 7. Activate UPnP on the LTE2566-M634 by clicking Configuration > Management > UPnP. Make sure the computer is connected to the LTE2566-M634. Turn on your computer and the LTE2566- M634. - Page 108 Select Turn on network discovery and click Save Changes. Network discovery allows your computer to find other computers and devices on the network and other computers on the network to find your computer. This makes it easier to share files and printers. LTE2566-M634 User’s Guide...
-
Page 109: Auto-Discover Your Upnp-Enabled Network Device
Chapter 18 Universal Plug-and-Play (UPnP) 18.4.1 Auto-discover Your UPnP-enabled Network Device Before you follow these steps, make sure you already have UPnP activated on the LTE2566-M634 and in your computer. Make sure your computer is connected to the LTE2566-M634. Open Windows Explorer and click Network. - Page 110 In the Internet Connection Properties window, click Settings to see port mappings. Figure 80 Internet Connection Properties You may edit or delete the port mappings or click Add to manually add port mappings. Figure 81 Internet Connection Properties: Advanced Settings LTE2566-M634 User’s Guide...
-
Page 111: Turn On Upnp In Windows 10 Example
This section shows you how to use the UPnP feature in Windows 10. UPnP server is installed in Windows 10. Activate UPnP on the LTE2566-M634 by clicking Network Setting > Home Networking > UPnP. Make sure the computer is connected to the LTE2566-M634. Turn on your computer and the LTE2566- M634. - Page 112 Chapter 18 Universal Plug-and-Play (UPnP) Click the start icon, Settings and then Network & Internet. Click Network and Sharing Center. Click Change advanced sharing settings. LTE2566-M634 User’s Guide...
-
Page 113: Auto-Discover Your Upnp-Enabled Network Device
This makes it easier to share files and printers. 18.5.1 Auto-discover Your UPnP-enabled Network Device Before you follow these steps, make sure you already have UPnP activated on the LTE2566-M634 and in your computer. LTE2566-M634 User’s Guide... - Page 114 Chapter 18 Universal Plug-and-Play (UPnP) Make sure your computer is connected to the LTE2566-M634. Open File Explorer and click Network. Right-click the LTE2566-M634 icon and select Properties. Figure 85 Network Connections In the Internet Connection Properties window, click Settings to see port mappings.
- Page 115 Figure 89 System Tray Icon To see more details about your current Internet connection status, right click the network icon in the system tray and click Open Network & Internet settings. Click Network and Sharing Center and click the Connections. LTE2566-M634 User’s Guide...
-
Page 116: Web Configurator Easy Access In Windows 7
18.6 Web Configurator Easy Access in Windows 7 With UPnP, you can access the Web-based Configurator on the LTE2566-M634 without needing to find out the IP address of the LTE2566-M634 first. This comes helpful if you do not know the IP address of the LTE2566-M634. - Page 117 Right-click the icon for your LTE2566-M634 and select View device webpage. The Web Configurator login screen displays. Figure 92 Network Connections: My Network Places Right-click the icon for your LTE2566-M634 and select Properties. Click the Network Device tab. A window displays with information about the LTE2566-M634. LTE2566-M634 User’s Guide...
-
Page 118: Web Configurator Easy Access In Windows 10
Chapter 18 Universal Plug-and-Play (UPnP) Figure 93 Network Connections: My Network Places: Properties: Example 18.7 Web Configurator Easy Access in Windows 10 Follow the steps below to access the Web Configurator. Open File Explorer. Click Network. LTE2566-M634 User’s Guide... - Page 119 Right-click the icon for your LTE2566-M634 and select View device webpage. The Web Configurator login screen displays. Figure 95 Network Connections: Network Infrastructure Right-click the icon for your LTE2566-M634 and select Properties. Click the Network Device tab. A window displays information about the LTE2566-M634. LTE2566-M634 User’s Guide...
- Page 120 Chapter 18 Universal Plug-and-Play (UPnP) Figure 96 Network Connections: Network Infrastructure: Properties: Example LTE2566-M634 User’s Guide...
-
Page 121: Chapter 19 Tr-069
An administrator can use an ACS to remotely set up the LTE2566-M634, modify settings, perform firmware upgrades as well as monitor and diagnose the LTE2566-M634. You have to enable the device to be managed by the ACS and specify the ACS IP address or domain name and username and password. - Page 122 Enter the port number for TR-069 connection requests. Port Connection Request Enter the connection request user name. Username When the ACS makes a connection request to the LTE2566-M634, this user name is used to authenticate the ACS. Connection Request Enter the connection request password. Password When the ACS makes a connection request to the LTE2566-M634, this password is used to authenticate the ACS.
-
Page 123: Maintenance
• Use the User Account screen to change the LTE2566-M634’s system password (Section 20.3 on page 124). • Use the Time screen to change the LTE2566-M634’s time and date and configure daylight saving time (Section 20.4 on page 125). • Use the Power Saving screen to enable the power saving settings in the LTE2566-M634 (Section 20.5 on... -
Page 124: The User Account Screen
Click this button to save your changes back to the LTE2566-M634. 20.3 The User Account Screen This screen allows you to change the LTE2566-M634’s system password. It is strongly recommended that you change your LTE2566-M634's system password. To access this screen, click Maintenance > User Account . -
Page 125: The Time Screen
M634 has a software mechanism to get the current time and date from an external server. To change your LTE2566-M634’s time zone, click Maintenance > Time. The screen displays as shown. You can have the LTE2566-M634 get the date and time from a time server or change the IP address or URL of your time server. - Page 126 Time Zone and Daylight Saving at the same time, the new time and date you entered has priority and the Time Zone and Daylight Saving settings do not affect it. Get from Time Select this radio button to have the LTE2566-M634 get the time and date from the time server Server you specified below.
-
Page 127: The Power Saving Screen
Select the number of minutes after which the LTE2566-M634 activates power saving and enters sleep mode. In Power Saving the LTE2566-M634 turns off its wireless connections to save battery power when the USB port is not connected, and there are no wireless clients associating with the LTE2566-M634. -
Page 128: The Lcd Display Screen
Figure 101 Maintenance > Power Saving > Power Saving 20.6 The LCD Display Screen Use this screen to configure the length of inactive time before the LTE2566-M634 automatically turns off the LCD display. To access this screen, click Maintenance > Power Saving > LCD Display. -
Page 129: The Firmware Upgrade Screen
To access this screen, click Maintenance > Firmware Upgrade. This screen displays the current firmware version and status of the LTE2566-M634. Click Browse to find the location of the file. Remember that you must decompress compressed (.ZIP) files before you can upload them. Click Upload to begin the upload process. - Page 130 Click Apply to save your changes back to the LTE2566-M634. Note: If you uploaded the default configuration file you may need to change the IP address of your computer to be in the same subnet as that of the default LTE2566-M634 IP address (192.168.1.1).
-
Page 131: The Reboot Screen
LTE2566-M634. System restart allows you to reboot the LTE2566-M634 without turning the power off. Click Reboot to reboot the LTE2566-M634. Wait a few minutes until the login screen appears. If the login screen does not appear, type the IP address of the LTE2566-M634 in your Web browser. -
Page 132: Troubleshooting
If you changed the IP address and have forgotten it, you have to reset the device to its factory defaults. To reset your LTE2566-M634 press the power button and release it when the LCD screen displays Reset. I cannot see or access the Login screen in the Web Configurator. - Page 133 The default user name is admin. The default password is 1234. If this does not work, you have to reset the device to its factory defaults. To reset your LTE2566-M634 press the Reset button and release it when the LCD screen displays Reset.
-
Page 134: Internet Access
I cannot access the Internet through a 3G/4G wireless WAN connection. Make sure you insert a 4G SIM card into the card slot before turning on the LTE2566-M634. If your SIM card has a PIN code, connect to the Web Configurator (http://192.168.1.1) using the user name (Default: admin) and password (Default: 1234) to unlock your SIM card. -
Page 135: Ip Address Setup
Reboot the LTE2566-M634. The Internet connection is slow or intermittent. There might be a lot of traffic on the network. If the LTE2566-M634 is sending or receiving a lot of information, try closing some programs that use the Internet, especially peer-to-peer applications. - Page 136 Chapter 21 Troubleshooting Click Change adapter settings. Right-click the Ethernet icon, and then select Properties LTE2566-M634 User’s Guide...
- Page 137 Click Internet Protocol Version 4 (TCP/IPv4) and then click Properties. Select Use the following IP address and enter an IP address from 192.168.1.2 to 192.168.1.254. The Subnet mask will be entered automatically. Click OK when you are done and close all windows. LTE2566-M634 User’s Guide...
-
Page 138: Wifi Connections
Make sure your device (with a WiFi adapter installed) is within the transmission range of the LTE2566- M634. Make sure you are using the correct WiFi network name and password to connect to your LTE2566-M634. Check your WiFi network settings by reexamining the network name Name (SSID) and/or Preshared Key in the Web Configurator (Section 8.2 on page... - Page 139 • Brief description of the problem and the steps you took to solve it. Corporate Headquarters (Worldwide) Taiwan • Zyxel Communications Corporation • http://www.zyxel.com Asia China • Zyxel Communications (Shanghai) Corp. Zyxel Communications (Beijing) Corp. Zyxel Communications (Tianjin) Corp. • https://www.zyxel.com/cn/zh/ India • Zyxel Technology India Pvt Ltd • https://www.zyxel.com/in/en/ Kazakhstan •...
- Page 140 • Zyxel Singapore Pte Ltd. • http://www.zyxel.com.sg Taiwan • Zyxel Communications Corporation • https://www.zyxel.com/tw/zh/ Thailand • Zyxel Thailand Co., Ltd • https://www.zyxel.com/th/th/ Vietnam • Zyxel Communications Corporation-Vietnam Office • https://www.zyxel.com/vn/vi Europe Belarus • Zyxel BY • https://www.zyxel.by Belgium • Zyxel Communications B.V. • https://www.zyxel.com/be/nl/...
- Page 141 Appendix A Customer Support • https://www.zyxel.com/be/fr/ Bulgaria • Zyxel България • https://www.zyxel.com/bg/bg/ Czech Republic • Zyxel Communications Czech s.r.o • https://www.zyxel.com/cz/cs/ Denmark • Zyxel Communications A/S • https://www.zyxel.com/dk/da/ Estonia • Zyxel Estonia • https://www.zyxel.com/ee/et/ Finland • Zyxel Communications • https://www.zyxel.com/fi/fi/ France •...
- Page 142 • Zyxel Communications Poland • https://www.zyxel.com/pl/pl/ Romania • Zyxel Romania • https://www.zyxel.com/ro/ro Russia • Zyxel Russia • https://www.zyxel.com/ru/ru/ Slovakia • Zyxel Communications Czech s.r.o. organizacna zlozka • https://www.zyxel.com/sk/sk/ Spain • Zyxel Communications ES Ltd • https://www.zyxel.com/es/es/ Sweden • Zyxel Communications • https://www.zyxel.com/se/sv/ Switzerland •...
- Page 143 Appendix A Customer Support Turkey • Zyxel Turkey A.S. • https://www.zyxel.com/tr/tr/ • Zyxel Communications UK Ltd. • https://www.zyxel.com/uk/en/ Ukraine • Zyxel Ukraine • http://www.ua.zyxel.com South America Argentina • Zyxel Communications Corporation • https://www.zyxel.com/co/es/ Brazil • Zyxel Communications Brasil Ltda. • https://www.zyxel.com/br/pt/ Colombia •...
- Page 144 Appendix A Customer Support Middle East • Zyxel Communications Corporation • https://www.zyxel.com/me/en/ North America • Zyxel Communications, Inc. - North America Headquarters • https://www.zyxel.com/us/en/ Oceania Australia • Zyxel Communications Corporation • https://www.zyxel.com/au/en/ Africa South Africa • Nology (Pty) Ltd. • https://www.zyxel.com/za/en/...
- Page 145 The contents of this publication may not be reproduced in any part or as a whole, transcribed, stored in a retrieval system, translated into any language, or transmitted in any form or by any means, electronic, mechanical, magnetic, optical, chemical, photocopying, manual, or otherwise, without the prior written permission of Zyxel Communications Corporation. Published by Zyxel Communications Corporation. All rights reserved.
- Page 146 The band 2,400 to 2,438.5 MHz is 59.98 mW The band 5,150 to 5,350 MHz is 55.21 mW The band 5,470 to 5,725 MHz is 60.39 mW • WCDMA The WCDMA Band I is 316.23 mW The WCDMA Band VIII: 235.5 mW LTE2566-M634 User’s Guide...
- Page 147 Alulírott, Zyxel nyilatkozom, hogy a berendezés megfelel a vonatkozó alapvetõ követelményeknek és az 2014/53/EU (Hungarian) irányelv egyéb elõírásainak. Malti (Maltese) Hawnhekk, Zyxel, jiddikjara li dan tagħmir jikkonforma mal-ħtiġijiet essenzjali u ma provvedimenti oħrajn relevanti li hemm fid-Dirrettiva 2014/53/UE. LTE2566-M634 User’s Guide...
- Page 148 Make sure to connect the cables to the correct ports. • Place connecting cables carefully so that no one will step on them or stumble over them. • Always disconnect all cables from this device before servicing or disassembling. LTE2566-M634 User’s Guide...
- Page 149 Symbolen innebär att enligt lokal lagstiftning ska produkten och/eller dess batteri kastas separat från hushållsavfallet. När den här produkten når slutet av sin livslängd ska du ta den till en återvinningsstation. Vid tiden för kasseringen bidrar du till en bättre miljö och mänsklig hälsa genom att göra dig av med den på ett återvinningsställe. 台灣 以下訊息僅適用於產品具有無線功能且銷售至台灣地區 LTE2566-M634 User’s Guide...
- Page 150 A wiring terminal intended for connection of a Protective Earthing Conductor. Class II equipment: The method of protection against electric shock in the case of class II equipment is either double insulation or reinforced insulation. Viewing Certifications Go to http://www.zyxel.com to view this product’s documentation and certifications. LTE2566-M634 User’s Guide...
- Page 151 You can download the latest firmware at www.zyxel.com. If you cannot find it there, contact your vendor or Zyxel Technical Support at support@zyxel.com.tw. To obtain the source code covered under those Licenses, please contact your vendor or Zyxel Technical Support at support@zyxel.com. LTE2566-M634 User’s Guide...
Need help?
Do you have a question about the LTE2566-M634 and is the answer not in the manual?
Questions and answers