Advertisement
Table of Contents
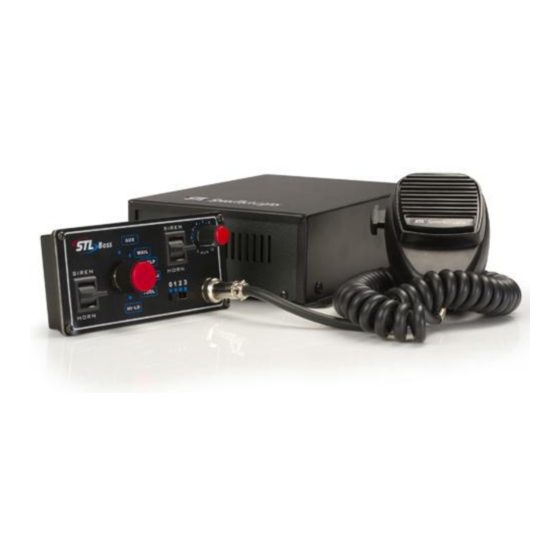
STL Boss
SUMMARY:
Powered by 12V
Clear sound frequency
Control Unit Dim: 5"L x 3" W x 1" H
Amplifier output power of 300-Watts
Speakers not included in original set
Optional Flat brackets included for mounting unit
Microphone and cable included with siren
Optional Speaker Dim: 8" L x 7" W x 5" H
Allows for independent siren tones for each speaker
INSTALLATION INSTRUCTIONS:
1. The Boss siren system comes with all cabling needed for installation
2. This system will include a telephone cable (one long and straight and one curly); these
will connect with an adapter, also included.
3. It will also include (2) long red cables and (2) long black cables for power, and a gray
connector with (2) orange, (2) green, (1) gray, and (1) yellow wires.
4. Connect the phone cable to the plug in on the power supply labeled "Signal Socket".
5. Then connect the Gray connector into the power supply to the right of the phone cable.
6. From the gray connector, you will wire the (2) orange wires to one speaker, and the (2)
green wires to your second speaker. (The yellow and gray wires are for international use).
7. You will then connect the power cables, (2) red and (2) black, to the power supply. Each
cable includes a connector at one end for you to screw to the power supply.
8. Connect the (2) black cables to the (2) negative slots on the power pack and the (2) red
cables to the (2) positive slots.
9. Once you have connected all the wires correctly, wire up your (2) red power cables to the
positive on your battery and your (2) black cables to the negative on your battery.
10. This will allow you to give power to the whole system.
Advertisement
Table of Contents

Subscribe to Our Youtube Channel
Related Manuals for SpeedTech Lights STL Boss


Summary of Contents for SpeedTech Lights STL Boss
- Page 1 STL Boss SUMMARY: Powered by 12V Clear sound frequency Control Unit Dim: 5”L x 3” W x 1” H Amplifier output power of 300-Watts Speakers not included in original set Optional Flat brackets included for mounting unit ...
- Page 2 11. Connect the other end of the phone cable to your face place labeled “STL Boss” and connect your microphone to your face plate. 12. Turn the unit on and power its functions using the faceplate. 13. If you order a console bracket, insert the faceplate into the bracket and screw the...
Need help?
Do you have a question about the STL Boss and is the answer not in the manual?
Questions and answers