Advertisement
Quick Links
Advertisement

Subscribe to Our Youtube Channel
Related Manuals for Amari Acoustics LP-16s


Summary of Contents for Amari Acoustics LP-16s
- Page 1 LP-16s Manual AMARI Audio equipment co.,LTD www.amari.cc Email:amari@vip.163.com...
-
Page 2: Packing List
Preface Thank you very much for purchasing Armani vinyl record player products. Please read this manual carefully before use. Save all packaging materials. The player can only be moved or transported using the original packing. Not using the original packing with increased risk of damage during transportation. Do not open the motor cover. - Page 3 LP-16s Record Player Additional tonearm counterweight suitable for cartridge heavier than 6 grams.
-
Page 4: Installation Procedure
LP-16s Record Player Installation Procedure 1. Place the turntable base on a horizontal table or platform, use a level ruler to check and adjust the turntable feet such that the base is level. After adjusting, lock it with a nut to maintain the level. - Page 5 LP-16s Record Player 3. Put the belt on the motor wheel and aluminum inner platter. 4. Put the aluminum alloy outer platter on top of the inner platter and ensure the hole of the outer platter is align with the shaft.
- Page 6 LP-16s Record Player 5. Attach the tonearm counterweight to the rear axle end of the phono arm, and adjust the height of the end of the tonearm by turning the VTA adjustment screw, so the tonearm is parallel to the surface of the record. Lock the tonearm in place...
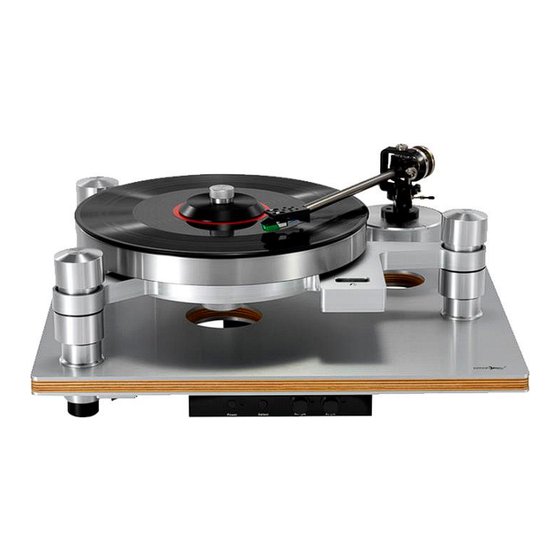
- Page 7 LP-16s Record Player Components 1. Counterweight – for tracking force adjustment 2. VTA adjustment screw 3. Anti-skate adjustment screw 4. Cartridge 5. Real time speed monitoring 6. Real time speed monitoring switch 7. On/Off switch (beneath the plinth) 8. Phono amplifier (beneath the plinth) 9.
- Page 8 LP-16s Record Player 1. Motor start/stop switch 2. Switch between 33/45 rpm 3. Fine adjustment of 33rpm 4. Fine adjustment of 45rpm 1. Phono amplifier power input (DC24V*) 2. Phono amplifier output 3. MM/MC switch 4. Phono amplifier input 5. Phono amplifier ground...
- Page 9 LP-16s Record Player Adjust levelling of upper plinth...
- Page 10 LP-16s Record Player Adjustment and playback 1. Connect the turntable motor power supply (DC24V) and the phono amplifier power supply (DC24V or AC18V). Connect the audio output of the tonearm to the input of the phono amplifier. The pickup selector switch to the MM type (for standard AT-95E cartridge), and the output of the phono amplifier to the inputs of pre-amplifier or integrated amplifier.
- Page 11 LP-16s Record Player About LP-16s The plinth (1) 24mm thick aluminum/wood sandwich based plinth which has good vibration absorption. (2) The bearing, motor, tonearm all fixed on 24mm thick aluminum plinth, which is suspended by 3 springs. Magnetic levitated bearing system (1) Use the Neodymium Iron Boron magnet to float the bearing shaft.
- Page 12 Feet (1) Three feet design for full adjustability and leveling capability. (2) The POM feet have excellent shock absorption. MM/MC Phono Amplifier Switchable MM and MC phono amplifier. Tonearm and Cartridge Single point 9 inches tonearm and Audio Technica original AT-95E MM cartridge fitted as standard Accessories (1) Additional tonearm counterweight (2) Record strobe disc...
Need help?
Do you have a question about the LP-16s and is the answer not in the manual?
Questions and answers