Advertisement
Quick Links
Advertisement

Related Manuals for Free The Tone FT-2Y/FLIGHT TIME


Summary of Contents for Free The Tone FT-2Y/FLIGHT TIME
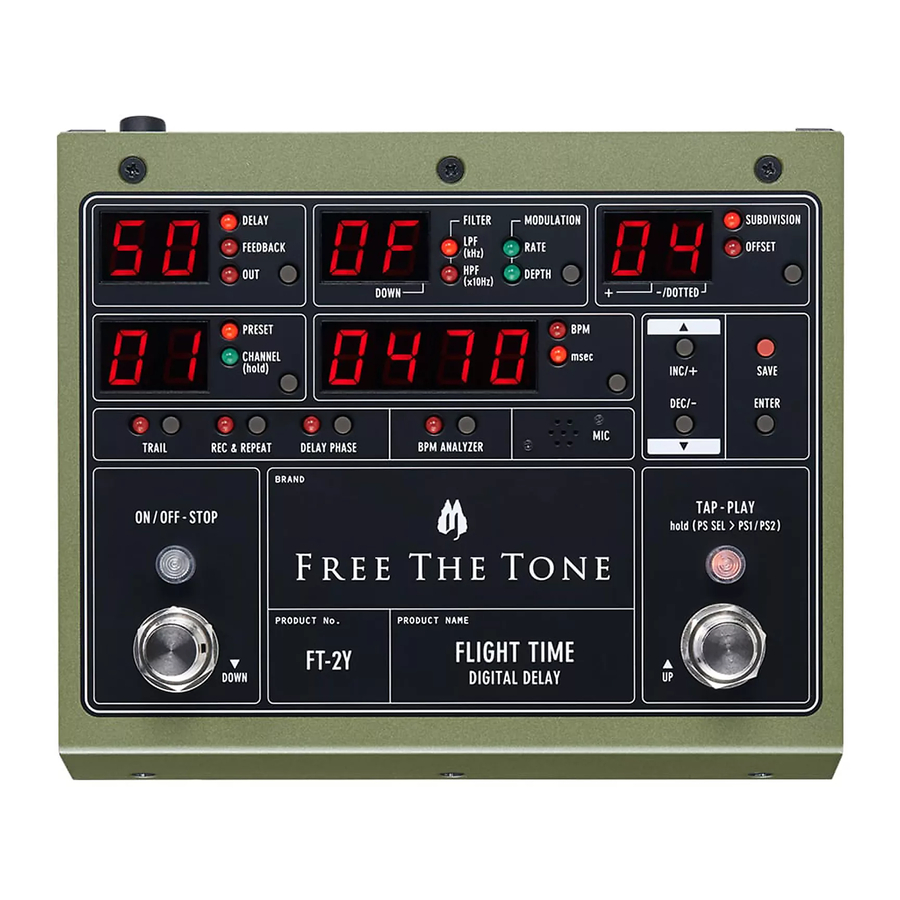
- Page 1 FT-2Y/FLIGHT TIME DIGITAL DELAY Preset Data Dump & Load Procedures (applicable to FT-2Y only)
- Page 2 Do not connect the FLIGHT TIME unit to the MIDI interface at this step. For setting up information of the MIDI interface, please refer to its manual. (NOTE: As we use a YAMAHA USB-MIDI interface UX16 for operation evaluations at Free The Tone, we recommend to use this model.) 2.
-
Page 3: For Macintosh
For Macintosh Preparation of MIDI software 1 ) Download the freeware “SysEx Librarian” from http://snoize.com/SysExLibrarian/ and save it in a folder. 2 ) Unzip the downloaded file and install the software. 3 ) Start the SysEx Librarian.The following screen appears. 4 ) Setting up the SysEx Librarian: From the pulldown menu in the main window, select the MIDI interface to be used. - Page 4 The interface list will not be shown if no MIDI interface is connected or the MIDI interface driver is not installed correctly. If the list is not shown, confirm whether the MIDI interface is connected correctly and the driver has been installed. The following screen appears when you select the interface to be used.
- Page 5 2 ) Click “Record Many” displayed in the SysEx Librarian screen. 3 ) Click “Record Many.” The following screen appears.
- Page 6 4 ) While holding down both the [PRESET/CHANNEL(hold)] and [BPM/msec] switches on the FLIGHT TIME, turn on the power to it. 5 ) The [BPM/msec] display shows the firmware version and flashes “SEND.” 6 ) Press the [ENTER] switch. 7 ) The [BPM/msec] display starts counting up from “0000” to “0099.” The SysEx Librarian also shows counting up. When the countup in the SysEx Librarian completes and the following screen appears, click “Done.”...
- Page 7 9 ) Select the received preset data. Select “Save As Sysex(.syx)” from the “File” menu of the SysEx Librarian to save the received preset. 10 ) Enter a name, select the storage location, and click “Save” to complete.
- Page 8 Loading the saved preset data to the FLIGHT TIME unit 1 ) Connect the MIDI interface’s “MIDI OUT” terminal to the FLIGHT TIME’s [MIDI IN] terminal. MIDI OUT/THRU POWER HOLD MIDI IN DC12V IN (REC) KILL DRY OFF ON 2 ) While holding down both the [PRESET/CHANNEL(hold)] and [BPM/msec] switches on the FLIGHT TIME, turn on the power to it.
- Page 9 7 ) Select the preset data to be written into the FLIGHT TIME and click “Open.” After selecting the file, the following message is displayed. Click “OK.”...
- Page 10 8 ) Select the preset data shown in the SysEx File list and click “Play” near the upper left corner of the screen. 9 ) The preset data is sent from the SysEx Librarian. The connected FLIGHT TIME unit’s [BPM/msec] display counts up from “0000”...
-
Page 11: For Windows Pc
For Windows PC Preparation of MIDI software 1 ) From http://www.bome.com/products/sendsx, download the shareware “SendSx” which can be used for free for a limited period of time and save it in a folder. 2 ) Unzip the downloaded file and install the software. 3 ) Start the SendSx application. - Page 12 The following screen appears when you select the interface to be used. => Sending and saving the preset data from the FLIGHT TIME unit to your computer: refer to page 12. => Loading the saved preset data to the FLIGHT TIME unit: refer to page 15. Sending and saving the preset data from the FLIGHT TIME unit to your computer 1 ) Connect the MIDI interface’s “MIDI IN”...
- Page 13 5 ) The [BPM/msec] display starts counting up from “0000” to “0099.” The “MIDI IN” field in SendSx counts up. NOTE: If the SendSx application opens upon receiving a preset and the MIDI interface is correctly selected, then you do not have to operate SendSx.
- Page 14 7 ) Select “Save MIDI In As...” from the “File” menu. 8 ) Enter a filename. Select the storage location and click “Save” to complete.
- Page 15 Loading the saved preset data to the FLIGHT TIME unit 1 ) Connect the MIDI interface’s “MIDI OUT” terminal to the FLIGHT TIME’s [MIDI IN] terminal. MIDI OUT/THRU POWER HOLD MIDI IN DC12V IN (REC) KILL DRY OFF ON 2 ) While holding down both the [PRESET/CHANNEL(hold)] and [BPM/msec] switches on the FLIGHT TIME, turn on the power to it.
- Page 16 7 ) From the folder, select the preset data to be written to the FLIGHT TIME and click “Open.” 8 ) The “MIDI Out” field indicates character strings. Click “Send.” 9 ) The preset data is sent from SendSX. The connected FLIGHT TIME unit’s [BPM/msec] display counts up from “0000” to “0099.”...
Need help?
Do you have a question about the FT-2Y/FLIGHT TIME and is the answer not in the manual?
Questions and answers