Advertisement
Available languages
Available languages
Quick Links
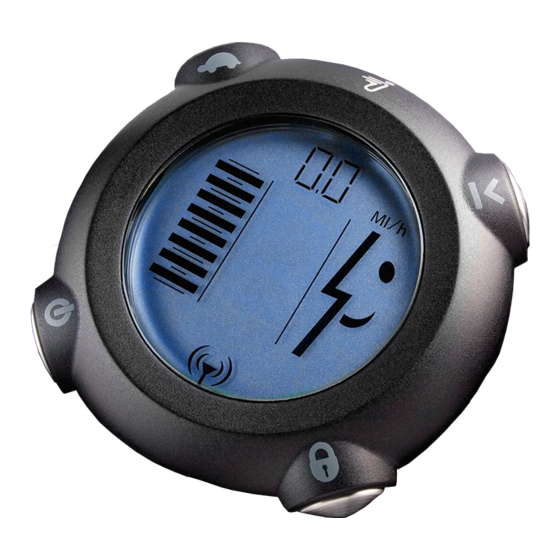
InfoKey™ Controller
Adapters, Dock & Battery
20946-00001
Dispositif de commande InfoKey™ Adaptateurs, socle et batterie •
Adattatori controller InfoKey™, vano di aggancio e batteria •
InfoKey™ Adapter, Sockel und Batterie • Adaptadores, zócalo
de acoplamiento y batería del disco informativo InfoKey™ •
InfoKey™ コントローラ アダプタ、 ドック&バッテリー •
InfoKey™ 控制器接头、底座和电池
Advertisement

Summary of Contents for Segway InfoKey
- Page 1 InfoKey™ Controller Adapters, Dock & Battery 20946-00001 Dispositif de commande InfoKey™ Adaptateurs, socle et batterie • Adattatori controller InfoKey™, vano di aggancio e batteria • InfoKey™ Adapter, Sockel und Batterie • Adaptadores, zócalo de acoplamiento y batería del disco informativo InfoKey™ •...
- Page 2 Italiano 1. Make sure the Segway PT is unplugged and powered off. Deutsch 2. Using a 3mm hex wrench, remove the fastener which holds the InfoKey Español Controller Dock to the LeanSteer™ Frame and remove the InfoKey Controller Dock. See Figure 1.
- Page 3 InfoKey Controller” section of this document. To remove the InfoKey Controller Adapter Ring, twist the ring from the underside 2. Using a coin or a fl athead screwdriver, unscrew the back cover of the InfoKey of the InfoKey Controller.
- Page 4 InfoKey monté sur le cadre LeanSteer™ et retirez le socle du dispositif de commande InfoKey. Référez-vous à la fi gure 1. 3. Pour installer le socle du dispositif de commande InfoKey, placez le socle contre la partie supérieure du cadre LeanSteer en orientant la languette de retenue vers le bas.
- Page 5 InfoKey. 2. À l’aide d’une pièce de monnaie ou d’un tournevis plat, dévissez le panneau arrière du dispositif de commande InfoKey et retirez la batterie. Référez-vous à la fi gure 4. Installation et retrait du dispositif de commande InfoKey 3.
- Page 6 Rimozione e installazione del vano di aggancio per controller InfoKey 1. Verifi care che il Segway PT sia spento e scollegato dalla presa di alimentazione. 2. Con una chiave a brugola esagonale da 3 mm, togliere la vite che fi ssa il vano al montante LeanSteer™...
- Page 7 InfoKey. 3. Per sganciare il controller InfoKey, premere la linguetta di sgancio sulla base del vano per controller InfoKey. 4. Estrarre il controller InfoKey dal vano con il display rivolto verso l’alto. Vedere la Figura 3. CR2430 Figura 2.
- Page 8 InfoKey-Sockel am LeanSteer™ Rahmen befestigt ist, und entfernen Sie den InfoKey-Sockel. Siehe Abbildung 1. 3. Einbau des InfoKey-Sockels: Setzen Sie den Sockel (mit der Arretierung nach unten) auf den oberen Teil des LeanSteer-Rahmens. Siehe Abbildung 1. 4. Drehen Sie die 16 mm lange Schraube (in diesem Kit enthalten) durch das Loch oben im InfoKey-Sockel in den oberen LeanSteer-Rahmen.
- Page 9 Siehe dazu den Abschnitt „Aus- und Einbau des InfoKey-Sockels“ dieses Dokuments. 4. Setzen Sie die InfoKey-Batterie mit der positiven Seite (+) nach oben ein. 5. Befestigen Sie die rückseitige Abdeckung des InfoKey wieder mit einer Münze 2. Schieben Sie den InfoKey von unten nach oben in den InfoKey-Sockel ein.
- Page 10 InfoKey y en la parte superior de la barra de dirección LeanSteer. 5. Con una llave hexagonal de 3 mm, apriete las tuercas aplicando 2,0 N-m (18,0 pies-lbf).
- Page 11 En las tiendas de artículos electrónicos se venden baterías CR2430 de repuesto. zócalo de acoplamiento del disco esté instalado. Consulte la sección “Cómo 4. Inserte la batería del disco informativo InfoKey con el lado positivo (+) a la vista. desmontar e instalar el zócalo de acoplamiento del disco informativo InfoKey”...
- Page 12 指示に従って、 大怪我や死亡に至ったり、 セグウェイ PT に損傷を与えて使用が危険にな シャッ トダウン 電源プラグを します。 外します。 るような状態を防止してください。 GARANTÍA LIMITADA Este producto es una “pieza de repuesto” cubierto por la Garantía limitada InfoKey コントローラドックを設置し、乗る前に InfoKey コントローラをドッ para transportadores personales Segway (se incluye un ejemplar de la misma クに取り付けます。 乗っている間は常に前方に注意を払います。 en este kit).
- Page 13 図 1. InfoKey コントローラドックの取り外しと取り付け 図 3. InfoKey コントローラのアンドック InfoKey コントローラバッテリーの交換または再取り付 け アダプタリングの取り付けと取り外し 1. InfoKey コントローラをドックから取り外し、InfoKey コントローラドックア InfoKey コントローラ アダプタリングを取り付けるには、 InfoKey コントローラ ダプタのねじを外します。詳細は、本書の「InfoKey コントローラのドックと の下側のリングを締めます。 アンドック」節を参照してください。 InfoKey コントローラアダプタリングを取り外すには、InfoKey コントローラ 2. 硬貨またはマイナスドライバを使い、InfoKey コントローラの裏カバーの の下側のリングを回転させます。 ねじを外し、InfoKey コントローラバッテリーを外します。 図 4 を参照してく ださい。 3. バッテリーを交換する場合は、新しいバッテリーが CR2430 型であること InfoKey コントローラのドックとアンドック を確かめます。交換用の CR2430 は電気店でお求めいただけます。 1. InfoKey コントローラをドックさせるには、InfoKey コントローラドックアダ 4. InfoKey コントローラバッテリーをプラス (+) 側が見えるようにして挿入し プタが取り付けられていることを確認します。本書の「 InfoKey コントロー ます。 ラドックの取り付けと取り外し 」節を参照してください。 5. 硬貨またはマイナスドライバを使って、InfoKey コントローラの裏カバー 2. InfoKey コントローラを InfoKey コントローラドックに差し込みます。 を取り付けます。InfoKey コントローラの裏側に InfoKey コントローラアダプ 図 2 を参照してください。 タリングをねじ込みます。...
- Page 14 1. 确保 Segway PT 的插头已拔出,电源已关掉。 2. 用 3mm 六角扳手拆下将 InfoKey 控制器底座固定到倾斜操纵架上的紧 固件,并卸下 InfoKey 控制器底座。请参见图 1。 3. 要安装 InfoKey 控制器底座,请将底座放在倾斜操纵架的上部,使释放 压片朝下。请参见图 1。 4. 将 16mm 长的紧固螺钉 (本套件随附) 穿入 InfoKey 控制器底座顶上的孔, 并插入倾斜操纵架上端内。 5. 使用 3mm 六角扳手拧紧到 2.0 牛 - 米(18 英尺 - 磅) 。 警告! 注...
- Page 15 拆卸和安装接头环 1. 从 InfoKey 控制器底座上取下控制器,拧下 InfoKey 控制器底座接头。 要安装 InfoKey 控制器接头环,请将环拧到 InfoKey 控制器的下面。 更多信息请参阅本文档的“放入和取下 InfoKey 控制器”一节。 要拆卸 InfoKey 控制器接头环,请将环从 InfoKey 控制器的下面拧下。 2. 用硬币或平头螺丝刀拧下 InfoKey 控制器后盖, 取出 InfoKey 控制器电池。 请参见图 4。 3. 更换电池时,确认新电池为 CR2430 型。在电子产品商店中可买到 放入和取下 InfoKey 控制器 CR2430 型替换电池。 1. 要放入 InfoKey 控制器,请确保已安装 InfoKey 控制器底座接头。请参阅...
- Page 16 注意 请务必要经常检查所有紧固件的紧固度。 有问题吗? 如有遗失零部件或有任何问题,请与当地的 Segway 授权经销商联系。 要查找离您最近的经销商, 请访问 www.segway.com。 要获取本文档的更新, 也可以访问 www.segway.com。 有限保修 本产品是“Segway Personal Transporter 有限担保” (随本套件提供副本) 所担保的“更换零件” 。...
- Page 17 21158-00002 Rev ab...


Need help?
Do you have a question about the InfoKey and is the answer not in the manual?
Questions and answers