Silvercrest SSOT 6 B2 Operating Instructions Manual
Forehead & ear thermometer
Hide thumbs
Also See for SSOT 6 B2:
- Operating instructions manual (121 pages) ,
- Operating instructions manual (119 pages) ,
- Operating instructions manual (93 pages)
Table of Contents
Advertisement
Available languages
Available languages
Quick Links
Advertisement
Chapters
Table of Contents

Subscribe to Our Youtube Channel
Related Manuals for Silvercrest SSOT 6 B2


Summary of Contents for Silvercrest SSOT 6 B2
- Page 1 STIRN-UND-OHR-THERMOMETER SSOT 6 B2 STIRN-UND-OHR- THERMOMÈTRE FRONTAL THERMOMETER ET AURICULAIRE Bedienungsanleitung Mode d’emploi TERMOMETRO ISTANTA- FOREHEAD & EAR NEO PER LA FEBBRE THERMOMETER Istruzioni per l’uso Operating instructions IAN 106635...
- Page 2 Klappen Sie vor dem Lesen die beiden Seiten mit den Abbildungen aus und machen Sie sich anschließend mit allen Funktionen des Gerätes vertraut. Avant de lire le mode d‘emploi, ouvrez les deux pages conte- nant les illustrations et familiarisez-vous ensuite avec toutes les fonctions de l‘appareil.
- Page 4 SET 12hr SET 24hr (12/24) (12/24) SET hour SET minute SET sleep SET Year SET month SET day disable...
-
Page 5: Table Of Contents
Einleitung Bestimmungsgemäße Verwendung ....Seite Lieferumfang ............Seite Teilebeschreibung ..........Seite Technische Daten ..........Seite Sicherheit Allgemeine Sicherheitshinweise ......Seite 11 Sicherheitshinweise ..........Seite 14 Sicherheitshinweise zu Batterien ....... Seite 14 Vor der Inbetriebnahme Batteriesicherung entfernen ....... Seite 16 Betrieb Datum / Uhrzeit einstellen (Abb. - Page 6 In dieser Bedienungsanleitung / am Gerät werden folgende Piktogramme verwendet: Bedienungsanleitung lesen! Warn- und Sicherheitshinweise beachten! Explosionsgefahr! Gleichstrom (Strom- und Spannungsart) Milliampere Lebens- und Unfallgefahr für Kleinkinder und Kinder! Medizinprodukt Typ BF Fabrikationsjahr und -monat 2015-01 Entsorgen Sie Verpackung und Gerät umweltgerecht! DE/AT/CH...
-
Page 7: Bestimmungsgemäße Verwendung
Stirn-und-Ohr-Thermometer © Einleitung Herzlichen Glückwunsch zum Kauf Ihres neuen Gerätes. Sie haben sich damit für ein hochwer- tiges Produkt entschieden. Die Bedienungsanleitung ist Bestandteil dieses Produkts. Sie enthält wichtige Hinweise für Sicherheit, Gebrauch und Entsorgung. Machen Sie sich vor der ersten Inbetrieb- nahme mit den Funktionen des Gerätes vertraut. -
Page 8: Lieferumfang
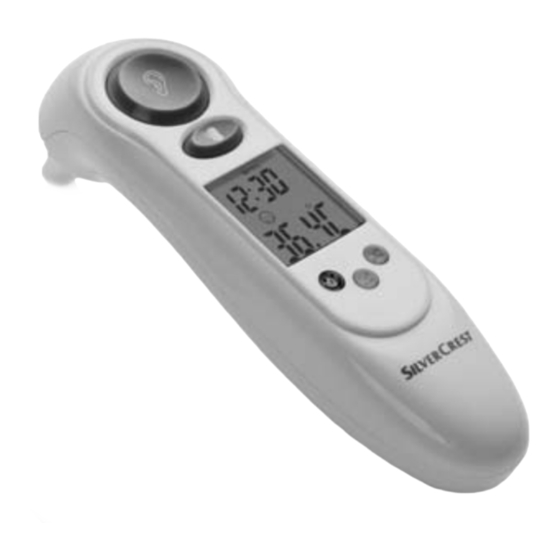
© Lieferumfang 1 x Stirn-und-Ohr-Thermometer (inkl. Batterie und Schutzkappe 1 x Bedienungsanleitung © Teilebeschreibung Messkopf „EAR”-Taste (Temperaturmessung im Ohr / Scan-Modus) „FOREHEAD”-Taste (Temperaturmessung an der Stirn / Schläfe) LC-Display LED rot: Fieber 38,0 °C - 42,9 °C (100,4 °F - 109,2 °F) LED orange: leichte Temperaturerhöhung 37,5 °C - 37,9 °C (99,5 °F - 100,3 °F) LED grün: kein Fieber 34,0 °C - 37,4 °C... -
Page 9: Technische Daten
LC-Display Symbol Batteriewechsel Symbol Anzeige Jahr Symbol Anzeige Datum Symbol Ohren-Modus Symbol Standard-Modus Symbol Scan-Modus Temperaturanzeige Symbol Stirn-Modus Symbol Reinigung Datum und Zeit im Standard-Modus Symbol Sleep-Modus Anzeige PM Symbol Setup-Modus Symbol Memory-Modus © Technische Daten Messverfahren: Infrarot (berührungsfrei) Stromversorgung: Lithium-Batterie 3 V CR2032 Stromverbrauch:... - Page 10 Messbereich Stirn- und Ohren-Modus: 32 °C - 42,9 °C (89,6 °F - 109,2 °F) Messgenauigkeiten: ± 0,2 °C (± 0,4 °F) im Bereich von 35,5 °C - 42,0 °C (95,9 °F - 107,8 °F) ± 0,3 °C (± 0,5 °F) im Bereich von 32,0 °C - 35,4 °C (89,6 °F - 95,8 °F) und im Bereich von 42,1 °C - 42,9 °C (107,9 °F - 109,2 °F)
-
Page 11: Sicherheit
© Sicherheit BEWAHREN SIE ALLE SICHERHEITSHIN- WEISE UND ANWEISUNGEN FÜR DIE ZUKUNFT AUF! Allgemeine Sicherheitshin- weise ½ LEBENS- WARNUNG! UND UNFALLGEFAHR FÜR KLEINKINDER UND KIN- DER! Lassen Sie Kinder niemals unbeaufsichtigt mit dem Verpackungsma- terial. Es besteht Erstickungsgefahr. Kin- der unterschätzen häufi g die Gefahren. Halten Sie Kinder stets vom Produkt fern. - Page 12 an Erfahrung und Wissen benutzt wer- den, wenn sie beaufsichtigt oder bezüg- lich des sicheren Gebrauchs des Gerä- tes unterwiesen wurden und die daraus resultierenden Gefahren verstehen. Kin- der dürfen nicht mit dem Gerät spielen. Reinigung und Benutzer-Wartung dürfen nicht von Kindern ohne Beaufsichtigung durchgeführt werden.
- Page 13 Lassen Sie Reparaturen nur von Fachkräf- ten durchführen. ½ Nehmen Sie das Gerät nicht in Betrieb, wenn es beschädigt ist. Verletzungen und / oder ungenaue Messwerte können die Folge sein. ½ Suchen Sie einen Arzt auf, wenn das Ther- mometer hohe Körpertemperatur-Messwer- te anzeigt! Fieber liegt bei dieser Messme- thode oberhalb von 38,0 °C (100,4 °F) vor.
-
Page 14: Sicherheitshinweise
Sicherheitshinweise ½ Das Gerät ist ausschließlich für den pri- vaten Gebrauch bestimmt. Es unterliegt daher nicht der Eichpfl icht. ½ Verwenden Sie das Gerät nicht weiter, wenn es beschädigt ist oder Ihnen die Messwerte unrealistisch erscheinen. Zie- hen Sie das Kapitel „Funktionen / Fehleranalyse - Behebung von Proble- men“... - Page 15 ½ Reinigen Sie Batterie- und Gerätekontakt vor dem Einlegen falls erforderlich. ½ Batterien gehören nicht in den Haus- müll! ½ Jeder Verbraucher ist gesetzlich ver- pfl ichtet, Batterien ordnungsgemäß zu entsorgen! ½ VORSICHT! EXPLOSIONS- GEFAHR! Halten Sie Batterien von Kindern fern, werfen Sie Bat- terien nicht ins Feuer, schließen Sie Batterien nicht kurz und neh- men Sie sie nicht auseinander.
-
Page 16: Vor Der Inbetriebnahme Batteriesicherung Entfernen
© Vor der Inbetriebnahme © Batteriesicherung entfernen Schieben Sie den Batteriefachdeckel nach unten. Ziehen Sie die Schutzfolie an der Lasche aus dem Batteriefach. Schieben Sie den Batteriefachdeckel wieder auf das Batteriefach, bis er hörbar einrastet (Abb. A). – Beim Einschalten wird ein interner Abgleich und ein Selbsttest des LC-Displays durchgeführt. -
Page 17: Temperaturmessungen
3. Drücken Sie die „FOREHEAD“-Taste . Die Stunden blinken und können mit der „MEM / SET“-Taste korrigiert werden. 4. Drücken Sie die „FOREHEAD“-Taste erneut. Die Minuten blinken und können mit der „MEM / SET“- Taste korrigiert werden. Wiederholen Sie die Schritte 3. und 4., um die Werte für Jahr, Monat und Tag einzustellen bzw. - Page 18 Körpertemperatur messen (Ohren-Modus) WICHTIG! Es wird empfohlen, 3 Messungen hinter- einander am selben Ohr durchzuführen und dabei die höchste Temperatur als Messwert anzunehmen. Die neue Messung kann jeweils gestartet werden, wenn die Anzeige „ “ erlischt. Verwenden Sie das Thermometer nicht, wenn bei der Messung Schmerzen auftreten.
- Page 19 4. Reinigen Sie vorsichtig den Gehörgang des Ohres mit einem Wattestäbchen. 5. Ziehen Sie die Ohrmuschel leicht in Richtung Hinter- kopf schräg nach oben / nach hinten, damit der Gehörgang frei zugänglich wird und sich keine Hin- dernisse zwischen Messfühler und Trommelfell befi...
- Page 20 Hinweis: Das Ausschalten des Gerätes erfolgt automatisch, wenn es länger als 1 Minute nicht betätigt wird. Bei akti- viertem Sleep-Modus schaltet sich das LC-Display aus. Bei deaktiviertem Sleep-Modus schaltet das Gerät in den Standard-Modus. Wenn das Thermometer unter normalen Bedingungen betrieben wurde, wird immer das Ergebnis der jeweils letzten Messung vor dem Ausschalten automatisch gespeichert.
- Page 21 Merken Sie sich, mit welchem Messverfahren Sie die Temperatur gemessen haben und teilen Sie dies auch Ihrem Arzt mit. 1. Falls der Sleep-Modus aktiv ist, aktivieren Sie das Thermometer vor der Messung durch Drücken einer beliebigen Taste. 2. Drücken Sie vorsichtig auf die Schutzkappe entfernen Sie sie ohne Kraftaufwendung mit einer leichten Drehbewegung.
- Page 22 8. Die Anzeige kann sowohl in „°C“ als auch in „°F“ erfolgen (siehe “Funktionen / Fehleranalyse - Temperatureinheit wählen“). 9. Wiederholen Sie Schritt 3. bis 6., um weitere Messungen durchzuführen. Hinweis: Das Ausschalten des Gerätes erfolgt automa- tisch, wenn es länger als 1 Minute nicht betätigt wird. Bei aktiviertem Sleep-Modus schaltet sich das LC-Display aus.
- Page 23 Diese kann sich von seiner Innentemperatur unterschei- den, besonders, wenn die Oberfl äche der Sonnenein- strahlung oder einem Luftzug ausgesetzt ist! Das Thermometer misst bauartbedingt den exakten Wert, wenn sein Gehäuse Raumtemperatur angenommen hat. Behalten Sie es zur Messung deshalb nicht zu lange in der Hand und halten Sie es von direkter Sonnen- strahlung fern! Benutzen Sie das Gerät nicht sofort nach der Reinigung...
- Page 24 5. Halten Sie den Messkopf in einer Entfernung von 1 cm an die Flüssigkeit und / oder Oberfl äche, deren Temperatur Sie messen wollen. 6. Drücken Sie die „EAR“-Taste , um die Messung zu starten. 7. Nun können Sie das Messergebnis auf dem LC-Display ablesen (Abb.
-
Page 25: Funktionen / Fehleranalyse
© Funktionen / Fehleranalyse © Temperatureinheit wählen Drücken und halten Sie gleichzeitig die „EAR“-Taste und die „FOREHEAD“-Taste , bis hinter der Temperaturanzeige „°F“ erscheint. Ein Umschalten von „°F“ in „°C“ ist mit der gleichen Prozedur möglich. © Die Memory-Funktion (Memory-Modus) WICHTIG! Die aktuelle Messung wird stets auf dem letzten Speicher- platz abgelegt. -
Page 26: Batteriewechsel
1. Drücken Sie gleichzeitig die „FOREHEAD“-Taste und die „EAR“-Taste so oft, bis im LC-Display wieder Raumtemperatur, Datum und Uhrzeit, sowie das Symbol angezeigt werden (Abb. D). 2. Sie befi nden sich jetzt wieder im Standard-Modus. © Batteriewechsel Das Gerät ist mit einer Lithium-Batterie (CR2032, 3 V ausgestattet, die sehr viele Messungen ermöglicht. -
Page 27: Behebung Von Problemen
© Behebung von Problemen Falls das Gerät eine Messung nicht im vorgesehenen Bereich durchführen kann, gibt es eine Fehlermeldung aus. Diese Meldung soll zur Problembehebung beitragen. Fehler Problem Beseitigung Gerät reagiert Batterie leer? Neue Batterie einsetzen nicht / setzt sich automatisch Batteriepolarität Batterie entfernen,... - Page 28 Fehler Problem Beseitigung Umgebungstem- Sorgen Sie für Anzeige „ErrE“ peratur außerhalb eine Umge- LC-Display des Bereiches bungstemperatur 15,0 °C - 40,0 °C / im Bereich 59,0 °F - 104,0 °F 15,0 °C - 40,0 °C / (Stirn-Modus) und 59,0 °F - 104,0 °F 10,0 °C - 40,0 °C / (Stirn-Modus) und 50,0 °F - 104,0 °F...
-
Page 29: Reinigung Und Pflege
© Reinigung und Pfl ege Nach einigen Temperaturmessungen erinnert Sie das Gerät daran, den Messfühler zu reinigen. Hierzu erscheint das Symbol Reinigung im LC-Display Signaltöne erklingen. Die Linse in der Öff nung des Messfühlers ist das empfi ndlichste Teil des Gerätes. Seien Sie sehr vorsichtig, wenn eine Reinigung erforderlich wird. -
Page 30: Garantie Und Service
anderenfalls wird eine Fehlermeldung ausgegeben (siehe „Funktionen / Fehleranalyse - Behebung von Problemen“). Ebenso ist zum Messen eine Raumtemperatur von 5,0 °C 59,9 °C (41,0 °F 139,8 °F) einzuhalten. Liegt sie außerhalb dieses Bereiches, erfolgt eine Fehlermel- dung (siehe „Funktionen / Fehleranalyse - Behebung von Problemen“). - Page 31 nicht eingeschränkt. Die Garantiezeit wird durch die Ge- währleistung nicht verlängert. Dies gilt auch für ersetzte und reparierte Teile. Eventuell schon beim Kauf vorhande- ne Schäden und Mängel müssen sofort nach dem Auspa- cken gemeldet werden, spätestens aber zwei Tage nach Kaufdatum.
-
Page 32: Entsorgung
© Entsorgung Die Verpackung besteht aus umweltfreundlichen Materialien, die Sie über die örtlichen Recycling- stellen entsorgen können. Möglichkeiten zur Entsorgung des ausgedienten Produkts erfahren Sie bei Ihrer Gemeinde oder Stadtverwaltung. Das Produkt unterliegt der Richtlinie 2012/19/EU (WEEE). Werfen Sie Ihr Produkt, wenn es aus- gedient hat, im Interesse des Umweltschutzes nicht in den Hausmüll, sondern führen Sie es einer fachgerechten Entsorgung zu. -
Page 33: Konformität
© Konformität In Übereinstimmung mit folgenden Europäischen Richtlinien wurde auf dem Produkt das CE-Zeichen 0197 angebracht: Richtlinie für Medizinprodukte 93/42/EEC, geändert durch die Richtlinie 2007/47/EC. Die dazugehörige Konformitätserklärung ist beim Importeur hinterlegt: KOMPERNASS HANDELS GMBH BURGSTRASSE 21 44867 BOCHUM GERMANY www.kompernass.com DE/AT/CH... - Page 34 Hersteller: Shenzhen Dongdixin Technology Co., Ltd. No. 3 Building XiliBaimang Xusheng Industrial Estate Nanshan, Shenzhen, China 518108 Tel.: +86 755 27 652 316 E-Mail: service@e-caretalk.com EU-Bevollmächtigter: Shanghai International Holding Corp. GmbH (Europe) Eiff estraße 80 20537 Hamburg, Germany Tel.: +49 (0) 40 2513175 Fax: +49 (0) 40 255726 34 DE/AT/CH...
- Page 35 Introduction Utilisation conforme à l’usage prévu ....Page 37 Fourniture ............Page 38 Description des pièces et éléments ....Page 38 Données techniques ........... Page 39 Sécurité Instructions générales de sécurité ..... Page 41 Instructions de sécurité ........Page 44 Consignes de sécurité...
- Page 36 Sont utilisés dans le présent mode d‘emploi / sur l‘appareil les pictogrammes suivants : Lire le mode d‘emploi ! Tenir compte des avertissements et instructions de sécurité ! Risque d‘explosion ! Courant continu (type de courant et de tension) Milliampère Danger de mort et d‘accidents pour les en- fants et les enfants en bas-âge ! Produit médical de type BF Année et mois de fabrication...
-
Page 37: Utilisation Conforme À L'usage Prévu
Thermomètre frontal et auriculaire © Introduction Toutes nos félicitations pour l’achat de votre nouvel appareil. Vous avez choisi un produit de grande qualité. Le mode d’emploi fait partie de ce produit. Il contient des remarques importantes concernant la sécurité, l’utilisation et la mise au rebut. -
Page 38: Fourniture
© Fourniture 1 x thermomètre frontal et auriculaire (avec pile et capuchon 1 x mode d’emploi © Description des pièces et éléments Tête de mesure Touche «EAR» (Mesure de la température dans l’oreille/mode scan) Touche «FOREHEAD» (Mesure de la température sur le front/les tempes) Écran LCD DEL rouge : Fièvre 38,0 °C - 42,9 °C (100,4 °F - 109,2 °F) -
Page 39: Données Techniques
Ecran à cristaux liquides Symbole changement de pile Symbole affi chage année Symbole affi chage date Symbole mode auriculaire Symbole mode standard Symbole mode scan Affi chage de la température Symbole mode frontal Symbole nettoyage Date et heure en mode standard Symbole mode Sleep Affi... - Page 40 Plage de mesure mode auriculaire et frontal : 32 °C - 42,9 °C (89,6 °F - 109,2 °F) Exactitude de mesure : ± 0,2 °C (± 0,4 °F) pour la plage 35,5 °C - 42,0 °C (95,9 °F - 107,8 °F) ± 0,3 °C (± 0,5 °F) pour la plage 32,0 °C - 35,4 °C (89,6 °F - 95,8 °F) et pour la plage 42,1 °C - 42,9 °C...
-
Page 41: Instructions Générales De Sécurité
Dimensions : env. 135 x 35 x 58 mm (long. x larg. x haut.) Poids : env. 54 g *Relative humidity = humidité relative de l’air © Sécurité CONSERVEZ POUR L’AVENIR L’EN- SEMBLE DES INSTRUCTIONS DE SECU- RITE ET INSTRUCTIONS ! Instructions générales de sécurité... - Page 42 ½ Cet appareil peut être utilisé par des en- fants dès l'âge de 8 ans ou des per- sonnes souff rant d'un handicap phy- sique ou psychomoteur ou encore des personnes souff rant de défi ciences men- tales ou ayant un manque de connais- sances et d'expérience s'ils sont sous la surveillance d'un adulte ou si l'usage de l'appareil leur a été...
- Page 43 ½ Ne démontez en aucun cas l‘appareil. Des réparations incorrectes peuvent être la source de dangers importants pour l’utilisateur. Ne faites eff ectuer toutes ré- parations que par des spécialistes. ½ Ne mettez pas l’appareil en service s’il est endommagé. Il pourrait en résulter des blessures et / ou des mesures inexactes.
-
Page 44: Consignes De Sécurité Pour La Pile
½ Ne pas utiliser de téléphones mobiles à proximité pendant l’utilisation du thermo- mètre. Il peut en résulter des mesures inexactes. Instructions de sécurité ½ Cet appareil est destiné uniquement à un usage privé. Il n’est donc pas soumis à une obligation d’étalonnage. ½... - Page 45 ½ Veiller à insérer la pile en respectant la po- larité correcte ! La polarité est indiquée dans le boîtier à piles. ½ Au besoin, nettoyer les contacts de la pile et de l’appareil avant l’insertion. ½ Ne pas jeter les piles dans les ordures ménagères ! ½...
-
Page 46: Avant La Mise En Service
© Avant la mise en service © Retrait de la protection pile Poussez vers le bas le couvercle du compartiment à pile Tirez le fi lm de protection au niveau de la languette du compartiment à pile. Repoussez le couvercle du compartiment à pile sur le compartiment à... -
Page 47: Mesures De Températures
2. Appuyez sur la touche « MEM / SET » pour sélectionner le mode 12h ou 24h. 3. Appuyez sur la touche « FOREHEAD » . Les heures clignotent et peuvent être corrigées à l’aide de la touche « MEM / SET » 4. Appuyez à nouveau sur la touche « FOREHEAD » Les minutes clignotent et peuvent être corrigées à... - Page 48 Prise de température (mode auriculaire) Important ! Il est recommandé de procéder à 3 prises de température consécutives dans la même oreille et de partir du principe que le température la plus élevée est la température exacte. La prise de tempé- rature suivante peut être commencée lorsque l’affi...
- Page 49 3. Vérifi ez que la tête de mesure et le capteur de mesure soient propres. 4. Nettoyez avec précaution le conduit auditif à l’aide d’un coton tige. 5. Tirez le pavillon de l’oreille légèrement vers l’arrière de la tête en biais vers le haut/vers l’arrière, afi n de li- bérer l’accès du conduit auditif et qu’il ne se trouve aucun obstacle entre le capteur et le tympan.
- Page 50 Avis : L’appareil se coupe automatiquement s’il n’est pas actionné pendant plus d’une minute. Si le mode de veille est activé, l’écran à cristaux liquides s’éteint. Si le mode de veille est désactivé, l’appareil se met en mode standard. Si le thermomètre a été utilisé dans des conditions normales, le résultat de la dernière prise de température est toujours mémorisé...
- Page 51 1. Si le mode de veille est actif, activez le thermomètre avant la prise de température en appuyant sur une touche quelconque. 2. Appuyez avec précaution sur le capuchon de protec- tion et retirez celui-ci sans forcer avec un léger mouvement tournant.
- Page 52 Avis : L’appareil se coupe automatiquement s’il n’est pas actionné pendant plus d’une minute. Si le mode de veille est activé, l’écran à cristaux liquides s’éteint. Si le mode de veille est désactivé, l’appareil se met en mode standard. Si le thermomètre a été utilisé dans des conditions normales, le résultat de la dernière prise de température est toujours mémorisé...
- Page 53 N’utilisez pas l’appareil immédiatement après nettoyage de la tête de mesure . Le froid provoqué par l’évaporation du nettoyant peut fausser le résultat de la mesure. Exemples d’application : température du lait pour le biberon température de l’eau de bain 1. Si le mode de veille est actif, activez le thermomètre avant la mesure en appuyant sur une touche quelconque.
- Page 54 9. Appuyez à nouveau sur la touche « EAR » pour procéder à d’autres mesures. 10. L’appareil se coupe automatiquement s’il n’est pas actionné pendant plus d’une minute. Il n’y a pas de mise en mémoire dans ce mode de mesure. Pour revenir au mode standard, procédez comme suit : 1.
-
Page 55: Fonctions / Analyse Des Problèmes
© Fonctions / analyse des problèmes © Sélection de l’unité de température Appuyez simultanément sur les touches « EAR » « FOREHEAD » et maintenez-les appuyées jusqu’à ce que « °F » apparaisse derrière l’affi chage de la température. Le passage de « °F » à « °C » est possible de la même manière. -
Page 56: Remplacement De La Pile
liquides (ill. F). Une nouvelle pression sur la touche « MEM / SET » permet de faire affi cher l’emplacement de mémoire suivant avec la valeur mesurée correspondante. Il est possible de mémoriser au plus 9 valeurs mesurées. Pour revenir au mode standard, procédez comme suit : 1. -
Page 57: Solutions Aux Problèmes
Mettez la pile neuve dans le compartiment à pile. Avis : Ce faisant, veillez à respecter la polarité. Le marquage Plus de la pile doit regarder vers le haut. Glissez la pile neuve sous l’ergot de métal et enfoncez-la jusqu’à ce que vous l’entendiez s’encliqueter. Repoussez le couvercle du compartiment à... - Page 58 Problème Cause possible Solution Le thermomètre Suivez le mode Affi chage « Lo » sur l‘écran à est-il correctement d’emploi pour cristaux liquides positionné dans vous assurer du l’oreille ou au bon positionne- (valeur me- niveau du front/ ment dans l’oreille surée inférieure à...
-
Page 59: Nettoyage Et Entretien
Problème Cause possible Solution Constat d‘un Contacter le Affi chage « ErrH » sur problème pen- point S.A.V. l‘écran à cris- dant l‘autodia- gnostic taux liquides Problème de Contacter le Affi chage « ErrP » sur matériel point S.A.V. l‘écran à cris- taux liquides ©... -
Page 60: Garantie Et S.a
Eviter des températures de plus de 80,0 °C ! Pour la me- sure, il est cependant nécessaire que l’appareil se soit adapté suffi samment longtemps à la température am- biante, un message de défaut est émis dans le cas contraire (voir « Fonctions / analyse des problèmes – solution aux problèmes »). - Page 61 Ce matériel est exclusivement destiné à un usage privé et non commercial. La garantie est annulée en cas d’utili- sation incorrecte et inappropriée, d’utilisation brutale et en cas d’intervention qui n’aurait pas été réalisée par un centre de service après-vente agréé.Cette garantie ne constitue pas une restriction de vos droits légaux.
-
Page 62: Recyclage
© Recyclage L’emballage se compose de matières recyclables qui peuvent être mises au rebut dans les déchetteries locales. Les possibilités de recyclage des produits usés sont à demander auprès de votre municipalité. Le produit est soumis à la Directive 2012 / 19 / EU. Afi... -
Page 63: Conformité
© Conformité En concordance avec les directives européennes suivantes, le label CE 0197 : Directive relative aux dispositifs médicaux 93/42/EEC, modifi ée par la directive 2007/47/EC. La déclaration de conformité correspondante est déposée chez l’importateur : KOMPERNASS HANDELS GMBH BURGSTRASSE 21 44867 BOCHUM GERMANY www.kompernass.com... - Page 64 Fabricant : Shenzhen Dongdixin Technology Co., Ltd. No. 3 Building XiliBaimang Xusheng Industrial Estate Nanshan, Shenzhen, China 518108 Tél. : +86 755 27 652 316 E-Mail : service@e-caretalk.com Mandataire CE : Shanghai International Holding Corp. GmbH (Europe) Eiff estraße 80 20537 Hamburg, Germany Tél. : +49 (0) 40 2513175 Téléc. : +49 (0) 40 255726...
- Page 65 Introduzione Utilizzo conforme alla destinazione d‘uso ..Pagina 67 Ambito di fornitura ...........Pagina 68 Descrizione dei componenti ......Pagina 68 Dati tecnici ............Pagina 69 Sicurezza Indicazioni generali di sicurezza ....Pagina 72 Indicazioni di sicurezza ........Pagina 75 Indicazioni di sicurezza relative alla batteria ..Pagina 75 Prima dell’avvio Rimozione della sicura della batteria .....Pagina 77 Funzionamento...
- Page 66 In queste istruzioni d‘uso / sull‘apparecchio sono utilizzati i seguenti pittogrammi: Leggere le istruzioni d’uso! Osservare le indicazioni di avvertimento e di sicurezza! Pericolo di esplosione! Corrente continua (tipo di corrente e di tensione) Milliampère Pericolo di morte e di incidenti per bambini e infanti! Prodotto medico del tipo BF Anno e mese di fabbricazione...
-
Page 67: Utilizzo Conforme Alla Destinazione D'uso
Termometro istantaneo per la febbre © Introduzione Congratulazioni per l’acquisto del nuovo appa- recchio. Lei ha scelto un prodotto di alta qualità. Il manuale di istruzioni è parte integrante del presente prodotto. Esso contiene importanti indicazioni per la sicurezza, l’uso e lo smaltimento. Familiarizzarsi con tutte le funzioni dell’apparecchio prima di utilizzarlo per la prima volta. -
Page 68: Ambito Di Fornitura
© Ambito di fornitura 1 x termometro istantaneo per la febbre (ivi inclusa batteria e coperchio di protezione 1 x libretto di istruzioni d‘uso © Descrizione dei componenti Testa di misurazione Tasto “ORECCHIO (EAR)” (per la misurazione della temperatura nell’orecchio / modalità di scannerizzazione) Tasto “FRONTE (FOREHEAD)”... -
Page 69: Dati Tecnici
Display a cristalli liquidi Simbolo per il cambio della batteria Simbolo per la visualizzazione dell’anno Simbolo per la visualizzazione della data Simbolo per la modalità “orecchie” Simbolo per la modalità standard Simbolo per la modalità di scannerizzazione Visualizzazione della temperatura Simbolo per la modalità... - Page 70 Scale di temperatura: °C (°Celsius) °F (° Fahrenheit) Visualizzazione dell’orario: Formato a 12 / 24 ore Spegnimento automatico: Spegnimento automatico dopo 1 minuto Gamma di misurazione per la modalità fronte e orecchie: tra 32° C e 42,9 °C (tra 89,6 °F a 109,2 °F) Scostamenti nella misurazione: ±...
- Page 71 Gamma di misurazione in modalità di scannerizzazione: tra –22,0 °C a + 80,0 °C (tra –7,6 °F a + 176 °F) Scostamento nella misurazione: ± 2,0 °C (± 4,0 °F) Temperatura ambiente: Modalità orecchie e modalità di scannerizzazione: tra +10,0 °C a + 40,0 °C (tra 50,0 °F a 104,0 °F) Modalità...
-
Page 72: Sicurezza
© Sicurezza CONSERVARE TUTTE LE INDICAZIONI DI SICUREZZA E LE ISTRUZIONI PER UN’EVENTUALE FUTURA CONSULTA- ZIONE. Indicazioni generali di sicurezza ½ PERICOLO AVVISO! DI MORTE E DI INCIDENTI PER BAMBINI E INFANTI! Non lasciare mai i bambini incustoditi con il materiale per imballag- gio. - Page 73 lora siano sorvegliati o siano stati ade- guatamente istruiti sull'uso sicuro dell'ap- parecchio e ne comprendano i relativi rischi. I bambini non devono giocare con l'apparecchio. La pulizia e la manutenzio- ne a cura dell'utente non devono essere eseguiti dai bambini se non sorvegliati. ½...
- Page 74 ½ Si prega di farsi visitare da un medico qualora il termometro mostrasse valori di misurazione caratteristici di un’eleva- ta temperatura corporea. Secondo que- sto metodo di misurazione vi è uno stato febbrile se la temperatura è superiore di 38,0 °C (100,4 °F). Il LED illuminato di colore rosso rappresenta un avverti- mento.
-
Page 75: Indicazioni Di Sicurezza
Indicazioni di sicurezza ½ L’apparecchio è destinato esclusivamen- te all’utilizzo privato. Non sussiste quin- di alcun obbligo di taratura. ½ Non utilizzare il termometro qualora sia danneggiato o in caso di misurazioni ir- realistiche. Consultare il capitolo “Fun- zioni / Analisi degli errori - Risoluzione dei problemi”... - Page 76 ½ Le batterie non devono essere gettate nei rifi uti domestici! ½ Ai sensi di legge ogni consumatore è te- nuto a smaltire correttamente le batterie! ½ ATTENZIONE! PERICOLO DI ESPLOSIONE! Tenere lon- tano le batterie dai bambini, non gettarle nel fuoco, non cortocircuitarle o smembrarle.
-
Page 77: Prima Dell'avvio
© Prima dell’avvio © Rimozione della sicura della batteria Spingere il coperchio del vano portabatterie verso il basso. Tirare la pellicola protettiva della linguetta dal vano portabatteria. Spingere il coperchio del coperchio del vano porta- batterie nuovamente sul vano portabatterie fi no a sentire un “clic”... -
Page 78: Misurazioni Della Temperatura
1. Premere e mantenere premuto il tasto “MEM / SET” per due secondi nella modalità standard. Si ode un segnale. L’apparecchio si trova in modalità di impostazione. 2. Premere il tasto “MEM / SET” per scegliere tra il formato di visualizzazione dell’orario a 12 o a 24 ore. 3. - Page 79 l’apparecchio rimane acceso e l’orario e la temperatura ambiente continuano a essere visualizzati e aggiornati una volta al minuto. Il display a cristalli liquidi visualizza alternativamente l’orario e la data (vedi fi g. D). Misurazione della temperatura corporea (modalità orecchio) IMPORTANTE! Si suggerisce di eseguire tre misura- zioni consecutive presso lo stesso orecchio e, facendo questo, assumere la temperatura più...
- Page 80 2. Premere con attenzione il coperchio di protezione e rimuoverlo senza forzare con un leggero movimento rotatorio. 3. Assicurasi che la testa di misurazione e il sensore di misurazione siano puliti. 4. Pulire con attenzione il canale uditivo dell’orecchio con un bastoncino di ovatta. 5.
- Page 81 11. Prima di avviare una nuova misurazione attendere fi no a che la visualizzazione “ ” si spegne. Nota: Lo spegnimento dell’apparecchio avviene automa- ticamente se non viene azionato per più di 1 minuto. In caso di modalità di sospensione (sleep) attivata il display a cristalli liquidi si spegne.
- Page 82 almeno 30 minuti prima di misurare la temperatura, così che si possa ottenere un risultato di misurazione possibilmente preciso. Fare attenzione a che la fronte o la tempia sia pulita e priva di ferite. Su di essa non vi devono essere trac- ce di sudore, cosmetici o pomate.
- Page 83 Nota: LED verde : febbre assente tra 34,0 °C e 37,4 °C (tra 93,2 °F e 99,4 °F) LED arancione : febbre leggera tra 37,5 °C e 37,9 (tra 99,5 °F e 100,3 °F) LED rosso : febbre tra 38,0 °C e 42,9 °C (tra 100,4 °F e 109,2 °F) 8.
- Page 84 Attenzione! Non utilizzare questa modalità per misurazioni della temperatura corporea. Con questa misurazione viene visualizzata la tempe- ratura superfi ciale corrente dell’oggetto. Questa può essere diff erente dalla sua temperatura interna, soprattutto se la superfi cie è soggetta all’irraggiamento del sole oppure a una corrente d’aria. A causa della propria struttura costruttiva, il termometro misura il valore esatto se il suo alloggiamento ha assunto la temperatura ambiente.
- Page 85 4. Premere contemporaneamente tante volte il tasto “FRONTE (FOREHEAD)” e il tasto “ORECCHIO (EAR)” fi no a quando sul display a cristalli liquidi viene visualizzata la scritta “Food“ (“Cibo”) (vedi fi g. E). 5. Mantenere la testa di misurazione a una distanza di 1 cm dal liquido e / o dalla superfi...
-
Page 86: Funzioni / Analisi Degli Errori
© Funzioni / Analisi degli errori © Selezione dell’unità di misurazione della temperatura Premere e mantenere premuto contemporaneamente il tasto “ORECCHIO (EAR)” e il tasto “FRONTE (FOREHEAD)” fi no a quando appare il simbolo “°F” dietro la visualizzazione di temperatura. Applicando la medesima procedura è... -
Page 87: Sostituzione Delle Batterie
Premendo nuovamente il tasto “MEM / SET” appare lo spazio di memoria successivo con il corrispondente va- lore di misurazione. Può essere memorizzato un numero massimo di nove valori di misurazione. Per tornare nella modalità standard procedere come segue: 1. Premere contemporaneamente tante volte il tasto “FRONTE (FOREHEAD)”... -
Page 88: Risoluzione Dei Problemi
Inserire la nuova batteria nel vano portabatterie. Nota: Assicurarsi che la polarità sia corretta. La scritta batteria con il segno di + deve essere rivolta verso l’alto. Spingere la nuova batteria sotto il sensore metallico e premerla verso il basso fi no a sentire un “clic”. Spingere nuovamente il coperchio del vano portabat- terie sul vano portabatterie fi... - Page 89 Risoluzione Errore Problema del problema Batteria in via di Inserire una nuo- Sul display a cri- esaurimento va batteria stalli liquidi vie- ne visualizzato il simbolo della batteria Il termometro è Per posizionare Sul display a stato posizionato correttamente il cristalli liquidi correttamente termometro...
- Page 90 Risoluzione Errore Problema del problema La temperatura Fare in modo che Sul display a ambiente si trova la temperatura cristalli liquidi al di fuori della ambiente si trovi viene visualiz- gamma tra nella gamma tra zato il messag- 15,0 °C e 15,0 °C e gio “ErrE”...
-
Page 91: Pulizia E Manutenzione
Risoluzione Errore Problema del problema Problema di Mettersi in con- Sul display a hardware tatto con il Cen- cristalli liquidi tro di viene visua- Assistenza lizzato “ErrP” © Pulizia e manutenzione Dopo alcune misurazioni della temperatura l’apparecchio ricorda di pulire il sensore. A tal fi ne viene visualizzato il simbolo Pulizia nel display LC e si sentono dei bip. -
Page 92: Garanzia E Assistenza
Le temperature superiori agli 80 °C sono da evitare! Per eff ettuare una misurazione è tuttavia assolutamente neces- sario che l’apparecchio venga adattato suffi cientemente a lungo alla temperatura ambiente, altrimenti verrà visualizzato un messaggio di errore (vedi il capitolo “Funzioni / Analisi degli errori - Risoluzione dei problemi”). - Page 93 esclusivamente all’uso domestico e non a quello commer- ciale. La garanzia decade in caso di impiego improprio o manomissione, uso della forza e interventi non eseguiti dalla nostra fi liale di assistenza autorizzata. Questa garanzia non costituisce alcun limite ai diritti legali del consumatore.
-
Page 94: Smaltimento
© Smaltimento L’imballaggio è costituito di materiali ecologici che si possono smaltire nei punti di raccolta per riciclaggio locali. Informarsi presso l’amministrazione cittadina o comunale sulle possibilità di smaltimento del prodotto usato. Il prodotto è realizzato ai sensi delle disposizioni di cui alla Direttiva 2012 / 19 / EU. - Page 95 © Conformità Il prodotto riporta il simbolo CE 0197 in conformità alle seguenti Direttive europee: Direttiva dispositivi per prodotti medici 93/42/EEC, modifi cata dalla Direttiva 2007/47/EC. La relativa dichiarazione di conformità è depositata presso l’importatore: KOMPERNASS HANDELS GMBH BURGSTRASSE 21 44867 BOCHUM GERMANY www.kompernass.com...
- Page 96 Produttore: Shenzhen Dongdixin Technology Co., Ltd. No. 3 Building XiliBaimang Xusheng Industrial Estate Nanshan, Shenzhen, Cina 518108 Tel.: +86 755 27 652 316 E-Mail: service@e-caretalk.com Rappresentante autorizzato per l’Unione Europea: Shanghai International Holding Corp. GmbH (Europe) Eiff estraße 80 20537 Hamburg, Germania Tel.: +49 (0) 40 2513175 Fax:...
- Page 97 Introduction Intended use ............Page 99 Scope of delivery ..........Page 100 Description of parts ........... Page 100 Technical data ........... Page 101 Safety General safety instructions ....... Page 103 Safety instructions ..........Page 106 Safety Instructions for the Battery ..... Page 106 Before getting started Removing the battery fuse ........
- Page 98 The following pictograms are used in these directions for use or on the device itself: Read the directions for use! Please observe the warning and safety instructions! Risk of explosion! Direct current (type of current and voltage) Milliampere Danger to life and danger of accidents for infants and children! Medical device type BF Year and month of manufacture...
-
Page 99: Intended Use
Forehead & Ear Thermometer © Introduction Congratulations on the purchase of your new appliance. You have clearly decided in favour of a quality product. These operating instructions are a part of this product. They contain important information in regard to safety, use and disposal. -
Page 100: Scope Of Delivery
© Scope of delivery 1 x Forehead and ear thermometer (incl. battery and protective head guard 1 x Directions for use © Description of parts Measuring head “EAR” button (Temperature measurement in the ear / scan mode) “FOREHEAD” button (Temperature measurement at forehead / temple) LC display Red LED: Fever 38.0 °C - 42.9 °C (100.4 °F - 109.2 °F) -
Page 101: Technical Data
LC display Battery change symbol Year display symbol Date display symbol Ear mode symbol Standard mode symbol Scan mode symbol Temperature display Forehead mode symbol Cleaning symbol Date and time in standard mode Sleep mode symbol PM display Setup mode symbol Memory mode symbol ©... - Page 102 Temperature scale: °C (°Celsius) °F (°Fahrenheit) Time display: 12 / 24-hour format Automatic switch-off : Automatic switch-off after 1 minute Measurement range forehead & ear mode: 32°C - 42.9°C (89.6°F - 109.2°F) Measurement accuracies: ± 0.2°C (± 0.4°F) in the range from 35.5°C - 42.0°C (95.9°F - 107.8°F) ±...
-
Page 103: Safety
Storage temperature: –10.0 °C - +55.0 °C (14.0°F - 131.0°F) at 20 % RH* - 85 % RH* Atmospheric pressure: 700 ~ 1060 hPa Dimensions: approx. 135 x 35 x 58 mm (L x B x H) Weight: approx. 54 g *RH = relative humidity ©... - Page 104 ½ DANGER TO LIFE! WARNING! Batteries can be swallowed, which may represent a danger to life. If a battery has been swallowed, medical help is required immediately. ½ This device may be used by children aged 8 over and by persons with re- duced physical, sensory or mental capa- bilities or lack of experience and knowl- edge, provided that they are under...
- Page 105 ½ Under no circumstances should you take the device apart. Improper repairs may place the user in considerable danger. Repairs should only be carried out by specialist personnel. ½ Do not use the device if it is damaged. Otherwise the consequence may be in- juries and / or inaccurate readings.
-
Page 106: Safety Instructions
½ Mobile telephones should not be used in the immediate vicinity when the thermom- eter is being used. Otherwise the conse- quence may be inaccurate measurement results. Safety instructions ½ This appliance is solely intended for pri- vate use. That is why it is not subject to mandatory verifi... - Page 107 ½ Ensure correct polarity when inserting the battery! This is indicated in the bat- tery compartment. ½ If necessary, clean the battery and de- vice contacts before inserting the battery. ½ Batteries must not be disposed of in the normal domestic waste! ½...
-
Page 108: Before Getting Started
© Before getting started © Removing the battery fuse Push the battery compartment lid downwards. Pull the tab of the protective fi lm out of the battery compartment. Push the battery compartment lid onto the battery compartment until it clicks into place (Fig. A). –... -
Page 109: Temperature Measurements
4. Press the “FOREHEAD” button again. The minutes will fl ash and can be corrected with the “MEM / SET” button Repeat steps 3 and 4 to set the values for the year, month and day or to switch the sleep mode on or off . Finally, press the “FOREHEAD”... - Page 110 Do not use the thermometer with external ear disorders (e.g. infl ammation of the ear canal, injuries to the outer ear). The condition of the aff ected areas could worsen. Do not use the thermometer straight after bathing or swimming when the ear canal is wet. This could dam- age the ear canal.
- Page 111 9. Now you can read off the measurement result on the LC display . At the same time, one of the 3 LEDs will come on. Note: LED green : no fever 34.0 °C - 37.4 °C (93.2 °F - 99.4 °F) LED orange : slight increase in temperature 37.5 °C - 37.9 °C (99.5 °F - 100.3 °F)
- Page 112 Measuring the body temperature (forehead mode) IMPORTANT! It is advisable to carry out 3 meas- urements in a row at the same place and to take the highest temperature as the measured value. With diff erent room temperatures, let the appliance lie in the room where the temperature is to be taken for at least 30 minutes to “acclimatise”...
- Page 113 button . The symbol will appear in the LC display and the measurement will start after an acoustic signal. 6. The end of the measurement is indicated by 2 acoustic signals. 7. Now you can read off the measurement result on the LC display .
- Page 114 Use as a household thermometer (scan mode) The thermometer can also be used in the house for non-contact temperature measurements in the range of –22.0 °C - 80.0 °C (–7.6 °F - 176.0 °F). Attention! Do not use this mode for measuring body temperature.
- Page 115 3. Make sure that the measuring head and the measuring sensor are clean. 4. Press the “FOREHEAD” button and the “EAR” button repeatedly at the same time until “Food” is shown in the LC display (Illustration E). 5. Hold the measuring head at a distance of 1 cm from the liquid and / or surface whose temperature you want to measure.
-
Page 116: Functions / Error Analysis
© Functions / error analysis © Selecting the temperature unit Press and hold down the “EAR” button and the “FOREHEAD” button at the same time until “°F” appears behind the temperature display. Switching from “°F” to “°C” is possible with the same procedure. ©... -
Page 117: Changing The Battery
1. Press the “FOREHEAD” button and the “EAR” button repeatedly at the same time until the LC display again shows the room temperature, date and time, as well as the symbol (Illustration D). 2. You are now in standard mode again. ©... -
Page 118: Problem-Solving
© Problem-solving If the appliance cannot take a measurement in the designated range, it will generate an error message. This message should help to solve the problem. Error Problem Solution Empty battery? Insert a new Appliance battery does not re- act / automat- Wrong battery Removing bat-... - Page 119 Error Problem Solution Check the meas- Please observe “Hi” on the urement mode. the directions LC display for use with re- (measured gard to taking value above correct measure- 42.9°C or ments. 109.2°F) Ambient tempera- Please ensure an “ErrE” on the ture outside the ambient tempera- LC display...
-
Page 120: Cleaning And Care
© Cleaning and care The device reminds you to clean the measuring sensor af- ter taking several temperature measurements. When this occurs, the cleaning symbol appears in the LC display and acoustic signals are heard. In order to avoid con- tamination with germs, the lens has to be rubbed after every use with a soft cloth that has been moistened with 70% medical alcohol. -
Page 121: Guarantee And Service
© Guarantee and Service The warranty for this appliance is for 3 years from the date of purchase. The appliance has been manufactured with care and meticu- lously examined before delivery. Please retain your receipt as proof of purchase. In the case of a warranty claim, please make contact by telephone with our Customer Service Depart- ment. -
Page 122: Disposal
Service Great Britain Tel.: 0871 5000 720 (£ 0.10/Min.) E-Mail: kompernass@lidl.co.uk IAN 106635 Hotline availability: Monday to Friday 08:00 - 20:00 (CET) © Disposal The packaging is made entirely of recyclable materials, which you may dispose of at local recycling facilities. Contact your local refuse disposal authority for more details of how to dispose of your worn-out product. -
Page 123: Conformity
Faulty or used batteries must be recycled in accordance with Council Directive 2006 / 66 / EC. Take used batteries and / or the appliance itself to the collection facilities provided. Batteries should not be disposed of with domestic waste! Take batteries and / or the product itself to the collection facilities provided. - Page 124 Manufacturer: Shenzhen Dongdixin Technology Co., Ltd. No. 3 Building XiliBaimang Xusheng Industrial Estate Nanshan, Shenzhen, China 518108 Tel.: +86 755 27 652 316 E-Mail: service@e-caretalk.com EU Representative: Shanghai International Holding Corp. GmbH (Europe) Eiff estrasse 80 20537 Hamburg, Germany Tel.: +49 (0) 40 2513175 Fax: +49 (0) 40 255726...
- Page 125 KOMPERNASS HANDELS GMBH BURGSTRASSE 21 44867 BOCHUM DEUTSCHLAND / GERMANY www.kompernass.com Stand der Informationen · Version des informations Versione delle informazioni · Last Information Update: 09 / 2014 · Ident.-No.: SSOT6B2-082014-2 IAN 106635...
Need help?
Do you have a question about the SSOT 6 B2 and is the answer not in the manual?
Questions and answers