Table of Contents
Advertisement
Available languages
Available languages
globalindustrial.ca
Distribucion Industrial Globales S DE RL DE CF
Assembly Instructions
Instrucciones de Ensamblaje
Directives d'assemblage
Customer Service
Servicio de atención al Cliente
Service à la clientèle
México: 01.800.681.6940
Canada: 888-645-2986
US: 1-800-645-2986
Salamander Heater
Electric Blower Heater
Models: 653558 653670 653671
Models: 653561 653560 653559
653672 653673 653674
653558 653562 246067
Wall/Ceiling Models: 653566 653567 653568
653569 246068
READ & SAVE THESE
INSTRUCTIONS
1
050117
Advertisement
Table of Contents

Related Manuals for Global 653558


Summary of Contents for Global 653558
- Page 1 Service à la clientèle México: 01.800.681.6940 Canada: 888-645-2986 US: 1-800-645-2986 Salamander Heater Electric Blower Heater Models: 653558 653670 653671 Models: 653561 653560 653559 653672 653673 653674 653558 653562 246067 Wall/Ceiling Models: 653566 653567 653568 653569 246068 READ & SAVE THESE...
-
Page 2: Important Instructions
4. Always switch off heater when not in use. near water. 5. Do not operate heater if unit malfunctions, has been For model 653558 only dropped, or is damaged in any way. Disconnect power at 15. Plug heater directly into wall outlet/receptacle. Avoid... -
Page 3: Wiring Diagrams
Assembly Instructions User’s Manual Salamander Heater Electric Blower Heater Wiring Diagrams 653673 653566 653558 653559 653558 653559 L1 L2 240V/60Hz/1P 208V/60Hz/3P 10KW 15KW Overheat Thermostat Overheat Thermostat Protection Protection Motor Motor Light Light Tip over switch Tip over switch Fan Switch... -
Page 4: Parts List
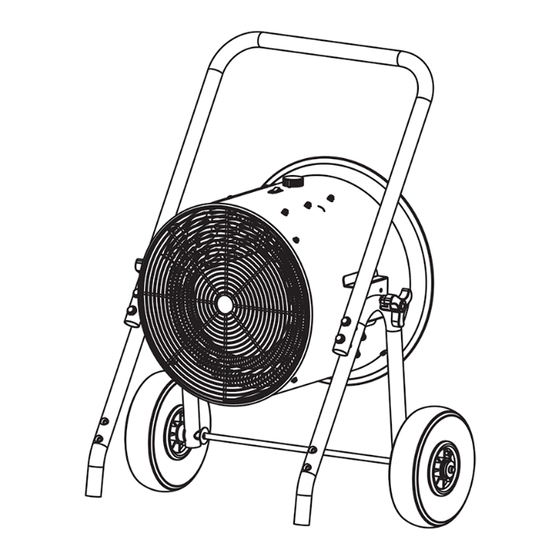
Assembly Instructions Salamander Heater Electric Blower Heater PARTS LIST (Part# 653565, Mobile cart kit only) A. Handle B. Heater Housing C. Tilt Adjustable Knob D. Wheel E. Front Exhaust Grill F. On/Off Switch G. Temperature Setting Knob Cart-Stand (Part# 653564, Mounting Bracket only) Wall/Ceiling Mounting Bracket A. - Page 5 Assembly Instructions User’s Manual Electric Blower Heater Salamander Heater CART INSTALLATION INSTRUCTION INSTALLATION INSTRUCTIONS CAUTION WARNING Keep electrical cords, drapery, furnishings and other combustibles All wiring must be installed by a certified at least 3 feet (0.9 m) from heater, electrician in accordance with electrical to prevent risk of fire.
-
Page 6: Wall Mount Installation Instructions
Assembly Instructions Salamander Heater 6.Connect the electrical power supply cable to the wiring compartment. (See wiring instructions). Attach connectors to the appropriate conductor and ground wiring. After completing the connections, arrange pigtail unit leads and power supply wires in wiring compartment. Wall Mount Installation Instructions: 1. -
Page 7: Maintenance And Cleaning
OVERHEAT & RESET 2. Interior dust can often be removed with a vacuum cleaner and crevice tool attachment. MODELS 653558, 653673, 653670, 653671,653672, 3. To clean enclosure, use a clean, soft and lightly damp 653566, 653567, 653568 & 653569 cloth to gently wipe off dirt from surface. Be sure not These heaters have thermal cut-off protection. -
Page 8: Wiring Instructions
Salamander Heater Electric Blower Heater WIRING INSTRUCTIONS For Model 653560 For Models 653558, 653670 & 653567 1. Open the compartment. 2. Connect the live wires to L1 and L2 of the terminal block. Connect ground wire to 3. Close compartment. - Page 9 Canada: 888-645-2986 US: 1-800-645-2986 Calentador De Salamandra Calentador De Aire E léc trico Modelos: 653558 653673 653670 Modelos: 653561 653560 653 3559 653671 653672 653674 653558 653562 246067 Wall/Ceiling Modelos: 653566 653567 653568 Wall Mount Modelos: 653566 653567 653568 653569 246068...
- Page 10 4. Apague siempre el calentador cuando no esté en uso. Para el modelo 653558 sólo 5. No utilice el calentador si la unidad no está funcionando correctamente, 15. Enchufe el calentador directamente en un toma/receptáculo de pared.
-
Page 11: Instrucciones De Ensamblaje
Instrucciones de Ensamblaje Instrucciones de Ensamblaje Calentador De Salamandra Calentador De Aire Eléctrico Diagramas de Cableado 653558 653673 653566 653558 653559 653559 653566 L1 L2 240V/60Hz/1P 208V/60Hz/3P 10KW 15KW El poder del bloque de terminales Protección Termostato Protección Protección Termostato... - Page 12 Instrucciones de Ensamblaje Calentador De Salamandra Calentador De Aire Eléctrico LISTA PARTES (Part# 653565, Solo kit de carro móvil) A. Manilla B. Carcasa Calentador C. Perilla Ajuste Inclinación D. Rueda E. Rejilla Escape Frontal F. Conmutador On/Off G. Perilla Configuración Temperatura Pedestal Carro (Part# 653564,...
-
Page 13: Antes De La Instalación
Manual del usuario Calentador De Salamandra Calentador De Aire Eléctrico INSTRUCCION DE INSTALACIÓN DE PRECAUCIÓN CARRO Mantenga los cables eléctricos, cortinas, ADVERTENCIA muebles y otros combustibles por lo menos 3 pies (0,9 m) de calentador, Todo el cableado debe ser instalado por un para prevenir el riesgo de incendio. -
Page 14: Manual Del Usuario
Manual del usuario Calentador De Aire Eléctrico 6.Conecte el cable de suministro de energía eléctrica al compartimiento de cableado (ver instrucciones de cableado).Fije los conectores al conductor y cableado de tierra apropiados. Después de completar las conexiones, organice los conectores y los cables de alimentación en el compartimiento de cableado. -
Page 15: Interruptor De Seguridad
3. Para limpiar el compartimiento, utilice un paño limpio, Recalentamiento y reposición suave y ligeramente húmedo para quitar cualquier MODELOS 653558, 653673, 653670, 653671,653672, suciedad de la superficie. Asegúrese de no mojar el 653566, 653567, 653568 & 653569 elemento calefactor ni los interruptores. Permita que la Estos calentadores tienen protección térmica de corte. -
Page 16: Instrucciones De Cableado
Calentador De Salamandra Calentador De Aire Eléctrico INSTRUCCIONES DE CABLEADO Modelo 653560 Modelos 653558, 653670 & 653567 1. Abra el compartimento. 2. Conecte los cables con corriente a L1 y L2 del bloque de terminales. Conecte el cable de tierra a 3. - Page 17 Service à la clientèle México: 01.800.681.6940 Canada: 888-645-2986 US: 1-800-645-2986 Chauffe Salamandre Ventilateur Électrique Chauffant Modèles: 653558 653673 653670 Modèles: 653561 653560 653 3559 653671 653672 653674 653558 653562 246067 Wall/Ceiling Modèles: 653566 653567 653568 Wall Mount Modèles: 653566 653567 653568...
-
Page 18: Instructions Importantes
Ne positionnez jamais le chauffeur près de l’eau. 5. Ne pas faire fonctionner le chauffeur si l’unité présente des Pour le modèle 653558 seulement dysfonctionnements, a été abandonnée ou est endommagée de quelque 15. Branchez le chauffeur directement dans une prise murale/prise de façon que ce soit. -
Page 19: Directives D'assemblage
Directives d’assemblage Directives d’assemblage Chauffe Salamandre Ventilateur Électrique Chauffant Wiring Diagrams 653558 653673 653566 653559 653566 653558 653559 L1 L2 240V/60Hz/1P 208V/60Hz/3P 10KW 15KW Power terminal block Protection Thermostat Protection Protection Thermostat Thermostat contre contre la contre la Protection Thermostat... -
Page 20: Liste Des Pièces
Directives d’assemblage Chauffe Salamandre Ventilateur Électrique Chauffant LISTE DES PIÈCES (Part# 653565, Kit de chariot mobile uniquement) A. Poignée B. Boitier du réchauffeur C. Inclinez bouton réglable D. Roue E. Échappement avant de la grille F. Interrupteur ON/OFF G Bouton de réglage température Montage de panier (Part# 653564, Support de montage uniquement) - Page 21 Directives d’assemblage Ventilateur Électrique Chauffant Chauffe Salamandre INSTRUCTIONS D'INSTALLATION DE MISE EN GARDE CHARIOT Gardez les cordons électriques, draperie, meubles et autres combustibles AVERTISSEMENT au moins 3 pieds (0,9 m) du réchauffeur, pour prévenir le risque d'incendie. Tout le câblage doit être installé par un électricien certifié...
- Page 22 Directives d’assemblage Chauffe Salamandre Ventilateur Électrique Chauffant 6.Connectez le câble d’alimentation électrique au compartiment de câblage. (Voir les instructions de câblage). Fixer les connecteurs aux conducteurs et câblages de masse. Après avoir effectué les connexions, organiser les connexions et les fils d’alimentation dans l’habitacle de câblage.
-
Page 23: Maintenance Et Nettoyage
SURCHAUFFE ET RESET et légèrement humide pour essuyer doucement la saleté de la surface. Assurez-vous de ne pas mouiller l’élément Modèles 653558, 653673, 653670, 653671,653672, de chauffage ou des commutateurs. Laissez l’appareil 653566, 653567, 653568 & 653569 sécher complètement avant de redémarrer. -
Page 24: Dépannage
Directives d’assemblage Chauffe Salamandre Ventilateur Électrique Chauffant INSTRUCTIONS DE CÂBLAGE Modèles 653558, 653670 & 653567 Modèle 653560 1. Ouvrir le compartiment. 2. Brancher les fils sous tension à L1 et L2 du 3. Fermez le compartiment. bornier. Connecter le fil de masse au...
Need help?
Do you have a question about the 653558 and is the answer not in the manual?
Questions and answers
Can the 653558 Salamander heater accept 208volt?
YES. The Global 653558 Salamander heater can operate on 208 volts, as indicated by the reference to "208" in its specifications.
This answer is automatically generated