Table of Contents
Advertisement
Quick Links
Advertisement
Table of Contents

Related Manuals for Eco Engineering Easypell 16


Summary of Contents for Eco Engineering Easypell 16
-
Page 1: 5 T T H H E E E E A A S S Y Y P P E E L L L
Installation Manual Easypell 16 — 32kW ENGLISH 200014_EN 1.2 · www.easypell.com... - Page 2 Title: Installation Manual Easypell 16 — 32kW Article number: 200014_EN 1.2 Version valid 12/2015 from: Approved: Wohlinger Christian Author Eco Engineering 2050 GmbH A-4132 Lembach, Mühlgasse 9 Tel.: +43 (0) 72 86 / 74 50 Fax.: +43 (0) 72 86 / 74 50 – 10 E-Mail: office@easypell.com...
-
Page 3: Table Of Contents
1 1 6 6 T T e e c c h h n n i i c c a a l l d d a a t t a a ........................................................6 6 0 0 Installation Manual Easypell 16 — 32kW... -
Page 4: 1 D D E E A A R R C C U U S S T T O O M M E E R
Dear Customer Dear Customer • This manual is intended to help you operate the product safely, properly and economically. • Please read this manual right through and take note of the safety warnings. • Keep all documentation supplied with this unit in a safe place for future reference. Please pass on the documentation to the new user if you decide to part with the unit at a later date. -
Page 5: 2 T T Y Y P P E E S S O O F F S S A A F F E E T T Y Y W W A A R R N N I I N N G G S S I I G G N
Note - indicates a situation that could lead to property damage. 2. Consequences of risk Effects and consequences resulting from incorrect operation. 3. Avoiding risk Observing safety instructions ensures that the heating system is operated safely Installation Manual Easypell 16 — 32kW... -
Page 6: 3 P P R R E E R R E E Q Q U U I I S S I I T T E E S S F F O O R R I I N N S S T T A A L L L L I I N N G G A A P P E E L L L L E E T T B B O O I I L L E E R
Prerequisites for installing a pellet boiler Prerequisites for installing a pellet boiler You must fulfill the following conditions before operating a fully automatic pellet boiler. 3.1 Guidelines and standards for installing a pellet boiler Overview of standards and guidelines applying to the installation of a pellet boiler. Check whether you need to obtain planning permission or approval from the authorities for installing a new heating system or changing your existing system. -
Page 7: Flue Gas System
The boi- ler performance must be reduced if the chimney does not possess the necessary cross-section. This may only be performend by authorised personnel. Installation Manual Easypell 16 — 32kW... -
Page 8: Safety Systems
Safety systems 3.4 Safety systems The following safety measures are the prerequisite for safe operation of your system. Emergency stop switch Every heating system must be able to be switched off with an Emergency Stop switch. The Emergency Stop switch must be inside the central heating room. Safety valve The hydraulic system must be equipped with a safety valve. -
Page 9: Basic Safety Instructions
R R i i s s k k o o f f e e x x p p l l o o s s i i o o n n Never burn petrol, diesel, engine oil or other explosive materials. Never use liquids or chemicals to ignite the pellets. Switch off the heating system before filling the storage room. Installation Manual Easypell 16 — 32kW... -
Page 10: What To Do In An Emergency
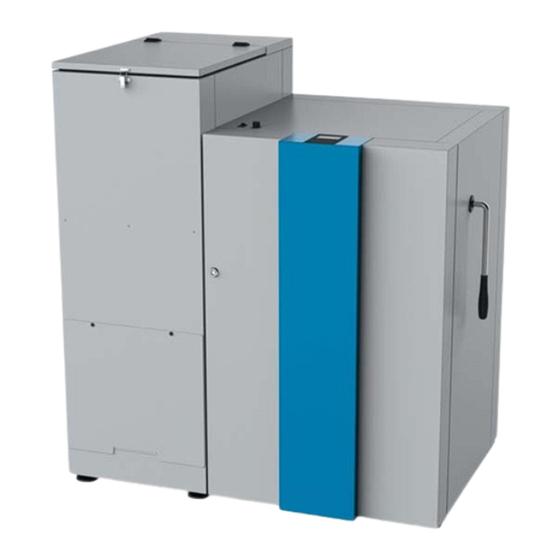
What to do in an emergency R R i i s s k k o o f f f f i i r r e e Do not store any flammable materials in the central heating room. Do not hang out any washing in the cen- tral heating room. - Page 11 The Easypell Easypell types and power ratings Eco Engineering offers the Easypell with the following power ratings: 16, 20, 25 and 32kW. Note: Refer to the data plate for the power rating of your Easypell. The data plate is located on the rear side of the boiler.
- Page 12 The Easypell Burner plate Suction fan Flame tube Anti-blowback system Heat exchanger Burner auger Boiler water Electronic ignition Boiler insulation Combustion chamber sensor Combustion chamber Ash box cover 200014_EN 1.2...
-
Page 13: Transport
C C o o n n t t a a m m i i n n a a t t i i o o n n a a n n d d c c o o r r r r o o s s i i o o n n Make sure that the pellet boiler is located under a roof if it needs to be stored outside before it is transported/ brought into the building. Installation Manual Easypell 16 — 32kW... -
Page 14: Notes On Bringing The Unit Into The Building
Before bringing the unit into the building, check the dimensions of all doors to ensure that the boiler has suffi- cient clearance and can be set up properly. Minimum door width — max. unit dimension 690 mm 16 — 20 kW Easypell 16 / 20 25 — 32 kW Easypell 25 / 32 Boiler dimensions Dimensions in mm... - Page 15 Min. room height 1950 mm Note: Legislation in your country must be observed! Placement of rubber plates The pellet heating boiler must be placed on the supplied rubber plates. Installation Manual Easypell 16 — 32kW...
-
Page 16: Casing Parts
Casing parts 6.3 Casing parts The boiler is protected by a casing on all sides. The casing parts prevent contact with hot, moving and live components. They also give Easypell pellet boilers a unique appearance. Pellet hopper casing cover Boiler door Boiler casing cover Pellet hopper casing Boiler side panel... -
Page 17: Dismantling The Burner Casing And The Burner
6 6 . . 4 4 . . 1 1 D D i i s s m m a a n n t t l l i i n n g g t t h h e e b b u u r r n n e e r r c c a a s s i i n n g g a a n n d d b b u u r r n n e e r r Installation Manual Easypell 16 — 32kW... - Page 18 Dismantling the burner casing and burner 200014_EN 1.2...
-
Page 19: Dismantling The Boiler Door
6 6 . . 4 4 . . 2 2 D D i i s s m m a a n n t t l l i i n n g g t t h h e e b b o o i i l l e e r r d d o o o o r r Installation Manual Easypell 16 — 32kW... -
Page 20: Dismantling The Boiler Casing
Dismantling the boiler casing 6 6 . . 4 4 . . 3 3 D D i i s s m m a a n n t t l l i i n n g g t t h h e e b b o o i i l l e e r r c c a a s s i i n n g g 200014_EN 1.2... -
Page 21: Installing The Turbulators And Closure Plugs
Eco Engineering supplies the pellet boilers in one of two sizes / outputs. Always observe the rating on the nameplate. The EasyPell 16 / 20 must always be set at or between 16 to 20KW. The EasyPell 25 / 32 must always be set at or between 25 to 32KW. - Page 22 Only the adjustment of the system by an authorized Eco Engineering service technician can guarantee an op- timal level of efficiency and with that a low-emission operation. Starting up for the first time has to be performed only by an authorized Eco Engineering service technician. 200014_EN 1.2...
- Page 23 Check the hydraulic system for leaks before starting up. Hydraulic schematics Always refer to the Eco Engineering hydraulic schematics when connecting up the pellet boiler. The Eco Engineering hydraulic schematics are available from your Eco Engineering sales partner or from the Eco Engineering website.
- Page 24 The boiler controller The boiler controller The boiler controller is located behind the front cover of the boiler. It is used to control the combustion procedere and the fuel-feeding system. The boiler controller is connected to the operating device by a bus-connection. The operating device is located in the boiler door.
-
Page 25: Plugs On The Boiler Control Unit
15 16 GN 24 Volt Pilot switch for hopper KAPRA 3 4 5 24 Volt Capacitive sensor – burner 24 Volt Burner contact for external heating controller — — Jumper for speed controlled high-efficiency pump Installation Manual Easypell 16 — 32kW... -
Page 26: Cable Routing
Cable routing 9.2 Cable routing Reroute cables after dismantling the casing or other system components. R R i i s s k k o o f f e e l l e e c c t t r r i i c c s s h h o o c c k k Switch off the system before performing work on the boiler. -
Page 27: Wiring Diagrams
R R i i s s k k o o f f e e l l e e c c t t r r i i c c s s h h o o c c k k Only a qualified person may connect the pellet boiler to the power supply. Always disconnect / de-energize the power supply be- fore working on the boiler. Installation Manual Easypell 16 — 32kW... - Page 28 To ensure a trouble-free operation, the density of the combustion chamber must be given. Note: The unit must be started up for the first time by an authorised Eco Engineering service technician. Note: Use the checklist enclosed to document the start-up procedure.
- Page 29 Icons System status Icon- Description view Run down time Heating full power Container cover is open Ignition Boiler cleaning Note: This message appears when the container cover has been open for longer than 20 seconds. Warning Installation Manual Easypell 16 — 32kW...
-
Page 30: Version A
Controller for heating circuits and DHW 1 1 2 2 Controller for heating circuits and DHW In principle, 2 versions are available: Version A: • (max. 2) room thermostats are used for controlling the heating circuits. • The boiler controller features a time program for controlling DHW heating. The required DHW sensor is included in the scope of supply. - Page 31 If the switching contact at terminal 7/8 is closed, DHW heating is started. A DHW sensor must be connected to terminal 43/44! If a time switch or manual switch is used, it is advisable NOT to program any domestic hot water heating periods. Installation Manual Easypell 16 — 32kW...
- Page 32 Version A Hydraulic diagram version A: Wiring diagram version A: Note: The total line length of the heating circuit pumps must not exceed 100 m! 200014_EN 1.2...
-
Page 33: Commissioning Controller Version A
On completion of the ignition process (can last up to 15 minutes), the symbol for heating at full power appears. The boiler is now heating at full power. Installation Manual Easypell 16 — 32kW... -
Page 34: Selecting The Set Dhw Temperature
Selecting the set DHW temperature – button The current boiler temperature is displayed. – button 1 1 2 2 . . 1 1 . . 2 2 S S e e l l e e c c t t i i n n g g t t h h e e s s e e t t D D H H W W t t e e m m p p e e r r a a t t u u r r e e The current DHW temperature is displayed. -
Page 35: Setting The Time Program For Dhw Heating
1 1 2 2 . . 1 1 . . 3 3 S S e e t t t t i i n n g g t t h h e e t t i i m m e e p p r r o o g g r r a a m m f f o o r r D D H H W W h h e e a a t t i i n n g g Heating period 1 2. Heating period 2 Installation Manual Easypell 16 — 32kW... - Page 36 Setting the time program for DHW heating – button Cursor at the hour. – button The value can be set by pressing the keys – button = save value Cursor jumps to the minute. Other values (minutes and hours) are set as described above. Note: The set heating period still needs to be activated.
- Page 37 Setting the time program for DHW heating – button Cursor at the symbol – button button = Activate the set heating periods. The symbol shows that the heating periods have been activated and saved. Installation Manual Easypell 16 — 32kW...
-
Page 38: Setting The Time
Setting the time – button 1 1 2 2 . . 1 1 . . 4 4 S S e e t t t t i i n n g g t t h h e e t t i i m m e e The current time is displayed. - Page 39 Setting the time – button = save value Cursor jumps to the minute. Note: Other values (minutes and seconds) are set as described above. Installation Manual Easypell 16 — 32kW...
-
Page 40: Status Display
Status display 1 1 2 2 . . 1 1 . . 5 5 S S t t a a t t u u s s d d i i s s p p l l a a y y The current status is displayed. - Page 41 Version B Hydraulic diagram version B: Wiring diagram version B: Note: The total line length of the heating circuit pumps must not exceed 100 m! Installation Manual Easypell 16 — 32kW...
-
Page 42: Commissioning Controller Version B
Commissioning controller version B 1 1 2 2 . . 2 2 . . 1 1 C C o o m m m m i i s s s s i i o o n n i i n n g g c c o o n n t t r r o o l l l l e e r r v v e e r r s s i i o o n n B B After switching on, the boiler starts (after approx. -
Page 43: Setting The Boiler Heating Period
During these periods, burner requests from the external controller (terminal 7/8) are ignored. Outside the programmed heating periods, burner demand from the external controller (terminal 7/8) is active again. Note: Programming of heating periods is NOT advisable if an external controller is used! – button Installation Manual Easypell 16 — 32kW... - Page 44 Setting the boiler heating period Cursor at the hour. – button The value can be set by pressing the keys – button = save value Cursor jumps to the minute. Other values (minutes and hours) are set as described above. Note: The set heating period still needs to be activated.
- Page 45 Setting the boiler heating period – button Cursor at the symbol – button button = Activate the set heating periods. The symbol shows that the heating periods have been activated and saved. Installation Manual Easypell 16 — 32kW...
-
Page 46: Setting The Time
Setting the time – button 1 1 2 2 . . 2 2 . . 3 3 S S e e t t t t i i n n g g t t h h e e t t i i m m e e The current time is displayed. - Page 47 Setting the time – button = save value Cursor jumps to the minute. Note: Other values (minutes and seconds) are set as described above. Installation Manual Easypell 16 — 32kW...
-
Page 48: Status Display
Status display 1 1 2 2 . . 2 2 . . 4 4 S S t t a a t t u u s s d d i i s s p p l l a a y y The current status is displayed. -
Page 49: Malfunctions - What To Do
Boiler sensor short circuit, measuring circuit from boiler sensor is shorted out Cause and Remedy: sensor defect measure sensor (approx. 2k at 25° C) replace if required sensor cable defect replace sensor sensor temperature too sensor temperature below measuring range (- 10° C) Installation Manual Easypell 16 — 32kW... - Page 50 Fault texts Display: Error code: 1, 2, 3 Description: Combustion chamber sensor fracture, measuring circuit from combustion chamber sensor is open Cause and Remedy: sensor not connected connect sensor at input sensor defect Measure sensor (approx. 5mV at 125° C) replace if required sensor cable defect replace sensor...
- Page 51 Error code: Description: Flame return gate closed fault. Cause and Remedy: flame return gate Connect up flame return gate and check cable unplugged connections Installation Manual Easypell 16 — 32kW...
- Page 52 Fault texts Flame return gate does check whether ball valve is jammed, check ball not reach CLOSE limit valve throughway to see if foreign objects are switch preventing it from closing no signal although check cables and flame return gate closed Error code: Description:...
-
Page 53: Checklist For Checking The Heating System
Check the switch on temperature (min. 60°C ) Boiler connection Is the pellet boiler correctly connected (flow and return)? Is the hydraulic system deaerated? Is the system filled up with water? Check the pressure. Safety systems Installation Manual Easypell 16 — 32kW... - Page 54 Checklist for checking the heating system CHECKLIST Comment Safety temp. sensor Check the installation and explain the function, securing location and connection Emergency stop Exists an emergency stop switch? switch Fire extinguisher Exists a fire extinguisher? Instruction Heating-up Explanation of functions, malfunctions and maintenance Operating manual Explanation of the operating and maintenance regulations Maintenance contract...
-
Page 55: Retrofit Motor Cleaning Device
Retrofit motor cleaning device 14.2 Retrofit motor cleaning device Installation Manual Easypell 16 — 32kW... - Page 56 Retrofit motor cleaning device 200014_EN 1.2...
- Page 57 Retrofit motor cleaning device Installation Manual Easypell 16 — 32kW...
- Page 58 Spare parts 1 1 5 5 Spare parts Art. Nr. Art. Nr. Art. Nr. 200002 B105 B144 (16 KW) 200015 200004 E1005 PE103 200005 E1204 E1030 200007 E1073 B101 200006 121004 (16 kW) B203 E1001A 200027 (25 kW) 200014_EN 1.2...
- Page 59 Spare parts E1413E PE273 PE523 B103 E1194 200029 (16 kW) B104 PE255S 200030 121011 24155 PE136 (UCF- (16 KW) L203) 121010 121198 PE137 (UCF- L204) E1004 E1049 Installation Manual Easypell 16 — 32kW...
- Page 60 Technical data 1 1 6 6 Technical data Here you can find the technical data according to the boiler type. Boiler – Type Easypell 16 Easypell 20 Easypell 25 Easypell 32 Boiler-rated power [kW] Boiler-partial load [kW] Boiler efficiency rated power [%]...
- Page 61 CO partial load [mg/m3] OGC rated power [mg/m3] <1 OGC partial load [mg/m3] Dust rated power [mg/m3] Accord. to § 15a BVG Austria CO rated power [mg/m3] CO partial load [mg/m3] NOX rated power [mg/m3] Installation Manual Easypell 16 — 32kW...
- Page 62 Technical data NOX partial load [mg/m3] HC rated power [mg/m3] <1 HC partial load [mg/m3] Dust rated power [mg/m3] 200014_EN 1.2...
- Page 64 Author Eco Engineering 2050 GmbH A-4132 Lembach, Mühlgasse 9 Tel.: +43 (0) 72 86 / 74 50 Fax.: +43 (0) 72 86 / 74 50 – 10 E-Mail: office@easypell.com © by Eco Engineering 2050 GmbH www.easypell.com Subject to modifcations...