Table of Contents
Advertisement
Advertisement
Table of Contents

Related Manuals for Italkero Focus 40


Summary of Contents for Italkero Focus 40
- Page 1 South Africa...
- Page 2 COMPLIANCE O u r e q u i p m e n t i s c o n f o r m i n g w i t h : G a s D i r e c t i v e 2 0 0 9 / 1 4 2 / E C ( e x . 9 0 / 3 9 6 / E E C ) E l e c t r o m a g n e t i c C o m p a t i b i l i t y D i r e c t i v e 2 0 0 4 / 1 0 8 / E C L o w Vo l t a g e D i r e c t i v e 2 0 0 6 / 9 5 / E C RANGE...
- Page 3 Dear Technician, Congratulations on having chosen our appliance. This unit is able to provi- de many years of well-being with extremely high standards of efficiency, reliability, quality and safety. By means of this booklet, we intend providing you with all the information we consider necessary for correct and easy installation.
-
Page 4: Table Of Contents
CONTENTS GENERAL General information pg. 5 Fundamental safety rules Description of the appliance Identification Structure Technical data Accessories Wiring diagram Control panel INSTALLATOR Receipt of product - Dimension and weight Installation - Positioning the appliance - Placing device - Compartment housing - Irradiation area - Installation - Cover the model... -
Page 5: General Information
GENERAL INFORMATION After removing the packaging, check the integrity This booklet is an integral part of the appliance and and completeness of the supply and in case of any must therefore be looked after carefully and must discrepancies, contact the Agency that sold the ALWAYS accompany the appliance, even when this appliance. -
Page 6: Description Of The Appliance
DESCRIPTION OF THE APPLIANCE This device is for decorative purposes. The device was built with materials and components to withstand humidity and low Independent gas appliances for heating environ- temperatures, nevertheless not be considered ments. They feature an atmospheric burner with fully water resistant. -
Page 7: Structure
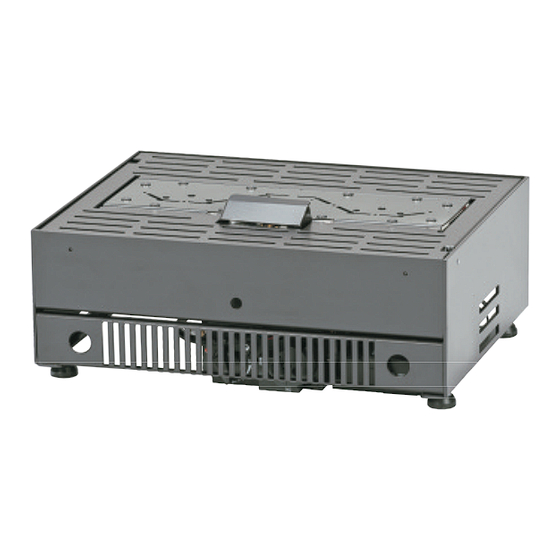
STRUCTURE 1 - Burner Cover 2 - Burner 3 - Frame 4 - Receiver 5 - Power group 6 - Adjustable foot 7 - Card flame control 8 - Gas valve 9 - MAX screw adjustment 10 - Valve Cover 11 - Magnet 12 - Battery holder 13 - Power supply 6V DC... -
Page 8: Technical Data
TECHNICAL DATA 0,713/0,300 0,893/0,349 1,087/0,582 1,25 ACCESSORIES GENERAL... -
Page 9: Wiring Diagram
ELECTRICAL SCHEME GENERAL... -
Page 10: Control Panel
CONTROL PANEL Automatic operation position with REMOTE CONTROL MANUAL Operation position 1 - Adjustment knob 2 - MAX gas adjustment screw 3 - Flame control Valve/Board connector 4 - Piezoelectric ignition button (emergency) 5 - O-1 switch 6 - Magnet switch for manual operation (emergency) 7 - Manual operation position knob 8 - Piezoelectric connector wire 9 - Flame control board... -
Page 11: Receipt Of Product
RECEIPT OF PRODUCT The model comes with: No. 1 Appliance No. 1 Remote On/Off Standard No. 4 Adjustable feet No. 1 Bag of documents: No. 1 Instructions for the User No. 1 Instructions for the installer No. 1 Warranty No. 1 Labels Warranty INSTALLER... -
Page 12: Dimension And Weight
DIMENSION AND WEIGHT DESCRIPTION Length ( C ) 1307 1857 Height ( B ) Depth ( A ) 14,5 21,5 28,5 Net weight INSTALLER... -
Page 13: Installation
INSTALLATION GENERAL INFORMATION - Clean the existing chimney before installing the device and before a trial evacuation of combustion products, according to the national regulations. - When installing, NEVER use accessories or com- ponent parts not approved by the Manufacturer, as these could be very dangerous. - Page 14 A) installed inside a closed environment with chimney. B) For outdoor installation without roof. C) outdoor installation, with no two adjoining walls. D) outdoor installation, with no two opposite walls. E) outdoor installation, with at least 25% of the open area. F) outdoor installation.
-
Page 15: Placing Device
PLACING DEVICE This type of apparatus can be installed in an existing chimney in which a new one constructed according to the size of the desired pattern or the space available. In both cases, the device can be installed (indoors or outdoors) in two modes, depending on technical or aesthetic: A - placed in the furnace... - Page 16 In the recessed type, the device should never be placed below the floor of the fire- box (6) to prevent its malfunction, overheating and damage its components. - His position is totally free, within the area under the chimney (7). Do not install the device out of the area (7) in the flue, so that any vapors are not pro- perly aspirated and expelled from the chimney.
-
Page 17: Irradiation Area
IRRADIATION AREA In this unit there are open flames, use a sui- table shelter for the protection of children, the elderly and the handicapped. Maintain a safety distance of at least 1m (1) between the appliance and objects made of combustible or inflammable material: wood furni- ture and furnishings, objects and curtains, etc. -
Page 18: Cover The Model
COVER THE MODEL Install the device without the use of cement or other adhesives for the building that may prevent the eventual removal. The Ductwork coating, all self-supporting, complete the installation of this device and must be constructed of nonflammable material in full compliance with the regulations. -
Page 19: Log Set And Pebbles
LOG SET AND PEBBLES Use only embers, ceramic logs and river rock that comes with the kit, do not add the other and respect the arrangement indicated by the manufacturer. Always use original parts or parts supplied by the manufacturer, the installation must be carried out by personnel authorized by the manufacturer or a qualified technician. -
Page 20: Manual Control
IMPORTANT! BEFORE PROCEEDING WITH IGNITION, CAREFULLY READ ALL THE INSTRUCTIONS AND PRECAUTIONS SHOWN IN THIS BOOKLET. When first ignited, the Appliance may give off a bad smell or vapours. This is entirely normal. The best thing is to ventilate the premi- ses adequately. -
Page 21: Remote Control Ir
Switch-off • Switch off the appliance: turn the control knob clockwise and return to “PILOT” position. • To switch the appliance off definitively (prolonged period without use): turn the control knob clockwise as far as “PILOT” position. After reaching this position, press the control knob and turn it to “OFF”... -
Page 22: Replacing The Batteries
Regolation This appliance has one types of remote control BASIC model (supplied) with Off and flame increase and decrease keys; Once turned on, you can choose the power level of the Device using the remote control. - Press the remote button "triangle DOWN" to redu- ce the intensity of the flame. -
Page 23: Manual Operating
Final switch-off The Appliance can be switched off from any heating position: press the “OFF” key on the remote control for a few seconds. To ensure long battery life, move the switch “O – I” (5) on the gas valve to “O” position. The system features an automatic safety lock that prevents further ignition until it is disengaged (this operation could take a few minutes). -
Page 24: Power Supply
POWER SUPPLY The receiving unit, for its operation, requires batteries that run out by frequency of use of the appliance. To prevent the replacement (about every two years), the device can be connected to the power line con- necting the power cord into the socket (1) present on the receiving unit (2). -
Page 25: Routine Maintenance
ROUTINE MAINTENANCE FAULTS AND SOLUTIONS Any type of job done on the appliance must THE PILOT LIGHT DOES NOT IGNITE OR WORK only be performed by a qualified technician - Make sure the pilot burner flame is of the correct and AT LEAST ONCE A YEAR. -
Page 26: Useful Information
USEFUL INFORMATION Seller Street tel. Installer Street tel. Technical Service Assistance Street tel. Date Intervention NOTE... - Page 27 NOTE...
Need help?
Do you have a question about the Focus 40 and is the answer not in the manual?
Questions and answers