Table of Contents
Advertisement
Available languages
Available languages
Quick Links
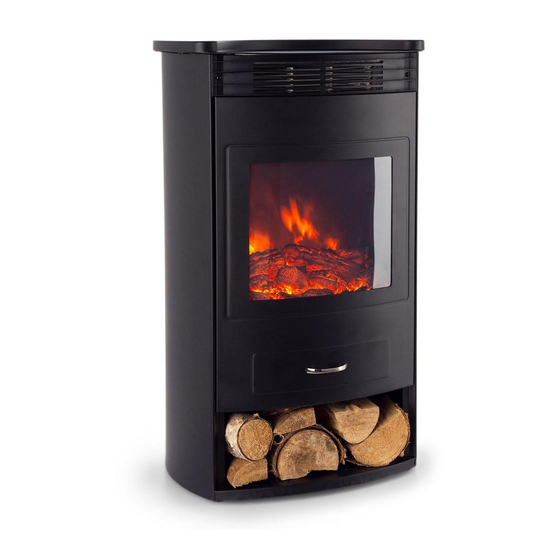
Elektrischer Kamin
Electric Fireplace
Chimenea eléctrica
Cheminée électrique
Camino elettrico
10032590 10034249
Hinweis: Dieses Produkt ist nur für gut isolierte Räume
oder für den gelegentlichen Gebrauch geeignet.
Note: This product is only suitable for well insulated
spaces or occasional use.
Advertencia: Este producto está indicado únicamente en
lugares abrigados o para una utilización punctual.
Remarque : Ce produit ne peut être utilisé que dans des
locaux bien isolés ou de manière occasionnelle.
Nota: Questo prodotto è adatto solo per spazi ben
isolati o uso occasionale.
Advertisement
Chapters
Table of Contents

Related Manuals for Klarstein 10032590


Summary of Contents for Klarstein 10032590
- Page 1 Remarque : Ce produit ne peut être utilisé que dans des Camino elettrico locaux bien isolés ou de manière occasionnelle. Nota: Questo prodotto è adatto solo per spazi ben isolati o uso occasionale. 10032590 10034249...
-
Page 3: Table Of Contents
Italiano 51 Fernbedienung und Tastenfunktionen 7 Inbetriebnahme 8 Manuelle Bedienung 8 Bedienung per Fernbedienung 9 Hinweise zur Entsorgung 13 TECHNISCHE DATEN Artikelnummer 10032590, 10034249 Stromversorgung 220-240 V ~ 50/60 Hz Leistung 1600-1900 W KONFORMITÄTSERKLÄRUNG Hersteller: Chal-Tec GmbH, Wallstraße 16, 10179 Berlin, Deutschland. Dieses Produkt entspricht den folgenden Europäischen... -
Page 4: Produktdatenblatt
PRODUKTDATENBLATT Modellkennung(en) 10032590, 10034249 Angabe Symbol Wert Einheit Angabe Einheit Wärmeleistung Nur bei elektrischen Speicher-Einzelraumheizgeräten: Art der Regelung der Wärmezufuhr Nennwärmeleistung Manuelle Regelung der Wärmezufuhr mit k.A. integriertem Thermostat Mindestwärmeleistung Manuelle Regelung der Wärmezufuhr k.A. (Richtwert) mit Rückmeldung der Raum- und/oder Außentemperatur... -
Page 5: Sicherheitshinweise
SICHERHEITSHINWEISE • Lesen Sie die Bedienungsanleitung vor der Inbetriebnahme aufmerksam durch und bewahren Sie diese für den zukünftigen Gebrauch auf. • Installieren Sie den Elektrokamin gemäß den Bestimmungen dieser Bedienungsanleitung. Konsultieren Sie bei Zweifeln den Kundendienst. • Achten Sie darauf, dass die Steckdose, welche Sie verwenden möchten, leicht zugänglich ist und sich nicht oberhalb des Geräts befi ndet. -
Page 6: Bedienfeld Und Tastenfunktionen
BEDIENFELD UND TASTENFUNKTIONEN Zum Anpassen der Heizleistung Zum Anpassen der Helligkeit des Flammeneffekts Anzeige für die Heizleistung Anzeige für den Timer Offenes-Fenster-Anzeige Ein-/Aus-Schalter... -
Page 7: Fernbedienung Und Tastenfunktionen
FERNBEDIENUNG UND TASTENFUNKTIONEN Ein-/Aus-Schalter Wert erhöhen Wert verringern Zum Anpassen der aktuellen Woche und Uhrzeit Zum Anpassen der Heizleistung Flammeneffekt und Kohlebett ein- oder ausschalten Zum Anpassen des Timers Zum Anpassen der Timer- Parameter Offenes-Fenster-Funktion ein- oder ausschalten 10 Zum Anpassen der Helligkeit des Kohlebetts 1 1 Zum Anpassen der Flammenhelligkeit... -
Page 8: Inbetriebnahme
INBETRIEBNAHME Stecken Sie den Stecker in die Steckdose. Drücken Sie auf den Ein-/Aus-Schalter auf der unteren rechten Seite des Geräts. Wenn das Gerät eingeschaltet wurde, kann es ausschließlich über die Fernbedienung gestartet werden. Drücken Sie dazu die Einschalttaste auf der Fernbedienung. Hinweis: Sobald das Gerät über die Fernbedienung gestartet wurde, kann es sowohl über das Bedienfeld links unten am Gerät, als auch über die im Fernbedienung bedient werden. -
Page 9: Bedienung Per Fernbedienung
BEDIENUNG PER FERNBEDIENUNG Hinweis: Entfernen Sie sich bei der Verwendung der Fernbedienung nicht mehr als 6 Meter vom Gerät und achten Sie darauf, dass die Fernbedienung immer in die Richtung des Geräts ausgerichtet ist. Gerät starten Wenn Sie auf der Fernbedienung die Einschalttaste drücken, geht der Bildschirm der Fernbedienung an, die Flamme entzündet sich und das Flammensymbol erscheint auf dem LCD-Bildschirm. - Page 10 Anpassen der Heizleistung • Wenn Sie die Taste das erste Mal drücken, arbeiten die Heizelemente mit einer Leistung von 1900 W, der LCD-Bildschirm zeigt an und die Anzeige für die Heizleistung leuchtet rot. • Wenn Sie die Taste das zweite Mal drücken arbeiten die Heizelemente mit einer Leistung von 950 W, der LCD-Bildschirm zeigt an und die Anzeige für die Heizleistung leuchtet blau.
- Page 11 Wenn Sie die Taste das zweite Mal drücken, zeigt der LCD-Bildschirm „2“ an, was für Dienstag steht. Hinweis: Sie können diese Taste bis zu sieben Mal drücken, um die Temperatureinstellung für die gesamte Woche vorzunehmen. Wenn Sie die Taste ein achtes Mal drücken, wird das Menü verlassen und der Bildschirm zeigt die Einstellung für den aktuellen Wochentag an.
- Page 12 Offenes-Fenster-Funktion • Wenn Sie die Taste einmal drücken, zeigt der Bildschirm das Symbol an und die Anzeige für die Offenes-Fenster-Anzeige am Gerät leuchtet gelb auf. • Wenn Sie die Taste erneut drücken, verschwindet das Symbol vom Bildschirm und die Anzeige am Gerät geht aus. •...
-
Page 13: Hinweise Zur Entsorgung
HINWEISE ZUR ENTSORGUNG Befindet sich die linke Abbildung (durchgestrichene Mülltonne auf Rädern) auf dem Produkt, gilt die Europäische Richtlinie 2012/19/EU. Diese Produkte dürfen nicht mit dem normalen Hausmüll entsorgt werden. Informieren Sie sich über die örtlichen Regelungen zur getrennten Sammlung elektrischer und elektronischer Gerätschaften. -
Page 15: Technical Data
Remote Control and Button Functions 19 Getting Started 20 Manual Operation 20 Operation via Remote Control 21 Hints on Disposal 25 TECHNICAL DATA Article number 10032590, 10034249 Power supply 220-240 V ~ 50/60 Hz Power consumtion 1600-1900 W DECLARATION OF CONFORMITY Producer: Chal-Tec GmbH, Wallstraße 16, 10179 Berlin, Germany. - Page 16 PRODUCT DATA SHEET Model identifier(s): 10032590, 10034249 Item Symbol Value Unit Item Unit Heat output Type of heat input, for electric storage local space heaters only Nominal heat output manual heat charge control, with integrated thermostat Minimum heat output manual heat charge control with room and/or...
-
Page 17: Safety Instructions
SAFETY INSTRUCTIONS • Read these operating instructions carefully before use and keep them for future reference. • Install the electric fi replace in accordance with the provisions of this manual. If in doubt, consult customer service. • Make sure the power outlet you want to use is easily accessible and not above the unit. -
Page 18: Control Panel And Button Functions
CONTROL PANEL AND BUTTON FUNCTIONS Adjust the heating power Adjust the brightness of the flame effect Display of heating power Display of timer Open window display On / off switch... -
Page 19: Remote Control And Button Functions
REMOTE CONTROL AND BUTTON FUNCTIONS On / off switch Increase value Decrease value Adjust the current week and time Adjust the heating power Switch the fl ame effect and coal bed on or off Set the timer Set the timer parameters Turn on or off the open window function 10 Adjust the brightness of... -
Page 20: Getting Started
GETTING STARTED Insert the plug into the socket. Press the on / off switch on the lower right side of the device. If the device has been switched on, it can only be started via the remote control. To do this, press the power button on the remote control. Note: As soon as the device has been started via the remote control, it can be operated via the control panel on the bottom left of the device as well as via the remote control. -
Page 21: Operation Via Remote Control
OPERATION VIA REMOTE CONTROL Note: When using the remote control, do not remove it more than 6 meters (19 feet) from the unit, making sure that the remote control is always oriented in the direction of the unit. Start the device When you press the power button on the remote control, the screen of the remote control will turn on, the flame will ignite, and the flame icon will appear on the LCD screen. - Page 22 Set the heating power • When you press the button for the first time, the heating elements will operate at a power of 1900 W, the LCD screen will display and the heating power indicator lights up red. • When you press the button the second time, the heating elements will operate at a power of 950 W, the LCD screen will display and the heating power indicator will light up blue.
- Page 23 When you press the button a second time, the LCD screen displays „2“ for Tuesday. Note: You may press this button up to seven times to set the temperature for the entire week. If you press the key an eighth time, you will exit the menu and the screen will show the setting for the current day of the week.
- Page 24 Open window function • If you press the button once, the screen will display the icon and the open window indicator on the device will turn amber. • If you press the button again, the icon will disappear from the screen and the indicator on the unit will turn off.
-
Page 25: Hints On Disposal
HINTS ON DISPOSAL According to the European waste regulation 2012/19/EU this symbol on the product or on its packaging indicates that this product may not be treated as household waste. Instead it should be taken to the appropriate collection point for the recycling of electrical and electronic equipment. - Page 27 Mando a distancia y botones de funcionamiento 31 Puesta en marcha 32 Uso manual 32 Manejo a través del mando a distancia 33 Retirada del aparato 37 DATOS TÉCNICOS Número de artículo 10032590, 10034249 Suministro eléctrico 220-240 V - 50/60 Hz Potencia 1600-1900 W DECLARACIÓN DE CONFORMIDAD Fabricante: Chal-Tec GmbH, Wallstraße 16, 10179 Berlín (Alemania).
-
Page 28: Hoja De Datos Del Producto
HOJA DE DATOS DEL PRODUCTO Denominación del modelo 10032590, 10034249 Dato Símbolo Valor Unidad Dato Unidad Potencia térmica Solo con disposítivos de acumulación de calor eléctricos para abastecimiento local: Tipo de regulación del abastecimiento de calor Potencia térmica nominal Regulación manual del abastecimiento de calor con termostato integrado: Potencia térmica mínima... -
Page 29: Indicaciones De Seguridad
INDICACIONES DE SEGURIDAD • Lea con detenimiento las instrucciones antes de la puesta en marcha y consérvelas para consultas posteriores. • Instale la chimenea eléctrica conforme a las disposiciones de este manual de instrucciones. Consulte al servicio de atención al cliente en caso de dudas. •... -
Page 30: Panel De Control Y Funciones De Los Botones
PANEL DE CONTROL Y FUNCIONES DE LOS BOTONES Para ajustar la potencia calefactora Para ajustar el brillo del efecto de llamas Indicador de la potencia de calefacción Indicador del temporizador Indicador de ventana abierta Interruptor on/off... -
Page 31: Mando A Distancia Y Botones De Funcionamiento
MANDO A DISTANCIA Y BOTONES DE FUNCIONAMIENTO Interruptor on/off Aumentar valor Reducir valor Para adaptar la semana y hora actuales Para ajustar la potencia calefactora Encender / apagar efecto de llamas y el carbón Para ajustar el temporizador Para ajustar los parámetros del temporizador Activar/desactivar... -
Page 32: Puesta En Marcha
PUESTA EN MARCHA Conecte el enchufe a la toma de corriente. Pulse el interruptor on/off situado en la parte inferior derecha del aparato. Cuando el aparato se haya encendido, puede iniciarse exclusivamente desde el mando a distancia. Para ello, pulse el botón de encendido del mando a distancia. -
Page 33: Manejo A Través Del Mando A Distancia
MANEJO A TRAVÉS DEL MANDO A DISTANCIA Advertencia: Al utilizar el mando a distancia, no se aleje a más de 6 metros del aparato y asegúrese de que el mando a distancia siempre se oriente en dirección al aparato. Iniciar el aparato Si pulsa el botón de encendido del mando a distancia, el display del mando se enciende, las llamas se iluminan y el símbolo de las llamas aparece en el display LCD. - Page 34 Ajustar la potencia calefactora • Si pulsa el botón una vez, las resistencias funcionan a 1900 W de potencia, el display LCD muestra X y el indicador de potencia calefactora se ilumina en color rojo. • Si pulsa el botón dos veces, las resistencias funcionan a 950 W de potencia, el display LCD muestra y el indicador de potencia calefactora se ilumina en color azul.
- Page 35 Si pulsa el botón dos veces, el display LCD muestra „2“, que corresponde a martes. Advertencia: Pulse pulsar este botón hasta siete veces para realizar el ajuste de temperatura para toda la semana. Si pulsa el botón una octava vez, abandona el menú...
- Page 36 Función de ventana abierta • Si pulsa el botón X una vez, el monitor muestra el símbolo y el indicador de ventana abierta del aparato se ilumina en color amarillo. • Si pulsa de nuevo el botón, desaparece el símbolo del display y el indicador del aparato se apaga.
-
Page 37: Retirada Del Aparato
RETIRADA DEL APARATO Si el aparato lleva adherida la ilustración de la izquierda (el contenedor de basura tachado) entonces rige la normativa europea, directiva 2012/19/UE. Este producto no debe arrojarse a un contenedor de basura común. Infórmese sobre las leyes territoriales que regulan la recogida separada de aparatos eléctricos y electrónicos. - Page 39 Télécommande et fonctions des touches 43 Mise en service 44 Utilisation manuelle 44 Utilisation avec la télécommande 45 Conseils pour le recyclage 49 FICHE TECHNIQUE Numéro d'article 10032590, 10034249 Alimentation 220-240 V ~ 50/60 Hz Puissance 1600-1900 W DÉCLARATION DE CONFORMITÉ Fabricant : Chal-Tec GmbH, Wallstraße 16, 10179 Berlin, Allemagne.
-
Page 40: Fiche De Données Produit
FICHE DE DONNÉES PRODUIT Référence (s) du produit 10032590, 10034249 Donnée Symbole Valeur Unité Donnée Unité Puissance calorifique Uniquement pour les radiateurs électriques à accumulation : Type de régulation de l'apport de chaleur Puissance calorifique Régulation manuelle de l'apport de chaleur... -
Page 41: Consignes De Sécurité
CONSIGNES DE SÉCURITÉ • Lisez attentivement ce mode d‘emploi avant d‘utiliser l‘appareil et conservez-le pour vous y référer ultérieurement. • Installez la cheminée électrique conformément aux dispositions de ce mode d‘emploi. En cas de doute, consultez le service client. • Assurez-vous que la prise de courant que vous souhaitez utiliser est facilement accessible et ne se trouve pas juste au-dessus de l‘appareil. -
Page 42: Panneau De Commande Et Fonctions Des Touches
PANNEAU DE COMMANDE ET FONCTIONS DES TOUCHES Pour régler la puissance de chauffage Pour régler la luminosité de la simulation de flammes Témoin de la puissance de chauffage Témoin de la minuterie Témoin de fenêtre ouverte Bouton de marche/arrêt... -
Page 43: Télécommande Et Fonctions Des Touches
TÉLÉCOMMANDE ET FONCTIONS DES TOUCHES Marche/arrêt Augmenter la valeur Réduire la valeur Ajustement de la semaine en cours et de l‘heure Ajustement de la puissance de chauffage Allumer ou éteindre la simulation de fl ammes et le lit de charbons Pour régler la minuterie Pour régler les paramètres de la minuterie... -
Page 44: Mise En Service
MISE EN SERVICE Branchez la fiche dans la prise. Appuyez sur l‘interrupteur marche/arrêt sur le côté inférieur droit de l‘appareil. Si l‘appareil a déjà été allumé, il ne peut être démarré que via la télécommande. Pour ce faire, appuyez sur le bouton d‘alimentation de la télécommande. -
Page 45: Utilisation Avec La Télécommande
UTILISATION AVEC LA TÉLÉCOMMANDE Remarque : Lorsque vous utilisez la télécommande, ne vous éloignez pas de plus de 6 mètres de l‘appareil, et assurez-vous que la télécommande reste toujours orientée en direction de l‘appareil. Démarrer l‘appareil Lorsque vous appuyez sur le bouton d‘alimentation de la télécommande, l‘écran de la télécommande s‘allume, la flamme s‘allume et l‘icône de la flamme apparaît sur l‘écran LCD. - Page 46 Réglage de la puissance de chauffage • Lorsque vous appuyez sur le bouton pour la première fois, les éléments chauffants fonctionnent avec une puissance de 1900 W, l‘écran LCD affiche et le témoin de chauffage s‘allume en rouge. • Lorsque vous appuyez une seconde fois sur le bouton, les éléments chauffants fonctionnent à...
- Page 47 Lorsque vous appuyez sur le bouton la deuxième fois, l‘écran LCD affiche „2“ pour „mardi“. Remarque : Vous pouvez appuyer sur ce bouton jusqu‘à sept fois pour régler la température pour toute la semaine. Si vous appuyez une huitième fois sur la touche, vous quittez le menu et l‘écran affiche le réglage du jour de la semaine en cours.
- Page 48 Fonction fenêtre ouverte • Lorsque vous appuyez une fois sur la touche, l‘écran affiche l‘icône et le témoin de fenêtre ouverte s‘allume en jaune sur l‘appareil. • Si vous appuyez à nouveau sur la touche, l‘icône disparaît de l‘écran et le témoin s‘éteint sur l‘appareil.
-
Page 49: Conseils Pour Le Recyclage
CONSEILS POUR LE RECYCLAGE Le pictogramme ci-contre apposé sur le produit signifie que la directive européenne 2012/19/UE s‘applique (poubelle à roues barrée d’une croix). Ces produits ne peuvent être jetés dans les poubelles domestiques courantes. Renseignez- vous concernant les règles appliquées pour la collecte d’appareils électriques et électroniques. -
Page 51: Dati Tecnici
Telecomando e tasti funzione 55 Messa in funzione 56 Utilizzo manuale 56 Utilizzo con il telecomando 57 Smaltimento 61 DATI TECNICI Numero articolo 10032590, 10034249 Alimentazione 220-240 V ~ 50/60 Hz Potenza 1600-1900 W DICHIARAZIONE DI CONFORMITÀ Produttore: Chal-Tec GmbH, Wallstraße 16, 10179 Berlino, Germania. -
Page 52: Scheda Informativa Del Prodotto
SCHEDA INFORMATIVA DEL PRODOTTO Identificazione del modello (i) 10032590, 10034249 Indicazione Simbolo Valore Unità Indicazione Unità Potenza termica Solo per gli apparecchi per il riscaldamento d'ambiente locale elettrici ad accumulo: Tipo di controllo dell´apporto termico Potenza termica nominale Controllo manuale del carico termico con N.D. -
Page 53: Avvertenze Di Sicurezza
AVVERTENZE DI SICUREZZA • Leggere attentamente il manuale d’uso prima della messa in funzione e conservarlo per futuri utilizzi. • Installare il camino elettrico secondo le indicazioni del presente manuale. In caso di dubbi, consultare il servizio di assistenza ai clienti. •... -
Page 54: Pannello Di Controllo E Tasti Funzione
PANNELLO DI CONTROLLO E TASTI FUNZIONE Per regolare la potenza riscaldante Per regolare l’intensità dell’effetto fiamma Indicazione della potenza riscaldante Indicazione per il timer Indicazione Finestra Aperta Interruttore ON/OFF... -
Page 55: Telecomando E Tasti Funzione
TELECOMANDO E TASTI FUNZIONE Interruttore ON/OFF Aumentare il valore Diminuire il valore Regolare la settimana e l’ora attuale Regolare la potenza riscaldante Accendere e spegnere l’effetto fi amma o il letto di braci Regolare il timer Regolare i parametri del timer Accendere o spegnere la funzione Finestra Aperta... -
Page 56: Messa In Funzione
MESSA IN FUNZIONE Inserire la spina nella presa elettrica. Premere l’interruttore ON/OFF sul lato inferiore destro del dispositivo. Una volta acceso, il dispositivo può essere attivato solo con il telecomando. A tal fine, premere il tasto di accensione sul telecomando. Nota: non appena il dispositivo è... -
Page 57: Utilizzo Con Il Telecomando
UTILIZZO CON IL TELECOMANDO Avvertenza: non allontanarsi a più d 6 metri dal dispositivo se si utilizza il telecomando e assicurarsi di direzionarlo sempre verso il dispositivo. Attivare il dispositivo Premendo il tasto ON/OFF sul telecomando, lo schermo del telecomando si accende, la fiamma comincia a brillare e il simbolo della fiamma compare sul display LCD. - Page 58 Regolare la potenza riscaldante • Premendo questo tasto la prima volta, gli elementi riscaldanti lavorano con una potenza di 1900 W, lo schermo LCD mostra e l’indicazione per la potenza riscaldante si illumina di rosso. • Premendo questo tasto la seconda volta, gli elementi riscaldanti lavorano con una potenza di 950 W, lo schermo LCD mostra e l’indicazione per la potenza riscaldante si illumina di blu.
- Page 59 Premendo il tasto una seconda volta, lo schermo LCD mostra “2”, che significa martedì. Nota: è possibile premere questo tasto fino a sette volte, per impostare la temperatura di tutta la settimana. Premendo il tasto un’ottava volta, si esce dal menù e lo schermo indica l’impostazione per il giorno della settimana corrente.
- Page 60 Funzione Finestra Aperta • Premendo il tasto la prima volta, sullo schermo compare il simbolo l’indicazione per la Finestra Aperta si illumina di giallo sul dispositivo. • Premendo il tasto la seconda volta, dallo schermo scompare il simbolo e l’indicazione sul dispositivo si spegne. •...
-
Page 61: Smaltimento
SMALTIMENTO Se sul prodotto è presente la figura a sinistra (il cassonetto dei rifiuti mobile sbarrato), si applica la direttiva europea 2012/19/UE. Questi prodotti non possono essere smaltiti con i rifiuti normali. Informarsi sulle disposizioni vigenti in merito alla raccolta separata di dispositivi elettrici ed elettronici. Non smaltire i vecchi dispositivi con i rifiuti domestici.
Need help?
Do you have a question about the 10032590 and is the answer not in the manual?
Questions and answers
Front coals won't stay on we have the user manual and have also reset it still the front coals won't come on this fire was only bought in November