Table of Contents
Advertisement
Quick Links
BUSH - 7.2V Rechargeable Hand-Held Vacuum Cleaner
Installation & User Instructions – Please keep for future reference
Important
– Please read these instructions fully before installing or using
These instructions contain important information which will help you get the best from your appliance and
ensure safe and correct installation, use and maintenance.
If you need help or have damaged or missing parts, call the Customer Helpline: 0870 600 3030
406/7874 (D)
Advertisement
Table of Contents

Related Manuals for Bush 406/7874


Summary of Contents for Bush 406/7874
- Page 1 BUSH - 7.2V Rechargeable Hand-Held Vacuum Cleaner Installation & User Instructions – Please keep for future reference 406/7874 (D) Important – Please read these instructions fully before installing or using These instructions contain important information which will help you get the best from your appliance and ensure safe and correct installation, use and maintenance.
-
Page 2: Table Of Contents
Table of contents Safety Warnings ....... . .2 Safety Warnings ....... . .3 Accessories included . -
Page 3: Safety Warnings
Safety information Important – Please read these instructions fully before installation Safety Warnings Do not use in an area where IMPORTANT SAFETY INSTRUCTIONS dangerous items are stored. When using an electrical appliance, Do not handle or use the Vacuum or basic safety precaution should Battery Charging Adapter with wet always be observed, including the... -
Page 4: Safety Warnings
Safety information Important – Please read these instructions fully before installation This vacuum includes re- The Vacuum Cleaner is not a toy, chargeable NI-MH cells. keep away from small children. D0 not incinerate cells or expose Do not abuse the charger cable. to high temperatures, as they may Never carry the charger or base by explode. -
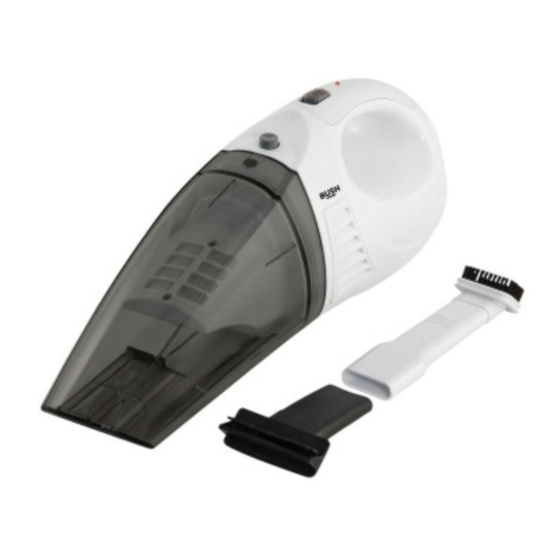
Page 5: Accessories Included
Functions & controls Please familiarize yourself with the parts and accessories listed below Accessories included • 1 X SLX225E Vacuum • 1 X Detachable Brush • 1 X Wall Bracket • 1 X Squeegee & Crevice tool • 1 X Spare Filter •... -
Page 6: Recharging Information
User instructions Recharging information Operating instructions • Before using for the first time charge the vacuum USAGE IN DRY CONDITIONS cleaner for at least 14 hours. The recommended 1: Lift and remove the Vacuum from the charging dock. duration for each subsequent charge is 14 hours to 2: Attach the BRUSH or CREVICE attachments to the maintain maximum performance from the internal SUCTION NOZZLE to reach confined spaces or brush... -
Page 7: Operating Instructions (Cont)
User instructions Operating instructions (cont) Cleaning & maintenance (cont) 5: When sucking up liquids, ensure the Vacuum is CLEANING THE DUST CONTAINER & FILTER positioned at least 40 - 90 degrees. 1: Remove the DUST CONTAINER (see step 1 of NOTE: Never allow liquids to come into contact removing the dust container), 2: Remove the FILTER by sliding the entire plastic... -
Page 8: Wall Mounting Instructions
User instructions Wall mounting instructions See the below diagram for wall mounting the charging dock. Further fixing instructions can be found on pg 8. 1: Insert the wall fixings supplied (or suitable fixings as described on page 8) shown to below. 2: Dock the Vacuum as show on the diagram below. -
Page 9: Wall Mounting & Fixings
A Guide to Wall Mounting & Fixings IMPORTANT: When drilling into walls always check that there are no hidden wires or pipes etc. Make sure that the screws and wall plugs being used are suitable for supporting your unit. Consult a qualified tradesperson if you are unsure. HINTS: 1) General Rule Always use a larger screw and wall plug if you are not sure. -
Page 10: Care & Maintenance
User instructions Care & maintenance Important: Always unplug the appliance from the power socket during cleaning and maintenance. Never use any sharp instruments or abrasive substances, soap, household cleaner, detergent or wax polish for cleaning. Clean the external surfaces with a damp soft cloth only. Never use abrasive products or solvents as they may damage the appliance. - Page 11 Guarantee PRODUCT GUARANTEE This product is guaranteed against manufacturing defects for a period of Year This product is guaranteed for twelve months from the date of original purchase. Any defect that arises due to faulty materials or workmanship will either be replaced, refunded or repaired free of charge where possible during this period by the dealer from whom you purchased the unit.