Lumens LC200 User Manual
Capture vision station
Hide thumbs
Also See for LC200:
- User manual (30 pages) ,
- Quick installation manual (2 pages) ,
- User manual (38 pages)
Table of Contents
Advertisement
Advertisement
Table of Contents

Related Manuals for Lumens LC200


Summary of Contents for Lumens LC200
- Page 1 - Engli [Im mportan To do ownload d the late est versio on of Qu ick Start t Guide, ltilingual l user ma anual, so oftware, or driver r, etc., pleas se visit L Lumens https s://www.M MyLume ns.com/s support...
-
Page 2: Table Of Contents
Table of Contents Copyright Information ................. 2 Chapter 1 Safety Instructions ..............3 Chapter 2 Package Contents ..............5 Chapter 3 Product Overview ..............6 Front panel ................6 Rear panel ................6 RS-232/RS-485 I/O pin description ........7 Chapter 4 Instruction for installation ............. -
Page 3: Copyright Information
Lumens is a trademark that is currently being registered by Lumens Digital Optics Inc. Copying, reproducing or transmitting this file is not allowed if a license is not provided by Lumens Digital Optics Inc. unless copying this file is for the purpose of backup after purchasing this product. -
Page 4: Chapter 1 Safety Instructions
Chapter 1 Safety Instructions Always follow these safety instructions when using the product: 1 Operation Please use the product in the recommended operating environment. Do not place product in tilted position. Do not place the product on an unstable trolley, stand or table. Do not use this product near water or source of heat. - Page 5 EN55032 (CE Radiation) Warning Operation of this equipment in a residential environment could cause radio interference.
-
Page 6: Chapter 2 Package Contents
C Chapte er 2 Pa ackag e Con ntents LC200 Power Ada apter Power C ppearance m may vary depen nding on cou untry/region RS-232/RS -485 unting Met tal Plate Quick k Installatio n Guide Connecto (x2) (x2) Quick Installation Gu... -
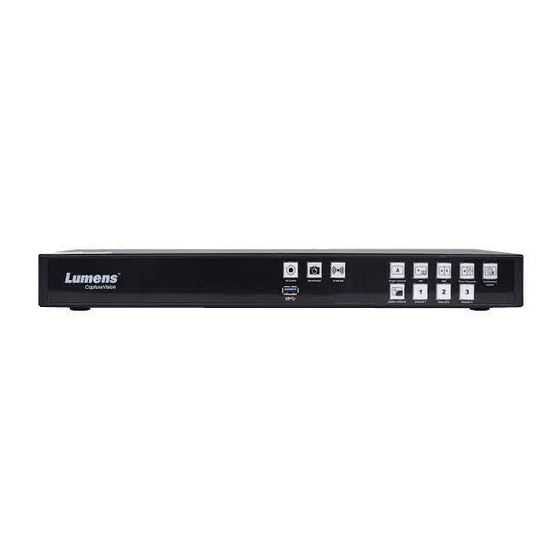
Page 7: Chapter 3 Product Overview
Chapter 3 Product Overview 3.1 Front panel 3.2 Rear panel 14 15 18 19 Name Function Descriptions RECORD Start/Stop recording SNAPSHOT Capture a single photo STREAM On/Off image streaming Single Channel Display a single channel screen Switch to PIP display Switch to PBP display Three Switch to three-channel display... -
Page 8: Rs-232/Rs-485 I/O Pin Description
3.3 RS-232/RS-485 I/O pin description RS-232 Pin NO. Function RS-485 Pin NO. Function T/R+ T/R-... -
Page 9: Chapter 4 Instruction For Installation
Chapter 4 Instruction for installation 4.1 Product connection diagram Display Display Power Cord Router (MultiView) Amplifier (Program) Microphone Power Supply Line/MIC device Audio In HDMI output HDMI Source Input Audio Output RS-232/RS-485 USB Control Control Environment External Control Keyboard/Mouse Equipment Camera Speaker Digital Presenter... -
Page 10: Chapter 5 Function Description
About formation of f LC200 hen connec cting to the router, the c current ass igned devic ce IP Device ddress will b be displayed... - Page 11 LC20 ※Displa Iden ntification ay name only y accepts En nglish charac cters and num mbers LC200 s supports diffe erent time zo one setting. I t can synchr ronize time w with NTP service (default) and d manual set ...
- Page 12 5.2.1.2 Network The factory reset of LC200 is DHCP. The IP address is assigned by the connecting LAN router. If you want to use a static IP address, please configure the connection here. Item Function Descriptions DHCP: Dynamic IP address as default ...
- Page 13 0 0 ~ 16 chara acters. {}()’&@~ ~^$%”|,`:?<> >*\/#; symbol ls, and space e are forbidd Restore es LC200 to f factory reset ※Chec k [Keep Netw work Setting s] and the ne etwork settin ngs will be re mained...
- Page 14 Item Function Descriptions Export Export the current configuration of LC200 as a configuration file Import Import the exported configuration files from a LC200 to another LC200 5.2.1.5 Display Settings Item Function Descriptions Output Select a HDMI output resolution on LC200...
- Page 15 5.2.2 Accoun You can n manage accounts f for 3 kinds of user mo ode here: m modify the user name a nd passwo ord to [Syst tem Mana gement], [ Director], a and [Conte Manage ement]. Item Username e/Password Functi ion Descript tions...
- Page 16 Function Descriptions Click [Refresh] and automatically scan the network cameras in the same LAN Click [Login Verification] and enter login information to connect the camera Lumens Network Network Camera Camera Account: admin Password: 9999 Once the status display “OK”, indicating that the image can be set under the signal source input selection.
- Page 17 5.2.4 Video Settings 5.2.4.1 Record Settings Item Function Descriptions Recording Mode: You can select Movie Mode (MP4) and Movie/Resource Mode (MP4) Encode Profile: 6 default encoding formats are available to be selected by resolutions and average bitrate (Please refer to the instructions of Encode Profile).
- Page 18 Supported streaming type: RTMP / RTMPS / RTP / Youtube / Youtube_Gaming / Facebook Live / Twitch / Smashcast Streaming Settings Real Time Streaming Protocol (RTSP): You can customize the real time streaming route of LC200 Default RTSP location: rtsp://LC200_IP_address:554/pgm...
- Page 19 5.2.5 Scene LC200 p provides 5 overlay st tyles, 5 bac ckground i mages, an nd 5 scene s. You can also o add your r own style Item unction Desc criptions Select and de elete overlay style. You c an upload file es to apply.
- Page 20 G format Supp ported size: 1 1920 x 1080 Scene is the i integration of f “Overlay,” “ “Background d Image,” and “R Recording La ayout,” which h provides th e scene mad de of differen ackground im mages, layou ut, and overla ay style.
- Page 21 Click [Stop] to o stop the cu rrent schedu uled recordin ancel Record ding 5.2.8 Backup Setting LC200 p provides a uto backup p service w which can u upload vide eos to a designa ated space automatic cally.
- Page 22 How to o series on Lu umens™ we ebsite for elated applic cation setting 5.2.9 About LC200 D Device-rela ated Inform mation: Firm mware ver rsion, devic ce serial nu umber, and tech hnical supp...
-
Page 23: Director
5.3 Director LC200 is built in Director, which allows you to monitor recording and preview the output video from streaming director. Related feature description as below: Item Function Descriptions Channel Signal The drop-down menu of image sources includes 4-channel HDMI source,... - Page 24 5.3.1 REC Record Setting Item Function Descriptions Check stream(s) and click recording button to strart streaming Recording while and recording function Streaming Recording Button Record the main screen image Single-channel Streams right away without starting recording function Streaming Button 5.3.2 Audio Source Management Item Function Descriptions...
- Page 25 5.3.4 Camera Setting Item Function Descriptions Camera Select a desired camera to control Preset Setting and Call Click number keys to perform preset settings and calls Direction Control Panel Move the center point to control the shooting direction Zoom In/Zoom Out Zooms in/out the lens Focus Setting Set up auto or manual focus...
-
Page 26: File Management
File management LC200 provides file management feature which can perform the following functions via the file management interface: Upload, download, delete, replay video files and editing recording information. Item Function Descriptions Preview Screen Click desired video files to play and control on the Preview screen... - Page 27 5.4.1 Webpage Interface The default page after accessing LC200 web page is system setting page. Click the video management icon on the top-right corner to access video management page. Video management Item Function Descriptions Video Click to access the video management page...
- Page 28 Upload Status Description: Icon Upload Status Icon Upload Status Videos are uploaded Videos are queued for successfully upload Fail to upload videos Videos are uploading Download Check the thumbnails of the videos to download. Click [ ] and the videos will be saved as MP4 video files and datasets.
- Page 29 Photo Management You can manage the photo files captured by pressing SNAPSHOT. Folders will be named with the shooting date automatically; all photos shot in the same date will be stored in the same folder. Just like Video Management, you can also upload, download, and delete photos in Photo Management subpage.
-
Page 30: Chapter 6 Troubleshooting
Chapter 6 Troubleshooting This chapter describes problems you may encounter while using LC200. If you have questions, please refer to related chapters and follow all the suggested solutions. If the problem still occurred, please contact your distributor or the service center.
Need help?
Do you have a question about the LC200 and is the answer not in the manual?
Questions and answers