Table of Contents
Advertisement
Advertisement
Table of Contents

Subscribe to Our Youtube Channel
Related Manuals for Weinmann prismaAQUA


Summary of Contents for Weinmann prismaAQUA
- Page 1 LINE Patient compass Welcome Guide · English Your guide to the therapy device...
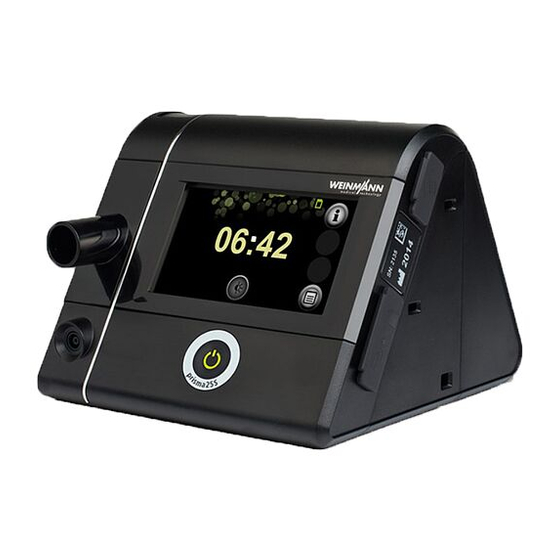
- Page 2 Filter compartment Handle Touchscreen Unlocking button Voltage input Name of device SD card slot On/off button...
- Page 3 Welcome to Weinmann..and congratulations on your new therapy device! Equipped with state-of-the-art medical technology tailored to your requirements, it will help you to sleep peacefully again and in doing so considerably improve your quality of life. To allow you to feel at ease with your new therapy partner from the word go, and start your therapy immediately, we have compiled the most important information concerning the therapy device for you in this patient compass.
-
Page 4: Table Of Contents
6. Cleaning the therapy device ..............16 1.1 Connecting the therapy device up to the power supply ......5 7. Accessories: prismaAQUA respiratory air humidifier ........18 1.2 Connecting the respiration hose and mask ..........5 7.1 Preparation prior to first use ............... 18 1.3 Setting the therapy device .............. -
Page 5: Preparing The Therapy Device
1. Preparing the therapy device The therapy device must be connected to the power supply for use. The hose and mask must also be connected. 1.1 Connecting the therapy device up to the power supply 1.2 Connecting the respiration hose and mask a. -
Page 6: Setting The Therapy Device
1.3 Setting the therapy device Your therapy device needs to be set (configured) before you can use it for the first time. The authorized dealer will often do this for you. If your authorized dealer has not set the device, you can also do it easily yourself. Setting the device using an SD card With the help of a prepared SD card from your authorized dealer setting the device is child's play. -
Page 7: Using The Sd Card
2. Using the SD card The SD card is included in the scope of supply of your therapy device. The device saves the settings automatically as soon as the SD card is inserted. In addition, you can also save your therapy data on the SD card and make them easily available to your physician or authorized dealer. Removing the SD card Inserting the SD card Requirement: The... -
Page 8: Explanation Of The Symbols And Displays On The Screen
3. Explanation of the symbols and displays on the screen When you switch on your therapy device, a display appears on the screen for 30 seconds informing you of the patient-related operating hours of your device. If your authorized dealer asks about the patient-related operating hours of your device, you can read these off conveniently during the first 30 seconds after switching on the device. - Page 9 Button functions Time with wake-up time Set by pressing the time. Go forward a screen Screen in "Standby" mode Info menu button Go back a screen Provides access to the info menu. Wake-up time Alarm is set. Confirm Displays the set wake-up time.
-
Page 10: Starting/Ending The Therapy
4. Starting/ending the therapy You have two options for starting the therapy: Press the on/off button briefly If the autoSTART-STOP function is activated: Breathe deeply into the mask and your therapy device will switch on automatically. Ensure that the respiration hose is placed where it will not be squashed and does not stop you from falling asleep. Screen in "Therapy"... - Page 11 You have two options for ending the therapy: Press the on/off button briefly If the autoSTART-STOP function is activated: Remove the ventilation mask. The therapy is automatically ended after 5 seconds. The last therapy is displayed. The more green checks are Depending on the device settings, the usage time may be visible (maximum of 3), the more effective the therapy was.
-
Page 12: Configuring Settings In The Menu
5. Configuring settings in the menu You can set the comfort, accessories, time and device parameters in the settings menu. The therapy device must be in "Standby" mode for this. The availability of the listed menu items depends on the ventilation mode and the configuration (settings) of the therapy device. Press the menu button Comfort parameters Accessories parameters... -
Page 13: Setting The Time
5.1 Setting the time 5.2 Setting the time zone 5.3 Setting the wake-up time Press the "Time" button and then "Time" For you to be able to set the correct time zone, Select the following screen (c.) for the wake- to proceed to the following screen (a.). -
Page 14: Autostart-Stop
5.4 autoSTART-STOP Your therapy device is equipped with the autoSTART-STOP function to make your therapy even more convenient. If it is activated, the therapy device can be switched on simply by breathing into the mask. When you take the mask off your face again after the therapy, the device switches off automatically after 5 seconds. The use of nasal pillow masks or incompatible mask systems can restrict the autoSTART-STOP function. -
Page 15: Softstart
5.5 softSTART 5.6 Energy saving The softSTART function is suitable for patients who find a high pressure uncom- You can activate the "Energy saving" function in the main menu of your therapy fortable when awake and cannot fall asleep. device. This function causes the device to switch off automatically if it has been in "Standby"... -
Page 16: Cleaning The Therapy Device
6. Cleaning the therapy device CaUTIon! Monthly Risk of injury from electric shock! Cleaning the air filter (gray filter): a. Remove the air filter. Any liquids entering the device can cause a short circuit, injure the user, and b. Clean the air filter under running water. damage the therapy device. - Page 17 Monthly Daily Replacing the optional pollen filter (white filter): Clean the respiration hose: a. Remove the air filter. a. Remove the respiration hose from the therapy device. b. Remove and dispose of the pollen filter. b. Rinse respiration hose off with clean water. c.
-
Page 18: Accessories: Prismaaqua Respiratory Air Humidifier
7. Accessories: prismaAQUA respiratory air humidifier The prismaAQUA respiratory air humidifier is used in combination with the therapy device in cases of dry upper airways and when the respiratory air is perceived as too cold. prismaAQUA may only be used on the recommendation of a physician. -
Page 19: Alternative Filling
If you want to start the therapy but there is no Caution! Risk of injury from hot element! water in your prismaaQUa , the warning signal During and shortly after operation, the element of the respiratory appears after 30 seconds and the humidifier air humidifier is hot and touching it can cause burns. -
Page 20: Connecting To The Therapy Device
7.4 Connecting to the therapy device a. To connect the respiratory air humidifier to the therapy device, start by pressing the unlocking button on the therapy device. Then remove the cover from the therapy device. b. Push the respiratory air humidifier into the therapy device from the side until the unlocking button clicks into place audibly. -
Page 21: Setting The Respiratory Air Humidifier
7.5 Setting the respiratory air humidifier Once the humidifier is connected to the therapy device it is ready for use. The humidifier starts automatically when the therapy starts. It is also possible to preheat the humidifier before starting the therapy in order to make your therapy more comfortable. To do this, press the humidifier button set your preferred humidifier output, and start your therapy a few minutes later. -
Page 22: Cleaning
7.6 Cleaning We recommend that you clean your respiratory air humidifier weekly. a. Remove the respiratory air humidifier from the therapy device. c. If present: Pour out the water in the base of the humidifier. d. Remove the humidifier insert from the top of the humidifier. b. - Page 23 g. Insert the humidifier insert in the top of the humidifier again. h. Fill the respiratory air humidifier with water again before the next use and connect it to the therapy device. Further information and cleaning tips can be found in the "Hygienic preparation of the respiratory air humidifier"...
- Page 24 Geräte für Medizin GmbH + Co. KG P.O. Box 540268 ■ D-22502 Hamburg Kronsaalsweg 40 ■ D-22525 Hamburg T : +49-40-5 47 02-0 F : +49-40-5 47 02-461 E : info@weinmann.de www.weinmann.de Center for Production, Logistics, Service Weinmann Geräte für Medizin GmbH + Co. KG Siebenstücken 14...
Need help?
Do you have a question about the prismaAQUA and is the answer not in the manual?
Questions and answers