Advertisement
Quick Links
?€Gh
http://www.djtechpr0.com
D ll'— -I 5
Professional .-2-Cl—l DJ scratch mixer
with integrated inn0l'—ADl'=l2
a'\A
%@->¢':
T'
0
¢(\@l\ 48
9"
\»\°
USER MANUAL
(English)
EN 1 EN 6
5.]-,?ecI1
MANUAL DE INSTRUCCIONES
(Espclfiol)
ES 1~ES 6
MANPALE 0| ISTRUZIONI
(lialiqno)
IT 1~|T
H>11=&§REH%
(EIZIKEE)
JP 1~JP 7
\|¢"
\¢
Y
9
,\¢
Q'
c ved
* * Q
*2
¢"
Y'
e ,~
%6a N3'
.(@
U
4
,-99
1*
9
a
'_
_ <»,
O(
O
O
". \ ' E >T=' 7 39
Q
@€; _
*3',
K
a
6
s\
'%
"Q
0
®
c-""\
T:
' Q
"Q
§n
\ I7
9
U pig)!'/Iifér
_
a
kw
A0
\/
Q
O
fi%
,'_ \N' ; ;_;4;1>
L
s ~ = = - e
/i\
A:9'
s\ {sf
/
9
3;, O Q'
o x" "
O
O
0k, O 0
'$0
O
Q»;-E
axx
f\
* / ( = §* ¢
Q :\
3
s\$ ~=. »
0 /€°'
-/7"!
0 >
9"
Q
\
¢-\"'a
%
\%
Q
// ]$<\V'%><8\
6
;\@
Advertisement

Subscribe to Our Youtube Channel
Related Manuals for DJ-Tech DIF-IS


Summary of Contents for DJ-Tech DIF-IS
-
Page 2: Safety Instructions
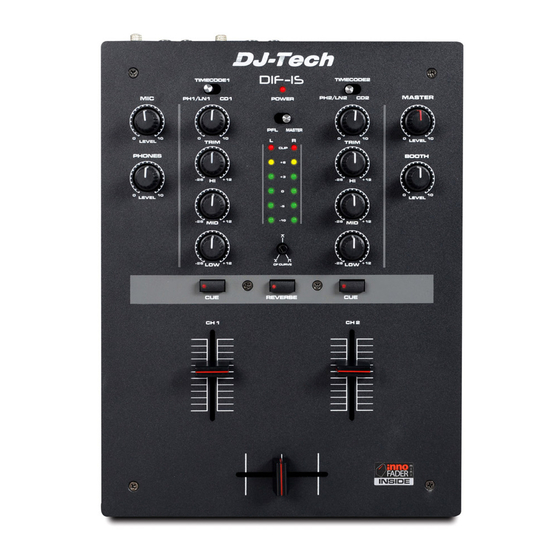
SAFETY INSTRUCTIONS 1. Read these Instructions. 2. Keep these Instructions. 3. Heed all Warnings. 4. Follow all Instructions. 5. Do not use this apparatus near water. 6. Clean only with dry cloth. Do not block any ventilation openings. Install in accordance with the manufacturer’s instructions. Do not install near any heat sources such as radiators, heat registers, stoves, or other apparatus (including amplifiers) that produce heat. - Page 4 A. Front, Rear and Top Panels Features EN-3...
- Page 5 Level Meter – Show the level depending on the position or other component with line level output. of the PFL/ MASTER Switch in No. 2 22. PH/LN Jacks – These jacks are inputs for a phono stage for magnetic (MM) cartridge or a line level device. PFL/ MASTER Switch –This switch will determine the level meter mode.
-
Page 8: Instrucciones De Seguridad
INSTRUCCIONES DE SEGURIDAD 1. Lea estas instrucciones. 2. Conserve estas instrucciones. 3. Respete todas las advertencias. 4. Siga todas las instrucciones. 5. No use este aparato cerca del agua. 6. Límpielo únicamente con un paño seco. 7. No bloquee las rejillas de ventilación. Instale el aparato siguiendo las instrucciones del fabricante. 8. - Page 10 A. Front, Rear y Top Panels Características ES-3...
- Page 11 Medidor de nivel – Indica el nivel dependiendo de la 16. Salida de auriculares – Conecte sus auriculares en posición del CH1/2, MASTER Switch (canal 1/2, esta clavija de 3.5/ 6.3mm. interruptor maestro) nº 2, 17. Interruptor de potencia – Enciende o apaga esta CH1/2, interruptor maestro –Este interruptor unidad.
-
Page 14: Avvertenze Di Sicurezza
AVVERTENZE DI SICUREZZA 1. Leggete le istruzioni. 2. Conservate le istruzioni. 3. Rispettate tutte le avvertenze. 4. Seguite tutte le istruzioni. 5. Non servitevi dell’apparecchio vicino all’acqua. 6. Per pulire l'apparecchio, utilizzate solo panni asciutti. 7. Non ostruite le aperture di ventilazione. Installate l’apparecchio seguendo le istruzioni del fabbricante. - Page 16 A. SPECIFICHE DEL PANELLO FRONTALE E POSTERIORE IT-3...
- Page 17 16. Uscita cuffie – Collegate le cuffie a questa presa Banda di livello – Visualizza il livello a seconda della posizione del selettore su CH1/2 o MASTER (cfr. n.2) 3.5/6.3 mm. Selettore CH1/2, MASTER – Questo selettore 17. Power On/Off (interruttore di alimentazione) – determina la modalità...
- Page 20 JP-1...
- Page 21 JP-2...
- Page 23 JP-4...
- Page 24 JP-5...
Need help?
Do you have a question about the DIF-IS and is the answer not in the manual?
Questions and answers