CapstanAG EVO Operator's Manual
Upgrade kit, compatible with: synchro aim* command
Hide thumbs
Also See for EVO:
- Installation instructions manual (28 pages) ,
- Operator's manual (126 pages)

Related Manuals for CapstanAG EVO


Summary of Contents for CapstanAG EVO
- Page 1 EVO™ Upgrade Kit Compatible with: Synchro™ AIM* Command Operator Manual 150300-011 Rev. B | Revised 09/2019 | ©2019 Capstan Ag Systems, Inc.
- Page 2 Thank you for your business! At CapstanAG, our goal is to redefine the way people do their chemical application. Our PWM control systems have been setting the bar for maximum productivity for more than 20 years. Our focus on performance, support, and education have dramatically changed the landscape of agricultural chemical application.
-
Page 3: Table Of Contents
Turn Compensation......................33 Rate Sync........................33 Pressure Increment......................34 Advanced Menu......................35 Start the Cab Display....................... 49 Change the Units of Measure....................50 Manual Mode Operation......................51 ByPass Mode......................... 52 Shutdown the Cab Display....................... 52 © 2019 Capstan Ag Systems, Inc. EVO Upgrade... - Page 4 Chapter 6: Maintenance..............53 Service the System........................53 Jump Start, Weld On, or Charge the Machine.............. 53 Inspect the System........................53 Clean the System........................53 Storage of the System......................53 Winterize for Storage..................... 53 Recommended Guidelines for Maintenance/Service..............54 Baseline Evaluation Process....................54 Chapter 7: Schematics................55 System Layout..........................
-
Page 5: Chapter 1: Introduction
If you are not the original owner of this machine, it is in your interest to contact your local CapstanAG dealer to inform them of this unit's serial number. Providing this information will help CapstanAG notify you of any issues or product improvements. - Page 6 Introduction © 2019 Capstan Ag Systems, Inc. EVO Upgrade...
-
Page 7: Chapter 2: Safety
Very small fires can be put out (extinguished) with a fire extinguisher. Use an appropriate method to extinguish a fire (water for paper fires, and chemical extinguishers for electrical or chemical fires. © 2019 Capstan Ag Systems, Inc. EVO Upgrade... -
Page 8: Personal Protective Equipment
Keep sparks and flames away from the battery. Battery gas can explode and cause serious injury. Do not smoke in the battery charging area. Remove jewelry, which might make electrical contact and create sparks. © 2019 Capstan Ag Systems, Inc. EVO Upgrade... -
Page 9: Chapter 3: Warranty
The terms of this warranty do not in any way extend to any product which was not manufactured by us or one of our affiliates. While necessary maintenance or repairs on your CapstanAG product can be performed by any company, we recommend that you use only authorized CapstanAG dealers. Improper or incorrectly performed maintenance or repair voids this warranty. - Page 10 This warranty gives you specific legal rights, and you may also have other rights which vary from state to state. Rev. Date 7/15/2014 © 2019 Capstan Ag Systems, Inc. EVO Upgrade...
-
Page 11: Chapter 4: Setup
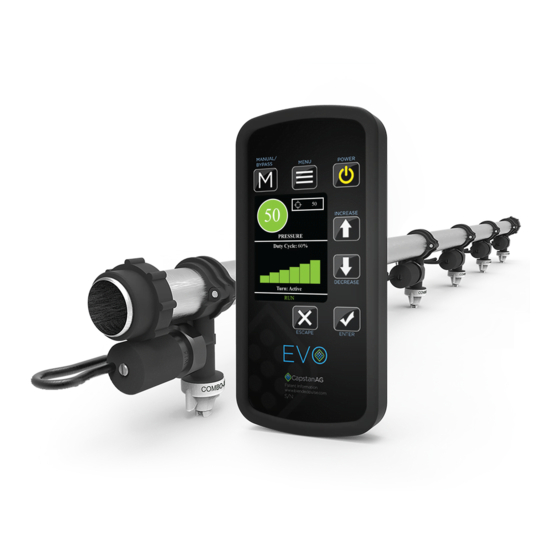
ENTER Button—Press to accept changes or go to the next screen ESCAPE Button—Press to cancel or go back to the previous screen. MANUAL/BYPASS Button—Press to use the manual operation or bypass mode. © 2019 Capstan Ag Systems, Inc. EVO Upgrade... -
Page 12: System Setup
Setup System Setup Before setting up the EVO upgrade system, make sure that you know how the sections are configured on the machine. Common system configurations with 20-in spacing include: Boom Width in ft Number of Nozzles Total Section Number... - Page 13 If the baud rate is showing on the Diagnostics screen, you have good a good GPS connection. Then verify that the correct NMEA information is being sent from the exported information ™ from you GPS. The EVO system requires VTG and GGA with a minimum of 5 Hz and 10 Hz recommended.
-
Page 14: Module Led Identification
PWR—Power—Solid Illumination—Correct Operation at 12 V Blue CAN—CAN Communication—Blinking Illumination—5 Hz Good CAN Communication MSG—Feedback Information—5 Hz Feedback Information is Present Blinking or Solid Illumination—5 Hz—The smart drivers are driving the valves (constant=100%) © 2019 Capstan Ag Systems, Inc. EVO Upgrade... -
Page 15: Pressure Transmitter Module
The system will have one boom signal transmitter module. Each module has 3 LEDs: Callout Color Description Green PWR—Power—Solid Illumination—Correct Operation at 12 V Blue CAN—CAN Communication—Blinking Illumination—5 Hz Good CAN Communication MSG—Feedback Information—5 Hz Feedback Information is Present © 2019 Capstan Ag Systems, Inc. EVO Upgrade... -
Page 16: Servo Transmitter Module
MSG—Feedback Information—5 Hz Feedback Information is Present Green DEC—Decrease in duty cycle—Solid Illumination—Switch is pressed, and the duty cycle is decreasing Yellow INC—Increase in duty cycle—Switch is pressed, and the duty cycle is increasing © 2019 Capstan Ag Systems, Inc. EVO Upgrade... -
Page 17: Nozzle Speed Ranges
Setup Nozzle Speed Ranges US Measurements Nozzle Speed Ranges Nozzle Spacing—15 in © 2019 Capstan Ag Systems, Inc. EVO Upgrade... - Page 18 Setup © 2019 Capstan Ag Systems, Inc. EVO Upgrade...
- Page 19 Setup © 2019 Capstan Ag Systems, Inc. EVO Upgrade...
- Page 20 Setup Nozzle Spacing—20 in © 2019 Capstan Ag Systems, Inc. EVO Upgrade...
- Page 21 Setup © 2019 Capstan Ag Systems, Inc. EVO Upgrade...
- Page 22 Setup © 2019 Capstan Ag Systems, Inc. EVO Upgrade...
- Page 23 Setup ™ Blended Pulse Droplet Classification Table-US Measurements © 2019 Capstan Ag Systems, Inc. EVO Upgrade...
- Page 24 Setup © 2019 Capstan Ag Systems, Inc. EVO Upgrade...
-
Page 25: Metric Nozzle Speed Ranges
Setup Metric Nozzle Speed Ranges Nozzle Spacing—38 cm © 2019 Capstan Ag Systems, Inc. EVO Upgrade... - Page 26 Setup © 2019 Capstan Ag Systems, Inc. EVO Upgrade...
- Page 27 Setup Nozzle Spacing—50 cm © 2019 Capstan Ag Systems, Inc. EVO Upgrade...
- Page 28 Setup © 2019 Capstan Ag Systems, Inc. EVO Upgrade...
- Page 29 Setup ™ Blended Pulse Droplet Classification Table-Metric © 2019 Capstan Ag Systems, Inc. EVO Upgrade...
- Page 30 Setup © 2019 Capstan Ag Systems, Inc. EVO Upgrade...
-
Page 31: Chapter 5: Operation
Press the Menu button (1) to enter the Main Menu. The Main Menu screen (2) includes this information: 1. Backlight 2. Alarm Volume 3. Turn Compensation 4. Rate Sync 5. Pressure Increment 6. Advanced Menu © 2019 Capstan Ag Systems, Inc. EVO Upgrade... -
Page 32: Backlight
2. Press the ENTER button to open the Alarm Volume screen (2). The Alarm Volume screen lets you change the volume level of the alarm. To silence the alarm, select Off. Range: Off to 5 (Quiet to Loudest) © 2019 Capstan Ag Systems, Inc. EVO Upgrade... -
Page 33: Turn Compensation
Note: A 5 Hz GPS connection is required for Rate Sync to operate properly. If a 5 Hz GPS signal is ™ not available, the Rate Sync feature should be set to Off. © 2019 Capstan Ag Systems, Inc. EVO Upgrade... -
Page 34: Pressure Increment
2. Press the ENTER button to open the Pressure Increment screen (2). The Pressure Increment screen lets you change pressure increment per toggle of the INCREASE or DECREASE button. Range: 1 to 10 © 2019 Capstan Ag Systems, Inc. EVO Upgrade... -
Page 35: Advanced Menu
• Units • Nozzle Spacing • Module Location Menu • Section Size Menu • GPS Menu • Servo Menu • Low Flow Menu • Pressure Sensor Menu • Diagnostics • Error Log © 2019 Capstan Ag Systems, Inc. EVO Upgrade... - Page 36 Stabilize an oscillating system by selecting a lower number. Speed up a sluggish system by selecting a higher number. © 2019 Capstan Ag Systems, Inc. EVO Upgrade...
- Page 37 I (Integral) Gain, the third pressure tuning parameter in the display, determines the acceleration driving duty cycle to the target value. To stabilize an oscillating system, use a lower number. To speed up a sluggish system, use a higher number. © 2019 Capstan Ag Systems, Inc. EVO Upgrade...
- Page 38 The diagnostic readout area will read Hold and count down the seconds to alert the operator that the Run/Hold Delay has been activated. When the hold count down is finished, the display will read Run in the diagnostics area. At this point, the display is controlling pressure once again. © 2019 Capstan Ag Systems, Inc. EVO Upgrade...
- Page 39 When set to Off, the display will maintain a minimum duty cycle percentage, equal to the pulse frequency, regardless of either low or zero pressure. © 2019 Capstan Ag Systems, Inc. EVO Upgrade...
- Page 40 Range: 12 or 25 milliseconds Select 15 ms when using 7-watt valves. Select 20 ms when using 12-watt valves. If the EVO Upgrade system has 24-series valves, make sure that the Valve Open Time is set to 20 © 2019 Capstan Ag Systems, Inc.
- Page 41 1. On the Advanced Menu screen, use the arrow buttons to select the Nozzle Spacing line (1). 2. Press the ENTER button to open the Nozzle Spacing screen (2). The Nozzle Spacing screen lets you change the system nozzle spacing. Range: 10 to 40 © 2019 Capstan Ag Systems, Inc. EVO Upgrade...
- Page 42 To change the order, follow the prompts on the display. Note: The smart driver module location must be correct for the sections to operate in the correct order. © 2019 Capstan Ag Systems, Inc. EVO Upgrade...
- Page 43 The section size programming must be performed for each section (smart driver) to pulse valves. If the section size is left at 0, that section will not drive valves. Common system configurations for an EVO Upgrade system with 20-in spacing include: Boom Width in ft...
- Page 44 From the GPS Source screen, you can change the GPS source type. Range: Serial or CAN If you are using a CapstanAG GPS module, make sure that the GPS source is set to CAN. © 2019 Capstan Ag Systems, Inc.
- Page 45 2. Press the ENTER button to open the Servo Type screen (4). 3. Use the arrow buttons to select the correct servo type from the list. Range: None to Synchro For EVO Upgrade systems, make sure that the servo information is set to: • Servo Type—Inline •...
- Page 46 Operation Low Flow Menu The Low Flow Menu is for use with the John Deere R Series Sprayers only. See a CapstanAG representative for more information. Pressure Sensor Menu Fig. 27: 1. On the Advanced Menu screen, use the arrow buttons to select the Pressure Sensor Menu line (1).
- Page 47 The Sensor volt min screen (4) lets you change the minimum voltage of the pressure sensor. Range: 0.5 to 1.0 ™ If you are using a CapstanAG pressure sensor, leave the default value of 0.5. Change the value as needed if you are using another type of pressure sensor.
- Page 48 2. Press the ENTER button to open the Error Log screen (2). The Error Log screen shows the last 50 system errors. The first error will be the most recent error found. Use the arrow buttons to move through the list of errors. © 2019 Capstan Ag Systems, Inc. EVO Upgrade...
-
Page 49: Start The Cab Display
3. Set the desired pressure on the cab display. 4. Start the rate controller, if necessary. 5. Make sure that the rate settings are correct on the rate controller. 6. Turn on the boom sections to spray. © 2019 Capstan Ag Systems, Inc. EVO Upgrade... -
Page 50: Change The Units Of Measure
6. Use the UP or DOWN arrow buttons to select the desired units of measure (6) on the Units screen. 7. When the desired unit of measure is highlighted, press the ENTER button. © 2019 Capstan Ag Systems, Inc. EVO Upgrade... -
Page 51: Manual Mode Operation
Press the MANUAL/BYPASS button (1) to enter manual mode operation. Use the UP or DOWN arrows (2) to control the nozzle duty cycle, regardless of the pressure sensor reading or target pressure set point. © 2019 Capstan Ag Systems, Inc. EVO Upgrade... -
Page 52: Bypass Mode
This is a way that the system can continue operation without CAN communication. Shutdown the Cab Display 1. Turn off the boom sections. 2. Press the POWER button on the cab display. 3. Turn off the machine. © 2019 Capstan Ag Systems, Inc. EVO Upgrade... -
Page 53: Chapter 6: Maintenance
Winterize the spray system with RV antifreeze for winter storage. Proper winterizing of the machine with a CapstanAG system installed on it is essential. Make sure that the booms are completely full of antifreeze at 100% strength and that the solenoids are pulsed (sprayed) for a few minutes to make sure that the antifreeze remaining in the solenoids is at full strength. -
Page 54: Recommended Guidelines For Maintenance/Service
Maintenance Recommended Guidelines for Maintenance/Service When servicing a system, CapstanAG recommends doing these: • Do the baseline service checks and verify the original setup values in this manual. • Identify individual performance problems. Evaluate possible causes and corrections for performance issues. -
Page 55: Chapter 7: Schematics
Callout Description Callout Description Mounting Plate PSI Adapter Harness Plug-to-Plug Adapter Harness-6 in EVO Shutoff Harness-4 ft CAN Terminator Cab Box Display Power to CAN X Harness Display Harness with GPS Drop Servo Adapter Harness (10) CAN-Bus Extension Harness-40 ft ©... -
Page 56: Six-Section Schematic
Callout Description Callout Description Mounting Plate PSI Adapter Harness Plug-to-Plug Adapter Harness-6 in EVO Shutoff Harness-4 ft CAN Terminator Cab Box Display Power to CAN X Harness Display Harness with GPS Drop Servo Adapter Harness (10) CAN-Bus Extension Harness-40 ft ©... -
Page 57: Five-Section Schematic
Callout Description Callout Description Mounting Plate PSI Adapter Harness Plug-to-Plug Adapter Harness-6 in EVO Shutoff Harness-4 ft CAN Terminator Cab Box Display Power to CAN X Harness Display Harness with GPS Drop Servo Adapter Harness (10) CAN-Bus Extension Harness-40 ft ©... -
Page 58: Kit Parts List
150005-008 PSI Adapter Harness HARNESS, ADAPTER PSI EVO- ACUPGRADE 150300-001 Mounting Plate Module Mount Plate, EVO AC Retro 150100-010 Smart Driver Module Assembly, Controller, Smart Driver, EVO 150003-006 Power to CAN X Harness Power to Can X for AC Retro... - Page 59 706530-356 12-pin D Dust Plug HN DUST PLUG 12- PIN DEUTSCh DT A Machine GPS Adapter Cable See Technical Bulletin TB19-04 for more Specific information about which cable is needed for your system. © 2019 Capstan Ag Systems, Inc. EVO Upgrade...
-
Page 60: Display Harness
GPS Rx Black/White GPS Ground Blue/White Table: CAN Extension Harness Connector (4) Pinout—6-pin DT Receptacle Description Color Description Color Power CAN Hi Yellow Ground Black CAN Lo Green Synch Blue AI Ground Brown © 2019 Capstan Ag Systems, Inc. EVO Upgrade... -
Page 61: Power To Can X Harness
Green Synch Blue AI Ground Brown Table: Left Boom/Left Trunk Connector (3)—6-pin DT Plug Description Color Description Color Power CAN Hi Yellow Ground Black CAN Lo Green Synch Blue AI Ground Brown © 2019 Capstan Ag Systems, Inc. EVO Upgrade... -
Page 62: Can Bus Extension Harness
Description Color Description Color Power Power Ground Black Ground Black Table: Right Trunk Connector (8)—4-pin Tower Description Color Description Color Power Power Ground Black Ground Black CAN Bus Extension Harness Fig. 39: © 2019 Capstan Ag Systems, Inc. EVO Upgrade... - Page 63 CAN Lo Green Synch Blue AI Ground Brown Table: Extension Connector (1) Pinout—6-pin DT Receptacle Description Color Description Color Power CAN Hi Yellow Ground Black CAN Lo Green Synch Blue AI Ground Brown © 2019 Capstan Ag Systems, Inc. EVO Upgrade...
- Page 64 Schematics © 2019 Capstan Ag Systems, Inc. EVO Upgrade...
-
Page 65: Chapter 8: Troubleshooting
Chapter 8: Troubleshooting Troubleshooting Charts ™ When troubleshooting the EVO system start with these: 1. Use the information shown on the main operation screen on the display, error list, and diagnostic information to begin your diagnosis. Also, use the LEDs on the modules to verify the situation and details experienced. - Page 66 Find the pressure sensor error and issues. repair or replace as needed Pressure Sensor 2 The pressure sensor is experiencing Find the pressure sensor error and Fail issues. repair or replace as needed © 2019 Capstan Ag Systems, Inc. EVO Upgrade...
- Page 67 The smart driver module is Find the smart driver module error experiencing issues. by separating the left and right trunk issue(s). Then disconnect the daisy- chained CAN extension harness connections until the issue is found. © 2019 Capstan Ag Systems, Inc. EVO Upgrade...
- Page 68 Do a check of the strainer(s) and clean if needed. Incorrect valve calibration Do a check of the valve calibration settings. settings, and adjust as necessary (See the manual for the rate controller). © 2019 Capstan Ag Systems, Inc. EVO Upgrade...
- Page 69 Replace the valve body. Plunger is lodged with debris. Clean the nozzle valve. Plunger is worn or damaged. Replace the plunger. Single nozzle valve Nozzle valve is faulty. Service the nozzle valve. operates erratically. © 2019 Capstan Ag Systems, Inc. EVO Upgrade...
-
Page 70: Interchangeable Components
7-watt coils resistance—21 ohms to 23.5 ohms • 12-watt coils resistance—10 ohms to 11.5 ohms If correct resistance is not found: • Clean the connector terminals and retest • Replace the coil assembly © 2019 Capstan Ag Systems, Inc. EVO Upgrade... -
Page 71: Battery Voltage Test
The 5 A in-line Fuse on the pin 1 battery wire. • The 3 (20 A fuses) located in the F6, F7, and F8 locations. • The system battery harness connections. • The condition of the battery and the alternator. © 2019 Capstan Ag Systems, Inc. EVO Upgrade... -
Page 72: Do A Check Of The System Load Capacity
• The condition of the connections • Check and clean the battery terminals. • Check the battery condition. • Check the alternator condition. • Check the condition of the connections and retest. © 2019 Capstan Ag Systems, Inc. EVO Upgrade... -
Page 73: Pressure Sensor Signal Test
Verify the accuracy of the pressure gauge on the sprayer. • Do a check of the power to the pressure sensor. • Use the serial diagnostics to check the pressure sensor calibration. • Replace the pressure sensor. © 2019 Capstan Ag Systems, Inc. EVO Upgrade... -
Page 74: Power To The Pressure Sensor Input Test
If no voltage is present, do a check of: • The fuse located at the battery • The battery connections • The condition of the battery • The condition of the alternator © 2019 Capstan Ag Systems, Inc. EVO Upgrade... -
Page 75: Index
Pressure Sensor Signal Test Pressure Transmitter Module Pressurized Fluid Lines PWM Frequency Screen GPS Menu Screens GPS Source Screen Rate Sync Screen Recommended Guidelines I Gain Screen Run/Hold Delay Screen Inspect the System Interchangeable Components © 2019 Capstan Ag Systems, Inc. EVO Upgrade... - Page 76 System Load Capacity System Setup This Manual Troubleshooting Charts Turn Compensation Screen Units Screen US Measurements Nozzle Speed Ranges Nozzle Spacing—15 in Nozzle Spacing—20 in Valve Open Time Screen Warranty Winterize for Storage © 2019 Capstan Ag Systems, Inc. EVO Upgrade...
- Page 78 Application Systems for Professionals™ prodsupport@capstanag.com | 855-628-7722 | www.capstanag.com ©2019 Capstan Ag Systems, Inc. All Rights Reserved. | All trademarks are owned by Capstan Ag Systems, Inc. This product may be covered by one or more U.S. Patents. For more information go to www.BlendedPulse.com...
Need help?
Do you have a question about the EVO and is the answer not in the manual?
Questions and answers