Table of Contents
Advertisement
Available languages
Available languages
Quick Links
Advertisement
Table of Contents

Related Manuals for Phonocar VM172


Summary of Contents for Phonocar VM172
- Page 1 MONITOR Monitor 7” - Wide vision TFT/LCD ITALIANO ENGLISH FRANÇAIS DEUTSCH ESPAÑOL ISTRUZIONI DI MONTAGGIO ASSEMBLING INSTRUCTIONS INSTRUCTIONS DE MONTAGE MONTAGEANLEITUNG INSTRUCCIONES PARA EL MONTAJE VM 172...
- Page 2 Prologo Caro utente, grazie per il tuo supporto e per l’acquisto del tuo nuovo monitor. Per ottenere il massimo dal suo utilizzo e mantenerlo il più a lungo performante, raccomandiamo di leggere attentamente il manuale proma di operare sull’unità. Ti preghiamo di tenerlo in considerazione per tutte le necessità di utilizzo. L’unità...
- Page 3 Precauzioni Questa unità non è stata studiata per l’installazione anteriore, nell’area guidtatore/passeggero, che potreb- be essere vista da chi è alla guida. L’installazione di questa unità in posti non idonei potrebbe disturbare il guidatore e far perdere la sua concentrazione pericolosamente. Il produttore non si assume responsabilità per non chi non segue le avvertenze.
-
Page 4: Pannello Di Controllo
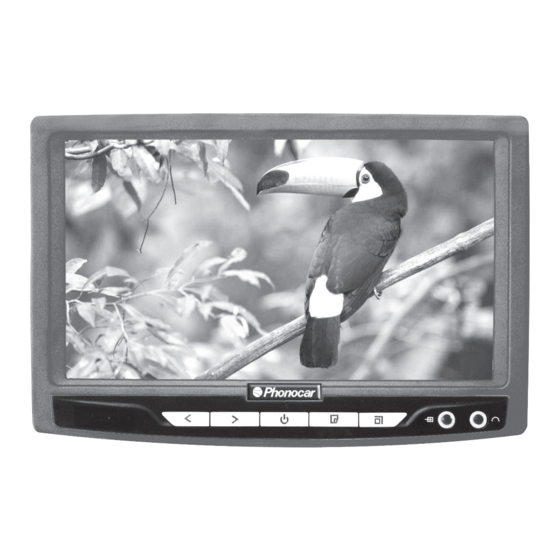
Pannello di controllo 1. PI indicatore accensione 7. V1 / V2 2. Trasmettitore audio IR 8. Sensore IR 3. Funzione - Volume - (indietro) < 9. Entrata Audio/Video 4. Menu 10. Cuffie 5. Funzione + Volume + (avanti) > 11. Formato display 6. - Page 5 Istruzioni per operare Premere “Menu” sul telecomando o il tasto < / > per entrare nel menu: premere < o > per selezionare le opzioni, premere MENU per scorrere le opzioni. Bright Contrast Color Zoom 16:9 4:3 Sys 1/2/3/4 Sleep English (simboli cinesi) IR-A 2M3 .
-
Page 6: Installazione
Specifiche Type: TFT LCD Screen size: 7.0” Display format: 16:9 Pillow Model: GMSP-007VS GMSP-007AO Pillow Specification: GS-10/130-180mm(Suitable Tube 12mm 12.7mm) / GS-12/130-180mm(Suitable Tube 12.7mm 14mm) Power consumption: 8.5W Power supply: DC 12V Brightness: 250 nits System: PAL/NTSC Video input: V1/V2 Operation Temperature: -10°C ~ + 60°C Storage Temperature: -20°C ~ + 70°C Resolution: 480(W)R/G/B×234(H) - Page 7 Prologue Dear User Thanks a lot for your support and purchasing of our monitor. We appreciate your purchase of our product. For maximum enjoyment and prolonged life of this unit, we strongly recommend you read this owner’s manual in detail before attempting to operate the unit. Please retain this manual for future reference. The unit you have purchased has the following advantages: 2 Power saving 3 High clarity of LCD screen...
- Page 8 Warning This unit is not intended for installation in the front driver/passenger area where it may be seen by the dri- ver. Installation of this unit where it may impair the driver’s concentration is dangerous. The manufactureror retailer assumes no responsibility for failing to obey the above warnings.To reduce the risk of electric shock, please do not exposethis unit to rain, moisture or attempt to open the unit.
-
Page 9: Control Panel
Control panel PI Power indicator V 1 / V 2 IR audio-transmitter IR sensor Function- Audio/Video Input Menu 10. Earphone Function+ 11. Remote window Power switch 11 7 Method of wiring Fuse 2A Red to battery +12V Black to grounding Yellow to Video 1 Yellow to Video 2 White to audio 1... - Page 10 Operating instruction Press “ MENU” button to select menu: press “< “ or “> “ to select options, press“MENU” to enter option,then press “ <“ or “ >“ to select sub-menu, press “ MENU” < “ “ >“ to confirm option and make adjustment. Bright Contrast Color...
-
Page 11: Specifications
Specifications Type: TFT LCD Screen size: 7.0” Display format: 16:9 Pillow Model: GMSP-007VS GMSP-007AO Pillow Specification: GS-10/130-180mm(Suitable Tube 12mm 12.7mm) / GS-12/130-180mm(Suitable Tube 12.7mm 14mm) Power consumption: 8.5W Power supply: DC 12V Brightness: 250 nits System: PAL/NTSC Video input: V1/V2 Operation Temperature: -10°C ~ + 60°C Storage Temperature: -20°C ~ + 70°C Resolution: 480(W)R/G/B×234(H) -
Page 12: Accessoires En Dotation
Prologue Cher usager, Nous vous remercions tout d’abord pour votre support et vous félicitons pour l’achat de votre nouveau monitor. Pour l’utiliser au maximum et le maintenir longtemps et toujours performant, nous vous conseillons de lire attentivement le mode d’emploi avant d’agir sur l’appareil. Nous vous prions aussi de le tenir en considération en cas de besoin pendant l’usage. - Page 13 Précautions Cet appareil n’est pas fait pour l’installation antérieure où elle pourrait être vu par qui est à la conduite. Son installation en lieu non apte pourrait distraire le chauffeur et lui faire perdre dangereusement la concentra- tion. Le producteur n’est pas responsable pour qui ne suit pas les recommandations. Afin de réduire les risques de chocs électriques, ne pas exposer l’appareil sous la pluie, à...
-
Page 14: Panneau De Contrôle
Panneau de contrôle PI indication d’allumage V1 / V2 Transmetteur audio IR Capteur IR Fonction – Volume – (en arrière) < Entrée Audio / Vidéo Menu 10. Casques Fonction – Volume – (en avant) > 11. Format display extinction / allumage 11 7 Méthodes de raccordement Fusibile 2A... - Page 15 Instructions pour agir Appuyer « Menu » sur la télécommande ou la touche < / > pour entrer dans le menu: appuyer < ou > pour sélectionner les options, Appuyer MENU pour parcourir les options. Bright Contrast Color Zoom 16:9 4:3 Sys 1/2/3/4 Sleep English (symbols chinois)
- Page 16 Spécificités Type: TFT LCD Screen Size: 7.0’’ Display format: 16:9 Pillow Mode: GMSP-007VS GMSP-007AO Pillow Specification: GS-10/130-180mm (Suitable Tube 12mm 12.7mm) / GS-12/130-180mm (Suitable Tube 12.7mm 14mm) Power consumption: 8.5W Power supply: DC 12V Brightness: 250 nits System: PAL/NTSC Video input: V1/V2 Operation Temperature: -20°C- +60°C Storage Temperature: - 20°C- +70°C Resolution: 480(W)R/G/Bx234(H)
- Page 17 Vorwort Sehr geehrter Kunde, wir freuen uns, dass Sie sich für den Kauf unseres Monitors VM172 entschieden haben und danken bestens dafür. Die vorliegenden Anweisungen ganz zu Anfang gut durchlesen und aufbewahren, um die Möglichkeiten des Geräts voll auszuschöpfen und um es lange in bester Ordnung zu halten.
- Page 18 Vor-Informationen hinsichtlich der Sicherheit Dieses Gerät ist NICHT für den Front-Einbau gedacht (Fahrer- bzw. Beifahrer-Sitz), denn der Fahrer sollte am Steuer keine Monitore betrachten können. Die Installation des Geräts könnte entweder beim Fahren im Wege stehen oder die Konzentration des Fahrers in Gefahr bringen. Der Hersteller übernim- mt keine Haftung bei Nichteinhalten der vorliegenden Sicherheits-Hinweise.
-
Page 19: Anschluss-Möglichkeiten
Bedienteil PI = Einschalt-Leuchte IR-Sensor Audio-IR-Sender Audio/Video-Eingang Funktion - Lautstärke – (zurück) < 10. Kopfhörer Menü 11. Bildschirm-Format Funktion + Lautstärke + (vorwärts) > Ein- bzw. Ausschalten V1 / V2 11 7 Anschluss-Möglichkeiten Sicherung 2A Rot zur Batterie +12V Schwarz zur Masse Gelb zu Video 1 Gelb zu Video 2 Weiss zu Audio 1... - Page 20 Inbetriebnahme Auf der Fernbedienung Menü-Taste oder < / > drücken, um das Menü zu betreten. Dann < oder > drücken, um die gewünschte Funktion zu wählen. Durch die Taste MENU werden alle verfügbaren Funktionen aufgelistet (scrolling). Bright Contrast Color Zoom 16:9 4:3 Sys 1/2/3/4 Sleep English (Chinesische Symbole)
-
Page 21: Technische Daten
Technische Daten Typ: TFT LCD Bildschirm-Größe: 7.0” Bildschirm-Format: 16:9 Pillow Model: GMSP-007VS GMSP-007AO Pillow Specification: GS-10/130-180mm(Suitable Tube 12mm 12.7mm) / GS-12/130-180mm(Suitable Tube 12.7mm 14mm) Strom-Verbrauch: 8.5W Stromversorgung: DC 12V Helligkeit: 250 nits System: PAL/NTSC Video-Eingang: V1/V2 Betriebs-Temperatur: -10°C ~ + 60°C Aufbewahrungs-Temperatur: -20°C ~ + 70°C Auflösung: 480(W)R/G/B×234(H) Installation... -
Page 22: Accesorios En Dotación
Prologo Apreciado Cliente, Gracias por habernos elegido. Para obtener la máxima prestación en la utilización y la conservación en el tiempo de este aparato, le aconsejamos de leer atentamente el manual de usuario con el fin de operar correctamente con el monitor. Le rogamos por lo tanto de tenerlo en consideración para cualquier duda o información que necesite. - Page 23 Precauciones Esta unidad no ha sido estudiada para ser instalada en la parte anterior del habitáculo en el área destinada al conductor y acompañante en cuanto podría ser vista por quien conduce, aspecto que esta prohibido por las normas de circulación y por ser potencialmente peligroso en cuanto podría distraer la atención del conductor mientras conduce.
-
Page 24: Panel De Control
Panel de control 1. PI indicador de encendido 7. V1 / V2 2. Transmisor audio IR 8. Sensor IR 3. Función - Volumen – (atrás) < 9. Entrada Audio/Video 4. Menú 10. Auriculares 5. Función + Volumen + (adelante) > 11. -
Page 25: Instrucciones De Uso
Instrucciones de uso Presionar “Menú” en el mando a distancia o la tecla < / > para entrar en el menú: presionar < o > para seleccionar las opciones, presionar MENU para visualizar las opciones. Bright Contrast Color Zoom 16:9 4:3 Sys 1/2/3/4 Sleep English (caracteres chinos) -
Page 26: Instalación
Instalación White Yellow Red White Yellow − +12V FUSIBLE 2A... - Page 27 Garantie legale: les dispositions stipulées ci-dessus ne sont pas exclusives du bénéfice de la garantie légale pour défaut et vice caché qui s’applique en tout état de cause dans les conditions des articles 1641 et suivants du Code Civil. Phonocar porte une attention toute particulière à...
- Page 28 Pflege, oder falscher Benutzung beruhen. Generell bei Fremdeingriff. Sollte das Gerät nicht funktionieren, bitte Ihren Händler zu Rate ziehen oder PHONOCAR-Deutschland befragen unter der Rufnr. 07144/823020. Nach vorheriger Absprache ist das Gerät einzusenden mit dem korrekt ausgefüllten Garantie-Schein und dem betreffenden Kauf-Nachweis.
Need help?
Do you have a question about the VM172 and is the answer not in the manual?
Questions and answers