Advertisement
Quick Links
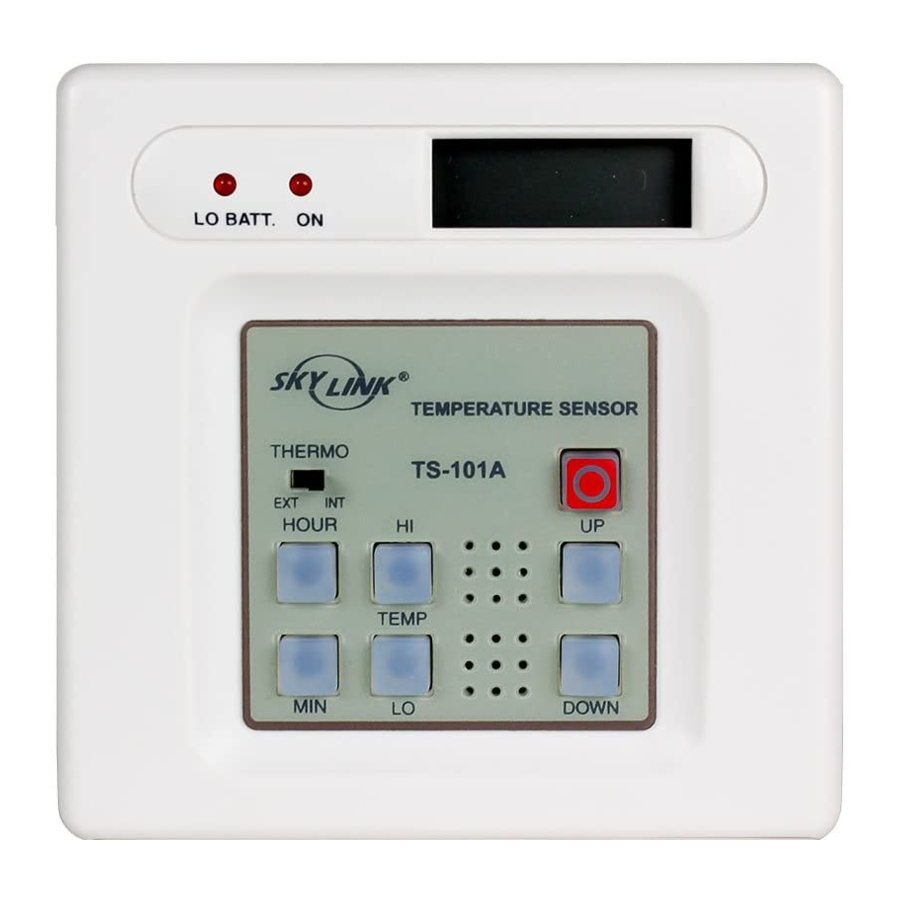
Temperature Sensor
1. INTRODUCTION
The Temperature Sensor is designed to monitor the temperature of a
specific area, whether that is the indoor temperature or outdoor
temperature. It works in conjunction with the AAA+
well as other Skylink's alarm system such as SC-001 or AD-433S etc.
When the actual temperature exceeds the preset limit, the control panel
will either alert you or alarm will be triggered.
In this package, you should find the temperature sensor, 2 lithium batteries,
an external measuring probe for measuring outdoor temperature and
mounting accessories.
Temperature
Sensor
(Batteries inside)
Please follow the instructions below to set up the temperature sensor.
2. PROGRAMMING
There are several things you need to program:
1) Clock
2) Upper temperature limit
3) Lower temperature limit
4) Set the temperature unit (Fahrenheit / Celsius)
5) Compatibility jumper (J2)
Clock
The current time will be displayed when the "HOUR" or "MIN" button is
pressed.
To set the hour:
1. Press and hold the "HOUR" button.
2. While holding on to the "HOUR" button, press "UP" or "DOWN" to
select the hour.
3. Release all buttons after setting the hour.
To set the minute:
1. Press and hold the "MIN" button.
2. While holding on to the "MIN" button, press "UP" or "DOWN" to
select the minute.
3. Release all buttons after setting the minute.
Upper Temperature Limit
When the actual temperature is above the upper temperature limit, the
temperature sensor will send a signal to the control panel.
To set the upper temperature limit:
1. Press and hold the "HI" button.
2. While holding on to the "HI" button, press "UP" or "DOWN" to select
the upper temperature limit.
3. Release all buttons after setting the upper temperature limit.
Lower Temperature Limit
When the actual temperature is below the lower temperature limit, the
temperature sensor will send a signal to the control panel.
To set the lower temperature limit:
1. Press and hold the "LO" button.
2. While holding on to the "LO" button, press "UP" or "DOWN" to select
the lower temperature limit.
3. Release all buttons after setting the lower temperature limit.
Set the temperature unit (Fahrenheit / Celsius)
The temperature sensor can operate and
display temperature in Fahrenheit or
Celsius. To select the desire unit, open
the back cover you will see a jumper
connector for "C/F" as shown below.
To select Fahrenheit, place a jumper on
this "C/F" connector. To select Celsius,
remove the jumper from this connector.
Fahrenheit
Note: The temperature sensor can monitor the temperature within this
range: 157°F (69°C) to -3°F(-19°C).
Model TS-101A
Control Panel, as
TM
External
measuring
2 pcs
probe
3.5 x 20 screws
External
dry contact cable
Compatibility Jumper
Refer to the following table to setup the sensor to work with different
Skylink's Security System or Emergency Dialer. To select, open the back
cover you will see a jumper connector for "J2" as shown below. Use a
paper clip to remove the jumper connector.
You have now programmed the temperature sensor and you can
mount the sensor to the desired location.
3. LEARN SENSOR TO AAA+
In order for the sensor to communicate with the control panel properly,
the sensor must be programmed to the control panel. Follow the brief
instructions below or refer to the detail instructions from the AAA+
User's Instructions to program the sensor to the control panel. Before
proceeding, please remove the battery isolator from the sensor.
Step
Keys
[PROG]
1
[MPIN]
[3]
2
[0] to [9]
3
Activate the
4
sensor by
pressing the
red "Panic"
button on the
temperature
sensor.
Remove
back cover
SENSOR 1
Zone 1
Button [1]
Zone 2
Button [2]
Celsius
Zone 3
Button [3]
Zone 4
Button [4]
Zone 5
Button [5]
2. PROGRAMMING (CONT)
Models
AM-001, ML-001
SC-001, AA-433,
AD-433S, MS-2001,
ED-100
TM
CONTROL PANEL
Function
Description
Enter master
Enter Program-
ming mode
password to
programming
mode
Select learn
sensor
programming
Refer to the dia-
Select sensor
gram below to
location
select the sensor
location, which
includes the zone
and sensor
number.
Activate sensor
Once the sensor
is activated, the
signal will be trans-
mitted to the Con-
trol Panel which
will be stored.
SENSOR 2
Note:
Button [6]
Each location is allowed to learn one
Button [7]
sensor only. Learning a sensor to a
Button [8]
location will clear the memory of the
sensor previously learnt.
Button [9]
Button [0]
Jumper J2 setting
Keep the connector in
default post
Reposition
connector to 2 posts
TM
Note
3 beeps for valid
password. 1 long
beep for invalid
password.
After [3] is entered,
some zone LEDs will
flash once, or twice,
some will be off. The
zone LEDs represent
whether that zone is
already occupied by
another sensor.
**See Table A below.
After you have
selected the zone,
that zone LED will
be on.
You will hear [Zone X
Sensor Y Accepted],
where X and Y are
the zone and sensor
numbers you have
selected.
This row
:
Buttons for
Sensor 1
Zone LED :
Flash once
This row
:
Buttons for
Sensor 2
Zone LED :
Flash twice
Advertisement

Subscribe to Our Youtube Channel
Related Manuals for SkyLink TS-101A


Summary of Contents for SkyLink TS-101A
- Page 1 Control Panel, as Skylink’s Security System or Emergency Dialer. To select, open the back well as other Skylink’s alarm system such as SC-001 or AD-433S etc. cover you will see a jumper connector for “J2” as shown below. Use a When the actual temperature exceeds the preset limit, the control panel paper clip to remove the jumper connector.
- Page 2 N/O CONTACT. 12. CUSTOMER SERVICE 7. SENSOR FAILURE OR LOW BATTERY If you would like to order Skylink’s products or have difficulty getting them to Sensor Failure (Only avaliable for AAA+ work or download latest information and user manual, please : 1.
Need help?
Do you have a question about the TS-101A and is the answer not in the manual?
Questions and answers