Table of Contents
Advertisement
Quick Links
Download this manual
See also:
User Manual
Advertisement
Table of Contents

Related Manuals for Epson P-4500


Summary of Contents for Epson P-4500
- Page 1 Quick Reference Guide...
- Page 2 DivX, DivX Certified, and associated logos are trademarks of DivX, Inc. and are used under license. General Notice: Other product names used herein are for identification purposes only and may be trademarks of their respective owners. Epson disclaims any and all rights in those marks.
-
Page 3: Table Of Contents
Deleting files and folders ..... 16 Installing the Epson Link2 Software ....7 Protecting files and folders . - Page 4 Take care when carrying it, as strong shocks may damage the internal hard disk drive and cause data to be lost. Epson is not responsible for backing up or recovering data. We recommend that you make your own backup files.
-
Page 5: Chapter 1 Getting Started
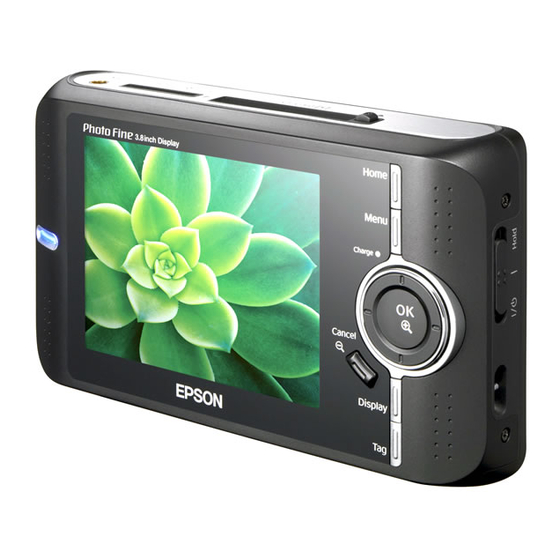
Chapter 1 Getting Started Unpacking Your Device Parts SD Card slot Access lamp CF Card slot CF Card slot Make sure that all of the items shown below are eject button included in the box with your device. Power switch with Hold function Headphones connector... -
Page 6: Setting Up The Device
LCD and control panel Setting Up the Device Menu key Charge lamp Home key Installing the battery Illumination lamp 4-way ring Home Open the battery cover. Menu Charge Cancel Display OK key Cancel key Tag key Display key Remote control Insert the battery into the compartment in the direction of the arrow on the battery sticker. - Page 7 Close the battery cover and slide it to the right The Charge lamp will glow during charging (It takes until it clicks. about 3.5 hours to fully charge the battery when the power is off). Caution: Disconnect the AC adapter when removing the battery.
-
Page 8: Turning The Power On
Turning the power on When you turn on this device the first time: The Language screen and Date and Time screen are displayed. Slide the power switch to Select the language to use with the 4-way ring, then press the OK key. Language English (Intl.) Français... -
Page 9: Holding The Key Operations
Press the Up or Down key to change the value of Home screen the setting, then press the OK key. After turning on the device, the Home screen Repeat steps 2 and 3 until you finish the date and appears. time settings. -
Page 10: Resetting The Device
(Videos) Select to display files/folders stored in the Videos folder. (Music) Select to listen to the music stored via the Epson Link2 software (page 21). Note: (Shortcut) Select to display the folder with a Avoid using the fragile objects such as pencil. -
Page 11: Installing The Epson Link2 Software
Display SVGA (800 x 600) or higher, administrative privileges to install the software. 16 bit color or higher Interface USB port (type A connector) The installer starts automatically. If necessary, start it by double-clicking the EPSON CD-ROM icon. Getting Started... - Page 12 When Restart Now appears, click the button to restart your computer. For Macintosh users Double-click the EPSON CD-ROM icon on your desk top, then Mac OS X icon in the EPSON folder. If a message appears prompting you to disable your antivirus software, click Continue.
-
Page 13: Chapter 2 Backing Up Memory Cards
Chapter 2 Backing Up Memory Cards Supported memory card types Inserting CF/SD Memory Cards CF (CompactFlash) memory card (Type1/Type2 and 3.3 V, including Micro Drive) Insert the memory card with the label side facing the display side of the device. SD memory card (up to 2 GB) MultiMedia Card (up to 1 GB) Label side... -
Page 14: Copying Data From Cf/Sd Memory Cards Onto The Device
Copying Data from CF/SD Memory Backing Up Data from the Device onto Cards onto the Device the Computer Select Memory Card in the Home screen using the 4-way ring, then press the OK key. Connecting the device to the computer In the Memory Card screen, select CF Memory Before connecting to the computer, install the Card Backup or SD Memory Card Backup... -
Page 15: Launching The Epson Link2 Software
The LCD turns off. For Macintosh Launch the Epson Link2 software (For details, Double-click the Epson Link2 icon in the Epson Link2 see “Launching the EPSON Link2 Software”). program folder. Only data that has not yet been backed up will be copied to the computer with the auto backup function. -
Page 16: Chapter 3 Viewing Images
Photo JPEG, RAW Video AVI, DIV, DIVX, MOV, MP4, MPG, MPE, Using the Epson Link2 software makes it easy to copy VOB, MOD, ASF photo and video data from a computer. Note: Connect to a computer, then open the Epson For details on the supported file formats, see the supplied Link2 software. -
Page 17: Viewing Photos And Videos
How to see the screen Viewing Photos and Videos Select Photos or Videos in the Home screen using the 4-way ring, then press the OK key. Photos/2005. 1205 Select a folder to view using the 4-way ring, then press the OK key. (If there is no folder, skip this step.) EPV2014.JPG EPV2171.JPG... - Page 18 Switching the screen Functions when displaying a photo in full screen You can switch the following screen by pressing the Zooming a photo Display key. Press the OK key to zoom in on a photo displayed in Thumbnails screen: full screen. Continue pressing it to zoom in even Photos/2005.
-
Page 19: Basic Operations While Playing Videos
OK key. (This function cannot be used for a video with total playback time of 1 minute or less.) EPV0001.JPG 0001/1256 EPSON RD-1 ** Rewind and fast-forward speed become faster if you press the 2005. 04. 28 12:30:08 Left/Right key several times while rewinding/fast-forwarding. -
Page 20: Deleting Files And Folders
Video Press the Menu key to display the pop up menu, select Delete using Up or Down key, then press For a video file, the progress information is displayed the OK key. at first. You can switch to the file information (as below) by pressing the Display key again. -
Page 21: Protecting Files And Folders
After the following confirmation dialog box Select Lock/Unlock using the Up or Down key, appears, select Yes using the Up or Down key, then press the OK key. then press the OK key to complete. Photos / 20051205 Copy/Move Lock/Unlock Select Files to Delete Edit Rotate Right... -
Page 22: Setting A Folder Thumbnail
Setting a folder thumbnail Setting tags on files You can set your favorite image as a thumbnail for You can quickly view tagged photo or video files from File Tag in the Home screen after setting a tag the folder. on the file. - Page 23 Selecting File Tag from the pop up menu in full Select the tag name in which to set a file using the screen displays the tag information. You can check the Up or Down key, then press the OK key. tag color corresponding to the tag name and set the tag on the file using the 4-way ring and the OK key.
-
Page 24: Chapter 4 Playing Music
After connecting the device to the computer, transfer audio data from the computer to the device using the Epson Link2 software. Note: For details about the software, see the online Epson Link2 User’s Guide. Supported audio file formats File Format... -
Page 25: Selecting The Category And Starting Playback
Basic operations while playing music Selecting the Category and Starting Playback Select Music in the Home screen using the 4-way ring, then press the OK key. 00001/10568 Title : A Hard Day Night Artist : The Beaties Album : A Hard Day Night Genre : POP Select a category to start playback using the Up... -
Page 26: Repeat And Shuffle Play
Sample Playlist Create New Playlist Creating a Playlist on This Device Not only can you create a Playlist on the Epson Link2 software, you can also create them on this device. Press the Menu key to display the pop up menu Music. - Page 27 The on-screen keyboard appears. Select a letter To add tracks to a created Playlist using the 4-way ring, then press the OK key to Select the desired Playlist instead of Create New input the selected letter. Playlist in step 3. Text Input To delete a Playlist/remove tracks from a Playlist Play List 00...
-
Page 28: Chapter 5 Customizing Settings
Chapter 5 Customizing Settings You can customize various settings for displaying File Operation Auto-Rotation Sets whether or not to rotate the and copying images, or change the sound setting to images automatically according to the EXIF information. make your device more useful. Unsupported Sets whether the files in Files... - Page 29 Slide Show Effects** Sets one of the five slide show Power Save Backlight Sets the time at which the LCD’s effects. The slide show is executed Timer backlight will turn off and the LCD with the selected effect. will go blank if there are no operations.
- Page 30 Movie Setting DivX Displays the registration code. Registration Code Play Settings Sets the screen size of a movie. Sound Key Beep Select ON or OFF to turn on or off the operation sound. Backup Select None (no announcement), Completion or one of the three preset sounds Sound to announce the completion of data backup.
Need help?
Do you have a question about the P-4500 and is the answer not in the manual?
Questions and answers