Table of Contents
Advertisement
Available languages
Available languages
Quick Links
Het toestel-identifi catieplaatje bevindt zich aan de onderkant van het toestel.
The appliance identifi cation card is located on the bottom of the appliance.
Plak hier het toestel-identifi catieplaatje.
Stick the appliance identifi cation card here.
Houd, wanneer u contact opneemt met de serviceafdeling, het complete typenummer bij de hand.
When contacting the service department, have the complete type number to hand.
Adressen en telefoonnummers van de serviceorganisatie vindt u op de garantiekaart.
You will fi nd the addresses and phone numbers of the service organisation on the guarantee card.
Gebruiksaanwijzing
Elektrische kookplaat
Instructions for use
Electric hob
HE6011B
Advertisement
Chapters
Table of Contents

Related Manuals for Atag HE6011B


Summary of Contents for Atag HE6011B
-
Page 1: Instructions For Use
When contacting the service department, have the complete type number to hand. Adressen en telefoonnummers van de serviceorganisatie vindt u op de garantiekaart. You will fi nd the addresses and phone numbers of the service organisation on the guarantee card. HE6011B... - Page 2 Handleiding NL 3 - NL 12 Manual EN 3 - EN 12 Gebruikte pictogrammen - Pictograms used Belangrijk om te weten - Important information Tip - Tips...
-
Page 3: Table Of Contents
INHOUDSOPGAVE Uw kookplaat Inleiding Beschrijving Gebruik Regelknop Pannen Onderhoud Reinigen Installatie Waar u op moet letten Inbouwmaten zaagmaat/nismaat Montage Technische gegevens Elektrische aasluiting Milieu aspecten Afvoeren toestel en verpakking NL 3... -
Page 4: Uw Kookplaat
UW KOOKPLAAT Inleiding In deze handleiding staat beschreven op welke manier u de kookplaat zo optimaal mogelijk kunt benutten. Naast informatie over de bediening treft u ook achtergrondinformatie aan die van dienst kan zijn bij het gebruik van dit product. Lees de separate veiligheidsvoorschriften voordat u het toestel in gebruik neemt! Lees eerst de gebruiksaanwijzing geheel en aandachtig door... -
Page 5: Beschrijving
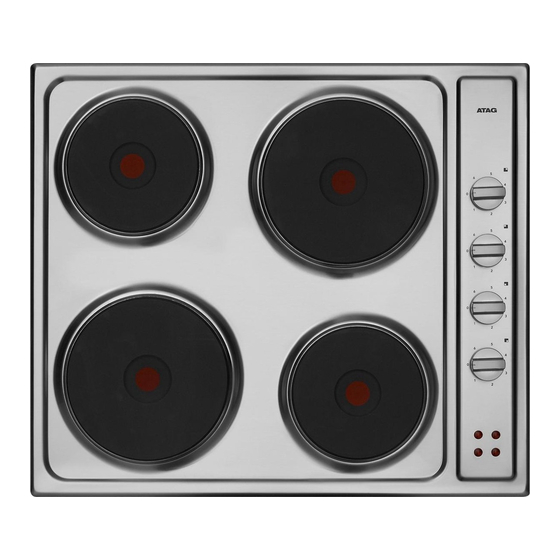
UW KOOKPLAAT Beschrijving 1. Bedieningsknop kookzone 145 mm rechtsachter 2. Bedieningsknop kookzone 180 mm linksachter 3. Bedieningsknop kookzone 180 mm linksvoor 4. Bedieningsknop kookzone 145 mm rechtsvoor 5. Kontrolelampjes kookzone’s NL 5... -
Page 6: Gebruik
GEBRUIK • De kookelementen zijn vervaardigd van gietijzer. De warmte wordt verkregen door gloeispiralen die ringsgewijs in het element liggen. • De warmte wordt door directe geleiding aan de panbodem afgegeven. Bij gebruik van de kookplaat gaat op het bedieningspaneel de signaallamp aan. •... -
Page 7: Pannen
GEBRUIK Stand 1 • Bouillon trekken. Vlees stoven. Warm houden. Doorkoken van soep, rijst, pap (kleine hoeveelheden). Stand 0 • Doorkoken van gerechten met een kooktijd korter dan 10 min., nadat het gerecht eerst op een hogere stand aan de kook is gebracht. -
Page 8: Onderhoud
ONDERHOUD Reinigen • De kookplaten reinigen kunt u het beste met een vochtige doek of keukenpapier. Verwijder overkooksel zo snel mogelijk. Vooral rode kool, rabarber en appelmoes werken in op emaille of roestvrijstaal. • Hardnekkige resten kan men behandelen met b.v. Vim, Ata of Scotch Brite, wel goed afnemen met schoon water. -
Page 9: Installatie
INSTALLATIE Waar u op moet letten Veiligheidsvoorschriften installatie • De aansluiting moet voldoen aan de nationale en lokale voorschriften. • Het toestel moet altijd geaard zijn. • Alleen een erkend elektrotechnisch installateur mag dit toestel aansluiten. • De aansluitkabel moet vrij hangen en mag niet door een lade worden aangestoten. -
Page 10: Inbouwmaten
INSTALLATIE Inbouwmaten In de volgende illustraties zijn de afmetingen van de uitsparingen aangegeven. Montage Voordat u de kookplaat in het aanrechtblad bevestigt, dient de meegeleverde kit aan de onderkant van de kookplaat geplakt te worden. Zet de kookplaat vast met behulp van de bijgeleverde klemmen. Sluit het toestel aan op het elektriciteitsnet. - Page 11 INSTALLATIE Elektrische aansluiting 230 V - 50 Hz Voor de aansluiting kunt u gebruiken: • een rubber aansluitkabel, type H05 RR-F 4 G 1,5 mm² of 5 x 1,5 mm² met een geel-groene aarddraad, • een geïsoleerde PVC kabel type H05 V2V2-F 4 G 1,5 mm² of 5 x 1,5 mm²...
-
Page 12: Milieu Aspecten
MILIEU ASPECTEN Afvoeren toestel en verpakking Bij de vervaardiging van dit toestel is gebruik gemaakt van duurzame materialen. Dit toestel moet aan het eind van zijn levenscyclus op verantwoorde wijze worden afgevoerd. De overheid kan u hierover informatie verschaffen. De verpakking van het toestel is recyclebaar. Gebruikt kunnen zijn: •... - Page 13 CONTENTS Your hob Introduction Description Control switch Pans Maintenance Cleaning Installation What you need to consider Built-in dimensions Mounting Technical details Wiring diagrams Environmental aspects Disposal of packaging and appliance EN 3...
-
Page 14: Your Hob
YOUR HOB Introduction This manual describes how you can make the best possible use of the hob. In addition to information about operation, you will also find background information that can assist you in using this product. You will also find cooking tables and maintenance tips. Read the manual thorougly before using the appliance, and store these instructions in a safe place for future reference. - Page 15 YOUR HOB Description 1. Switch right rear zone 145 mm fast plate 2. Switch left rear zone 180 mm fast plate 3. Switch left front zone 145 mm fast plate 4. Switch right front zone 180 mm fast plate 5. Control light cooking zones EN 5...
-
Page 16: Use
• The heating elements are made of cast iron. The heat comes from the spiral filaments lying in rings in the element. • The heat is transferred by direct conduction to the base of the pan. When the hob is in use the control light on the control panel goes on. •... - Page 17 OPERATION Setting 1 • Making stock. Stewing meats. Keeping food warm. Cooking soup, rice and porridge (small quantities). Setting 0 • Simmering food requiring less than 10 mins. cooking time, once it has first been brought to the boil at a higher setting. Pans The best thickness for the base of the pan is: •...
-
Page 18: Maintenance
MAINTENANCE Cleaning • The hobs are best cleaned with a damp cloth or kitchen paper • Remove all spillages as soon as possible. Red cabbage, rhubarb and apple sauce in particular will corrode the enamel or stainless steel. • Stubborn residue can be treated with Vim, Ata, Scotch Brite etc.; rinse well with clean water. -
Page 19: Installation
INSTALLATION What you need to consider Safety instructions for the installation • The connection must comply with national and local regulations. • The appliance must always be earthed. • This appliance may only be connected by a competent electrical installer. •... -
Page 20: Built-In Dimensions
INSTALLATION Built-in dimensions The dimensions and recesses are shown in the illustration beneath. Mounting Before placing the appliance in the worktop, apply the supplied sealing kit on the underside of the appliance. Fix the hob with the provided clamps. Connect the appliance to the mains. The appliance is ready for use. -
Page 21: Wiring Diagrams
INSTALLATION Wiring diagrams 230 V - 50 Hz Connection may be carried out by means of: • rubber coated connection cables, model H05 RR-F 5 x1,5 with yellow-green earthing cable; • PVC insulated connection cables, model H05 VV-F 5 x1,5 with yellow-green earthing cable;... -
Page 22: Environmental Aspects
ENVIRONMENTAL ASPECTS Disposal of packaging and appliance In the manufacturing of this appliance durable materials were used. Make sure to dispose of this equipment responsibly at the end of its lifecycle. Ask the authorities for more information regarding this. The appliance packaging is recyclable. The following may have been used: •...
Need help?
Do you have a question about the HE6011B and is the answer not in the manual?
Questions and answers