Lutron Electronics Sivoia QS Installation Manual
Drapery system
Hide thumbs
Also See for Sivoia QS:
- Installation instructions manual (25 pages) ,
- Setup manual (2 pages) ,
- Wiring and programming manual (20 pages)
Table of Contents
Advertisement
Available languages
Available languages
Sivoia QS Drapery System
Installation Guide-Please Read Before Installing
Important Notes - Please Read Before Installing
A. Lutron systems are intended for use with only Lutron hardware and
power supplies.
B. Codes: Install in accordance with all local and national electrical
codes.
C. Environment: Ambient operating temperature: 32 °F - 104 °F (0 °C
- 40 °C), 0 - 90% humidity, non-condensing. Indoor use only.
D. Plan the installation to maintain sufficient clearance between the
moving drapery and any object, including window hardware,
cranks, lock levers, and stationary drapery.
! CAUTION: RISK OF FALLING OBJECTS. Securely install the
shade system per the mounting instructions.
Failure to do so could result in minor or moderate injury.
Tools required:
• Tape measure
• Small flat-blade screwdriver
• #1 Phillips screwdriver
• #2 Phillips Screwdriver
System Components:
Drapery Track
Single-track, right-draw, pinch pleat system shown; dual systems will include additional track(s) and EDU(s)
Included with
wall-mount tracks:
Extendable
Wall-Mount
Bracket, Single*
Included with
ceiling-mount tracks:
Ceiling-Mount
Cam-Lock with Washer*
*Quantity varies with system width
Customer Assistance
USA and Canada: 1.844.LUTRON1 (588-7661) | UK: +44.(0)20.7702.0657 | lutron.com/help | support@lutron.com
For product warranty information, please see: lutron.com/TechnicalDocumentLibrary/Window Systems Warranty.pdf
Lutron Electronics Co., Inc.
7200 Suter Road
Coopersburg, PA 18036-1299, U.S.A.
• Power drill and drill bits
• Level
• Pliers
• 3/32 in hex key (included
w/recess-mount system)
Included with dual
wall-mount
tracks:
Extendable
Wall-Mount
Bracket, Dual*
Included with recess-mount tracks:
Recess-Mount
#8 x 1½ inch
Bracket*
Wood Screw*
12/2018
P/N 045700 Rev. A
O Lutron and Sivoia are trademarks of Lutron Electronics Co., Inc., registered in the U.S. and other countries
Contents
1
Wall Mount _________________________________ 2
2
Ceiling Mount ______________________________ 3
3
Recess Mount ______________________________ 4
4
Drive Installation ____________________________ 5
5
Pinch Pleat Fabric Installation ________________ 5
6
Ripplefold Fabric Installation _________________ 7
7
Power-Up and Control Assignment ____________ 8
8
Setting Open and Close Limits _______________ 8
9
Optional Manual Open Feature _______________ 9
Restoring Factory Default Settings ___________ 10
O
Terminal Block
†
QSSC-EDU-D105
QSSC-EDU-D145
QSSC-EDU-D175
English
Electronic Drive Unit (EDU)
EDU Models:
24-36 V- 41 W
24-36 V- 40 W
24-36 V- 45 W
†
Advertisement
Chapters
Table of Contents

Related Manuals for Lutron Electronics Sivoia QS


Summary of Contents for Lutron Electronics Sivoia QS
-
Page 1: Table Of Contents
For product warranty information, please see: lutron.com/TechnicalDocumentLibrary/Window Systems Warranty.pdf Lutron Electronics Co., Inc. 12/2018 7200 Suter Road P/N 045700 Rev. A O Lutron and Sivoia are trademarks of Lutron Electronics Co., Inc., registered in the U.S. and other countries Coopersburg, PA 18036-1299, U.S.A. -
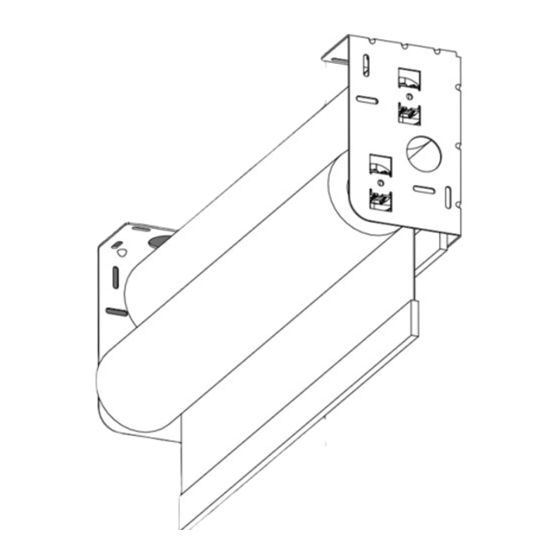
Page 2: Wall Mount
Sivoia QS Drapery System Installation Guide Wall-Mount 1.1 Mount the brackets: IMPORTANT: The drapery track must be level to operate properly, so all brackets must be aligned along a level horizontal line. Each wall-mount bracket must be installed into a wall stud or other structural member using appropriate fasteners. Ensure brackets are mounted firmly enough to support the combined weight of the drapery track, EDU, and fabric. -
Page 3: Ceiling Mount
Sivoia QS Drapery System Installation Guide Ceiling-Mount IMPORTANT: Each ceiling-mount cam-lock must be installed into a structural member using an appropriate fastener. Ensure the structural member is of sufficient strength to support the combined weight of the drapery track, EDU, and fabric. -
Page 4: Recess Mount
Sivoia QS Drapery System Installation Guide Recess-Mount IMPORTANT: A drapery track with recess-mount brackets must be installed into a structural member using wood screws. Ensure the structural member is of sufficient strength to support the combined weight of the drapery track, EDU, and fabric. -
Page 5: Pinch Pleat Fabric Installation
4.4 Basic Wiring: • For basic wiring instructions, please refer to the included wiring and setup guide: 045520 Sivoia QS Basic Wiring & Setup • For wireless receiver installation and setup, if applicable, please refer to the setup guide packaged with the wireless receiver:... - Page 6 Sivoia QS Drapery System Installation Guide Pinch Pleat Fabric Installation continued 5.2 Hang the drapery - left and right draw systems: Attach the drapery to the drapery track starting Idle End Drive End Auxiliary Carriers with the Master Carrier, attaching the last two hooks of the drapery to the railbox hooks.
-
Page 7: Ripplefold Fabric Installation
Sivoia QS Drapery System Installation Guide Ripplefold Fabric Installation 6.1 Drapery Panel Height Drapes are typically sized so the bottom of the drapery track and top of the drapery panel are located 4 in (101 mm) above the window casing. Location may need to be adjusted to accommodate the specific drapery panel height and application. It is recommended that a space of 1⁄2-1 in (13-25 mm) be maintained between the bottom of drapery panel and the floor. -
Page 8: Setting Open And Close Limits
Power Up the Drapery and Assign a Control 7.1 Initial Power-Up: For detailed system wiring, programming, and troubleshooting information, please refer to P/N 045314 Sivoia QS Wiring & Connect the power supply to an appropriate power source. Programming Guide. The LED on the EDU will flash a red/green/blue pattern as To find the meaning of LED blink codes, see: the EDU powers up. -
Page 9: Optional Manual Open Feature
Sivoia QS Drapery System Installation Guide The Optional Manual Open Feature NOTE: The Manual Open feature is only available in systems that were originally ordered with the option. The following instructions do not apply to the standard Master Carrier. 9.1 Enabling the Manual Open Feature The Manual Open feature allows the drapes to be manually opened in the event of a power failure, or if the user is not aware the drapery track is motorized. -
Page 10: Restoring Factory Default Settings
Sivoia QS Drapery System Installation Guide Restoring Factory Default Settings This procedure will un-assign this drapery drive from all wireless controls, but will not affect the open and close limits. HOLD HOLD HOLD HOLD A. Press and hold until B. Press and hold until C. - Page 11 Sivoia QS Drapery System Installation Guide Page 11...
- Page 12 London EC2A 1NQ, UK TEL: +44.(0)20.7702.0657 | FAX: +44.(0)20.7480.6899 Online: www.lutron.com/help | Email: Support@Lutron.com Technical Support: +44.(0)20.7680.4481 | FREEPHONE: 0800.282.107 12/2018 P/N 045700 Rev. A O Lutron and Sivoia are trademarks of Lutron Electronics Co., Inc., registered in the U.S. and other countries...
-
Page 13: Lutron Electronics Co., Inc
Pour les informations concernant la garantie, consultez : lutron.com/TechnicalDocumentLibrary/Window Systems Warranty.pdf Lutron Electronics Co., Inc. 12/2018 O Lutron et Sivoia est marques déposée de Lutron Electronics Co., Inc., 7200 Suter Road déposées aux États-Unis et d’autres pays. N° de pièce 045700 Rév. A... -
Page 14: Montage Mural
Guide d’installation du système de rideau Sivoia QS Montage mural 1.1 Montez les supports : IMPORTANT: La piste de rideau doit être de niveau pour fonctionner correctement. Tous les supports doivent donc être alignés le long d’une ligne horizontale à plat. Chaque support de fixation mural doit être installé dans un montant mural ou un autre élément structural à... -
Page 15: Montage Au Plafond
Guide d’installation du système de rideau Sivoia QS Montage au plafond IMPORTANT: Chaque verrou à came monté au plafond doit être installé dans un élément structural à l’aide d’une fixation appropriée. Assurez-vous que l’élément structural est suffisamment résistant pour supporter le poids combiné de la piste de rideau, de l’EDU et du tissu. -
Page 16: Montage Encastré
Guide d’installation du système de rideau Sivoia QS Montage encastré : IMPORTANT: Une piste de rideau avec les supports encastrés peut être installé dans un élément structural avec des vis à bois. Vérifiez que l’élément structural est suffisamment résistant pour supporter le poids combiné du piste de rideau, de l’EDU et du tissu. -
Page 17: Installation De Tissu À Plis Pincés
• Pour l’installation et la configuration du récepteur sans fil, si nécessaire, veuillez vous reporter au guide de configuration fourni avec le récepteur sans fil : 045555 Récepteur RF sans fil du Sivoia QS Installation de tissu à plis pincés 5.1 Attacher les crochets :... - Page 18 Guide d’installation du système de rideau Sivoia QS Installation de tissu à plis pincés (a continué ) 5.2 Suspendre le rideau – système avec ouverture à droite et à gauche : Attachez le rideau au piste de rideau à partir du Extrémité...
-
Page 19: Installation De Tissu Ondulé
Guide d’installation du système de rideau Sivoia QS Installation de tissu ondulé 6.1 Hauteur du panneau de rideau Les rideaux sont généralement dimensionnés de façon à ce que la partie inférieure des rideaux coulissants et la partie supérieure du panneau de rideau se trouvent à 101 mm (4 po) au-dessus du chambranle de la fenêtre. Il faut parfois ajuster l’emplacement pour tenir compte de la hauteur et de l’application spécifiques du panneau de rideau. -
Page 20: Activer L'électricité Et Attribuer Un Contrôle
Guide d’installation du système de rideau Sivoia QS Activer l’électricité de la piste et attribuer un contrôle 7.1 Mise en marche initiale : Pour des informations détaillées sur le câblage, la programmation et le dépannage du système, veuillez consulter le Guide de câblage et de programmation du Sivoia QS, n°... -
Page 21: La Fonction Optionnelle D'ouverture Manuelle
Guide d’installation du système de rideau Sivoia QS La fonction optionnelle d’ouverture manuelle REMARQUE: La fonction Ouverture manuelle n’est disponible que sur les systèmes commandés à l’origine avec l’option. Les instructions suivantes ne s’appliquent pas au transporteur principal standard. 9.1 Activation de la fonction d’ouverture manuelle La fonction d’ouverture manuelle permet d’ouvrir manuellement les rideaux en cas de panne de courant ou si l’utilisateur n’est pas... -
Page 22: Restauration Des Réglages Par Default
Guide d’installation du système de rideau Sivoia QS Restauration des réglages par default Cette procédure supprimera l’attribution de ce moteur de rideau de toutes les commandes sans fil, mais n’affectera pas les limites d’ouverture et de fermeture. MAINTENIR MAINTENIR MAINTENIR MAINTENIR A. - Page 23 Guide d’installation du système de rideau Sivoia QS Page 11...
- Page 24 London EC2A 1NQ, Royaume-Uni TÉL. : +44.(0)20.7702.0657 • FAX : +44.(0)20.7480.6899 En ligne : www.lutron.com/help | Email : Support@Lutron.com Assistance technique : +44.(0)20.7680.4481 | NUMÉRO GRATUIT : 0800.282.107 12/2018 O Lutron et Sivoia est marques déposée de Lutron Electronics Co., Inc., déposées aux États-Unis et d’autres pays. N° de pièce 045700 Rév. A...