Table of Contents
Advertisement
Quick Links
Advertisement
Table of Contents

Subscribe to Our Youtube Channel
Related Manuals for KNF N 922 Ex


Summary of Contents for KNF N 922 Ex
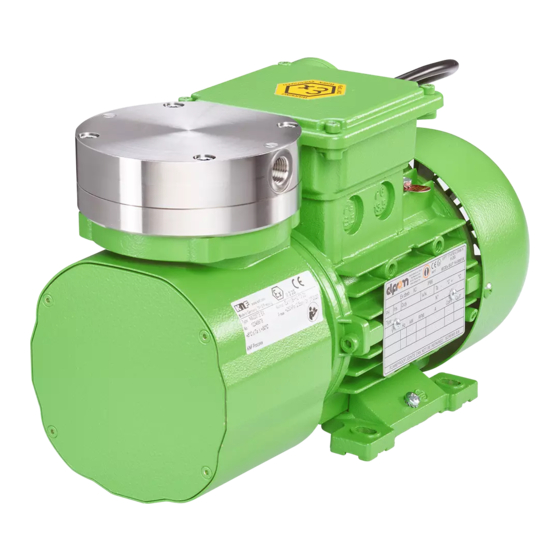
- Page 1 KNF 313600 11/19 N922 EX ATEX TRANSLATION OF ORIGINAL OPERATION AND INSTALLATION INSTRUCTION ENGLISH DIAPHRAGM PUMP Notice! Before operating the pump and the accessories, read the operating and installation instructions and observe the safety notices!
-
Page 2: Table Of Contents
Index KNF Neuberger GmbH Alter Weg 3 1 About this document ............ 3 79112 Freiburg 2 Use ................... 5 Germany 3 Safety................ 11 Tel. +49 (0)7664/5909-0 4 Technical data .............. 13 Fax. +49 (0)7664/5909-99 5 Design and function ............ 15 6 Transport ................ -
Page 3: About This Document
WARNING warns of possible dan- Death or serious injury or serious damage are possible. CAUTION warns of a possibly Minor injuries or dam- dangerous situation age are possible. Tab. 1 Translation of Original Operation and Installation Instruction, english, KNF 313600 11/19... - Page 4 An activity to be carried out is specified here (a step). 1. The first step of an activity to be carried out is specified here. Follow other sequentially numbered steps. This symbol indicates important information. Translation of Original Operation and Installation Instruction, english, KNF 313600 11/19...
-
Page 5: Use
KNF Customer Service. No overpressure may be applied to the suction side of the pump. This function can be made possible on a project basis upon consultation with KNF Customer Service. Translation of Original Operation and Installation Instruction, english, KNF 313600 11/19... - Page 6 The explosion protection designation can also be found at the following lo- cation: § Type plate of the pump Motor The pump motor must have at least the same explosion protection as the pump. Translation of Original Operation and Installation Instruction, english, KNF 313600 11/19...
- Page 7 Tab. 7 Translation of Original Operation and Installation Instruction, english, KNF 313600 11/19...
- Page 8 (or below) (see designation on the type plate) or that is not explosive and not combustible. Translation of Original Operation and Installation Instruction, english, KNF 313600 11/19...
- Page 9 An ignition hazard assessment in accordance with standards DIN EN ISO 80079-36 and DIN EN ISO 80079-37 was performed for the pumps. The protective goals were reached by applying ignition protection type con- structional safety "c". Translation of Original Operation and Installation Instruction, english, KNF 313600 11/19...
- Page 10 The pumps may not be set up outdoors. Commissioning may only be performed with suitable weather- and corrosion-protection paneling. § The pumps are to be set up so that they are not exposed to any UV ra- diation. Translation of Original Operation and Installation Instruction, english, KNF 313600 11/19...
-
Page 11: Safety
Make sure that a dangerous situation cannot arise as a result. When transferring hazardous media, observe the safety regulations for the handling of these media. Translation of Original Operation and Installation Instruction, english, KNF 313600 11/19... - Page 12 This applies in particular to parts that are contaminated with toxic substances. EU/EC directives/standards See EC/EU Declaration of Conformity Customer service and repairs The pumps are maintenance-free. KNF does, however, recommend peri- odically inspecting the pumps for noticeable changes to noises and vibra- tions.
-
Page 13: Technical Data
Tab. 21 * The gas tightness of the pump head is no longer ensured after the pump head is opened or after replacing diaphragm and valve plates/seals. A leak test can be used to determine whether the original gas tightness is again achieved. Translation of Original Operation and Installation Instruction, english, KNF 313600 11/19... - Page 14 Technical data Diaphragm pump N922 EX Weight Pump type Value [kg] N922 EX Tab. 23 Translation of Original Operation and Installation Instruction, english, KNF 313600 11/19...
-
Page 15: Design And Function
(2). In the upwards stroke, the diaphragm presses the medium out of the pump head via the outlet valve (1). The transfer chamber (3) is hermetically separated from the pump drive (7) by the diaphragm. Translation of Original Operation and Installation Instruction, english, KNF 313600 11/19... -
Page 16: Transport
- 10 to + 60 Permissible humidity (non-condens- 30 to 85 ing) [%] Tab. 25 Transport parameters Prior to commissioning, make sure that the pump has reached the ambient temperature (4 Technical data). Translation of Original Operation and Installation Instruction, english, KNF 313600 11/19... -
Page 17: Installation And Connection
7.1 Installing the pump à Before installing, store the pump at the installation location to allow it to reach the ambient temperature. à Mounting dimensions For mounting dimensions, see the following figures: Translation of Original Operation and Installation Instruction, english, KNF 313600 11/19... - Page 18 Installation and connection Diaphragm pump N922 EX Fig. 3 Mounting dimensions N922 EX (capacitor motor) Translation of Original Operation and Installation Instruction, english, KNF 313600 11/19...
- Page 19 Diaphragm pump N922 EX Installation and connection Fig. 4 Mounting dimensions N922 EX (three-phase motor) Translation of Original Operation and Installation Instruction, english, KNF 313600 11/19...
- Page 20 Installation and connection Diaphragm pump N922 EX Fig. 5 Mounting dimensions N922.29 EX (capacitor motor) Translation of Original Operation and Installation Instruction, english, KNF 313600 11/19...
- Page 21 Immediate environment of the During installation, make sure that no combustible or thermally de- hot pump parts formable objects are positioned in the immediate environment of the hot pump parts (head, motor). Translation of Original Operation and Installation Instruction, english, KNF 313600 11/19...
- Page 22 Pump vibrations, in combination with adjacent components, can result in crushing and/or dam- WARNING age to these components. à Make sure that pump vibrations cannot lead to dangers in combination with adjacent com- ponents. Translation of Original Operation and Installation Instruction, english, KNF 313600 11/19...
- Page 23 2. Remove the housing cover (2). The eccentric crank drive (3) and the four motor fastening screws (4) become visible. 3. Loosen and remove the four motor fastening screws (4). Translation of Original Operation and Installation Instruction, english, KNF 313600 11/19...
- Page 24 5. Screw in the four motor fastening screws (4) and tighten them (tightening torque: 6 Nm). 6. Position the housing cover (1) and screw down with the four Allen screws (2) (tightening torque: 15 Ncm). Translation of Original Operation and Installation Instruction, english, KNF 313600 11/19...
- Page 25 – the cables cannot be worn or damaged on sharp corners or edges – no tensile and pressure forces are exerted on the connection point of the cables (strain relief) Translation of Original Operation and Installation Instruction, english, KNF 313600 11/19...
- Page 26 2. Connect the suction line and the pressure line (for mounting dimen- sions, see Chapter 4 Technical data). 3. Lay the suction line and the pressure line at a downward angle to pre- vent condensate from running into the pump. Translation of Original Operation and Installation Instruction, english, KNF 313600 11/19...
-
Page 27: Operation
The pumps are built-in devices. Before they are commissioned, it must be ensured that the machines or systems into which the pumps were installed comply with the relevant provisions. Translation of Original Operation and Installation Instruction, english, KNF 313600 11/19... - Page 28 Because the diaphragm is a wear part, diaphragm breakage may occur at any time. à Pump standstill When the pump is at a pump standstill, establish normal atmospheric pressure in the lines. Translation of Original Operation and Installation Instruction, english, KNF 313600 11/19...
- Page 29 Recommissioning Before recommissioning, observe the applicable standards, guidelines, regulations and technical standards at the electrical connection. à Inspecting the pump Inspect the pump periodically for external damage or leakage. Translation of Original Operation and Installation Instruction, english, KNF 313600 11/19...
- Page 30 When the valve is closed as well as when completely open, signifi- cant resistance is felt; then turn no further. The corresponding end position is reached. X Self-locking adjustment screw Fig. 9 Setting the flow rate (N922FT.29E EX) Translation of Original Operation and Installation Instruction, english, KNF 313600 11/19...
-
Page 31: Servicing
Motor bearing Have replaced after 17,000 op- erating hours or after no more than 24 months à Gas connections Inspect the pump periodically for external damage or leakage Tab. 31 Translation of Original Operation and Installation Instruction, english, KNF 313600 11/19... - Page 32 Allen key, 4 mm Felt-tip pen Tab. 35 Information on the procedure Always replace zone diaphragm, valve plates/seals and O-ring (only .29 version) together to maintain the performance of the pump. Translation of Original Operation and Installation Instruction, english, KNF 313600 11/19...
- Page 33 4. Hold the diaphragm (6) on the side edges and unscrew it counterclock- wise. 5. Check all parts for soiling and clean them if necessary (see Chapter 9.2 Cleaning). Translation of Original Operation and Installation Instruction, english, KNF 313600 11/19...
- Page 34 6. Check the valve seats, intermediate plate (2), head plate (3) and, if necessary, O-ring groove for soiling and damage. Clean the parts if necessary. Contact KNF in the event of unevenness, scratches or corrosion. Order and replace the damaged parts. 7. Inserting valve plate/seal: Valve plates/seals are identical for the pressure and suction side;...
- Page 35 Before recommissioning, observe the applicable standards, guide- lines, regulations and technical standards at the electrical connec- tion. If you have questions with regard to maintenance, please contact your KNF technical adviser (contact data: see www.knf.com). Translation of Original Operation and Installation Instruction, english, KNF 313600 11/19...
- Page 36 5 Screws 6 Diaphragm 7 Screw 8 Washer 9 Valve plate/seal 10 O-ring (only .29 version) 11 Adjusting valve (only .29 version) 12 Locating pin Fig. 10 Pump parts N922FT.29E EX Translation of Original Operation and Installation Instruction, english, KNF 313600 11/19...
- Page 37 2. The valve diaphragm (Z) must be fully screwed in but must not be overtightened. 3. Adjust the flow rate according to 8.3 Adjust the flow rate (.29 ver- sion). Fig. 11 Adjusting valve Translation of Original Operation and Installation Instruction, english, KNF 313600 11/19...
-
Page 38: Troubleshooting
Install the pump at the highest location in the sys- tem. à Diaphragm or reed valves/valve Change the diaphragm and the reed valves/valve plate are worn. plate (see Chapter 9 Servicing). Tab. 39 Translation of Original Operation and Installation Instruction, english, KNF 313600 11/19... - Page 39 Determine the cause. à Contact KNF Customer Service. à Motor worn or defective. See operating instructions for motor. à Coupling worn or defective. See operating instructions for coupling. Tab. 43 Translation of Original Operation and Installation Instruction, english, KNF 313600 11/19...
- Page 40 2. Clean the pump (see Chapter 9.2.2 Cleaning the pump). 3. Send the pump together with completed Health and Safety Clearance and Decontamination Form to KNF, stating the nature of the trans- ferred medium. Translation of Original Operation and Installation Instruction, english, KNF 313600 11/19...
-
Page 41: Spare Parts And Accessories
Order number Hose screw connection, PVDF, for 303623 hose ID 6 x 1 Mounting kit - rubber-bonded metals 313180 Mounting kit - rubber-bonded metals 313181 and mounting bracket Tab. 51 Translation of Original Operation and Installation Instruction, english, KNF 313600 11/19... - Page 42 Spare parts and accessories Diaphragm pump N922 EX Fig. 12 Pump with accessories (depicted with hose screw connection, mounting kit - rubber-bonded metals and mounting bracket) Translation of Original Operation and Installation Instruction, english, KNF 313600 11/19...
-
Page 43: Returns
Diaphragm pump N922 EX Returns 12 Returns Prerequisite for repairing a pump by KNF is a completed Decontamination Form. This is made available on the KNF website as a download. § To find the form, select your country on the overview page (www.knf.com). -
Page 44: Appendix
Appendix Diaphragm pump N922 EX 13 Appendix 13.1 Declaration of Conformity For further information, see also § Konformitätserklärung N922 EX Translation of Original Operation and Installation Instruction, english, KNF 313600 11/19... - Page 49 Diaphragm pump N922 EX Appendix 13.2 Motor For further information, see also § Betriebsanleitung Motor.pdf § Anschlussplan Motor.pdf § CE-Erklärung Motor.pdf Translation of Original Operation and Installation Instruction, english, KNF 313600 11/19...
- Page 50 . The coupling components must also be balanced with a half key on a smooth Motors with forced ventilation (IC416) The Ex d motors have a normal terminal board. mandrel. Coupling belts and pulleys must be assembled by suitable tools to protect the bearings.
- Page 51 ORANGE 1 ELECTRIC MOTORS S.P.A. Via Mantova 93 43122 Parma Italy Te. +39 (0)521 272383 www.orange1.eu Dichiarazione UE di Conformità / UE Declaration of Conformity / Déclaration UE de Conformité UE Konformit tserk rung / Declaration UE de Conformidad ä ä...
- Page 52 Schemi di collegamento / Wiring diagrams Trifase 1 Velocità 2-4-6-8 poli (6 fili) – Three-phase 1 speed 2-4-6-8 poles (6 wires) W2 U2 V2 W2 U2 V2 W2 U2 V2 W2 U2 V2 U1 V1 W1 V1 W1 L2 L3 L2 L3 L2 L3 L2 L3...
- Page 54 IECEx Certificate of Conformity INTERNATIONAL ELECTROTECHNICAL COMMISSION IEC Certification Scheme for Explosive Atmospheres for rules and details of the IECEx Scheme visit www.iecex.com Certificate No.: IECEx EUT 14.0001X Issue No: 2 Certificate history: Issue No. 2 (2019-02-08) Status: Current Issue No. 1 (2017-03-10) Page 1 of 4 Issue No.
- Page 55 IECEx Certificate of Conformity Certificate No: IECEx EUT 14.0001X Issue No: 2 Date of Issue: 2019-02-08 Page 2 of 4 Manufacturer: ORANGE1 ELECTRIC MOTORS S.p.A. Via Mantova, 93 43122 Parma Italy Additional Manufacturing location(s): This certificate is issued as verification that a sample(s), representative of production, was assessed and tested and found to comply with the IEC Standard list below and that the manufacturer's quality system, relating to the Ex products covered by this certificate, was assessed and found to comply with the IECEx Quality system requirements.
- Page 56 IECEx Certificate of Conformity Certificate No: IECEx EUT 14.0001X Issue No: 2 Date of Issue: 2019-02-08 Page 3 of 4 Schedule EQUIPMENT: Equipment and systems covered by this certificate are as follows: The three-phase and single-phase asynchronous squirrel cage rotor motors series O-M, are made of aluminium (the paint used has a maximum thickness of 0.2 mm) with separate parts: motor enclosure, terminal box for supply and a capacitor enclosure.
- Page 57 IECEx Certificate of Conformity Certificate No: IECEx EUT 14.0001X Issue No: 2 Date of Issue: 2019-02-08 Page 4 of 4 DETAILS OF CERTIFICATE CHANGES (for issues 1 and above): - Changing of manufacturer's references - Use of metric threaded plugs in holes of flameproof terminal enclosure with a free internal volume up to 450 cm (which is possible for motors from size 63 to size 132) Annex:...
- Page 60 KNF worldwide You can find our local KNF partners at: www.knf.com...
Need help?
Do you have a question about the N 922 Ex and is the answer not in the manual?
Questions and answers