Advertisement
Quick Links
Advertisement

Related Manuals for DHP 5457096


Summary of Contents for DHP 5457096
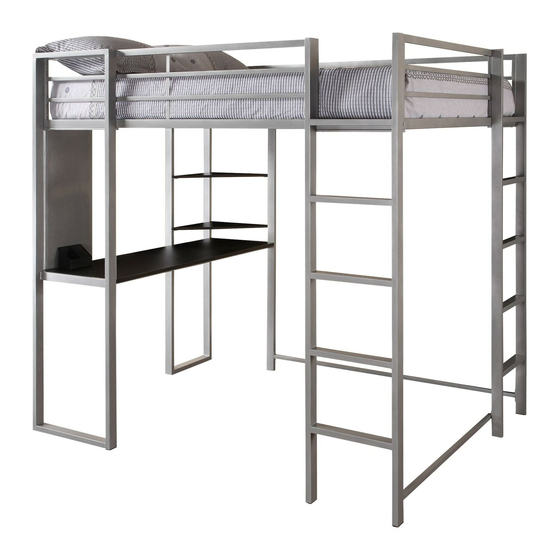
- Page 1 FULL SIZE METAL LOFT BED 300 Lbs Weight Limits: 136 Kgs B34545709600...
- Page 3 BACK GUARD RAIL FRONT T906420 GUARD RAIL QTY: 1 T906410 QTY: 1 SINGLE LEG BACK LEFT BACK RIGHT FRONT LEFT T906400 FRONT QTY: 1 T906370 RIGHT LEG T906390 T906360 QTY: 1 TRIPLE T906380 QTY: 1 QTY: 1 SPINDLE QTY: 1 SPINDLE BAR T906440 T906430...
- Page 4 PENCIL TRAY DESK TOP T906540 PEG BOARD BOLT CORNER T906510 QTY: 1 T906530 SHELF " X " BOLT QTY: 1 QTY: 1 WHITE T906520 " X 1" T127110 QTY: 2 WHITE QTY: 22 T127120 QTY: 8 WASHER WASHER 16mm 12mm WHITE HEX KEY WHITE...
- Page 5 * ALWAYS USE THE RECOMMENDED SIZE MATTRESS OR MATTRESS SUPPORT, OR BOTH, TO HELP PREVENT THE LIKELIHOOD OF ENTRAPMENT OR FALLS. * TO PREVENT INJURY, DHP RECOMMENDS ONE TWIN SIZE MATTRESS AND ONE FULL SIZE MATTRESS TO BE USED. * USE ONLY A FULL MATTRESS WHICH IS 74"-75" LONG AND 53 1/2"-54 1/2" WIDE.
- Page 6 Attach the RIGHT GUARD RAIL (M) to the FRONT RIGHT LEG (C) and BACK RIGHT LEG (D) with the BOLTS (2 & 3) and WASHERS (5). Attach the SHORT BOTTOM BRACE (N) with the BOLTS (1) and WASHERS (5) as shown below. Hardware Required 6 20 B34545709600...
- Page 7 Attach the FRONT GUARD RAIL (F) to the FRONT LEFT LEG (A) and the FRONT RIGHT LEG (C) with the BOLTS (2, 3, & 4) and WASHERS (5) as shown below. Hardware Required 7 20 B34545709600...
- Page 8 Attach the LEFT GUARD RAIL (L) to the FRONT LEFT LEG (A) and the BACK LEFT LEG (B) with the BOLTS (2 & 3) and WASHERS (5) as shown below. Hardware Required 8 20 B34545709600...
- Page 9 Attach the BACK GUARD RAIL (G) to the unit with the BOLTS (3 & 4) and WASHERS (5) as shown. Hardware Required 9 20 B34545709600...
- Page 10 Slide the TRIPLE SPINDLES and DOUBLE SPINDLES (I & J) into the square holes in the GUARDS RAILS (F & G) as shown below. 10 20 B34545709600...
- Page 11 Lock the SPINDLES (I & J) into place by placing the SPINDLE BAR (H) on top of them on each end and fasten into place with the SCREW (7) and WASHERS (6) as shown below. Hardware Required 11 20 B34545709600...
- Page 12 Attach the SINGLE LEG (E) to the BACK GUARD RAIL (G) with the BOLTS (1) and WASHERS (5). Attach the LONG BOTTOM BRACE (K) to the SINGLE LEG (E) and REAR RIGHT LEG (D) using the BOLTS (1) and WASHERS (5) as shown below. Hardware Required 12 20 B34545709600...
- Page 13 Attach the CORNER SHELVES (Q) to the BACK LEFT LEG (B) and the SINGLE LEG (E) using the BOLTS (1) and WASHERS (5) as shown below. Hardware Required 13 20 B34545709600...
- Page 14 Attach the DESK FRAME (O) to the FRONT LEFT LEG (A), BACK LEFT LEG (B), and SINGLE LEG (E) using the BOLTS (1 & 3) and WASHERS (5) as shown below. Hardware Required 14 20 B34545709600...
- Page 15 Attach the DESK TOP (P) to the DESK FRAME (O) with the BOLTS (3) and WASHERS (5) as shown below. Hardware Required 15 20 B34545709600...
- Page 16 Attach the PEG BOARD (R) to the unit using the BOLTS (1) and WASHERS (5) as shown below. Hardware Required 16 20 B34545709600...
- Page 17 B34545709600 Limites Del Peso: 300 Lbs\136Kgs REGRESAS ESTA PRODUCTO A LA TIENDA ALTO Las tiendas no tiene partes. Si falta partes o las partes esten danados llame gratis a la servicio del cliente. Con gusto mandarnos las partes. Sin alguno carga. Nesacitas partes o Asistancia? o visitar la pagina del internet www.dhpfurniture.com Para servicio mas rapido y reliable por favor tenga esta manual listo.
- Page 18 * UTILICE SIEMPRE EL COLCHÓN DEL TAMAÑO O LA AYUDA RECOMENDADO DEL COLCHÓN, O AMBOS, PARA AYUDAR A PREVENIR LA PROBABILIDAD DE LA TRAMPA O DE CAÍDAS. * PARA PREVENIR LESIÓN, DHP RECOMIENDA UN COLCHÓN GEMELO DEL TAMAÑO Y UN COLCHÓN DEL MISMO TAMAÑO QUE SE UTILIZARÁN. * UTILICE SOLAMENTE Un COLCHÓN LLENO QUE SEA 74"-75" Y 53 1/2"-54 ".
- Page 19 PÁGINA 09 Ate el TRASERO del CARRIL de PROTECTOR (G) a la unidad con los PERNOS (2 & 3) y ARANDELAS (5) como se muestra. PÁGINA 10 Resbale los HUSOS TRIPLES y los HUSOS DOBLES (I & J) en las perforaciones rectangulares en los CARRILES de PROTECTORES (F & G) como se muestra abajo. PÁGINA 11 Trabe los HUSOS (I &...
Need help?
Do you have a question about the 5457096 and is the answer not in the manual?
Questions and answers
What is the max weight
The maximum weight capacity of the DHP part number 5457096 is 300 lbs (136 kgs).
This answer is automatically generated