Table of Contents
Advertisement
Quick Links
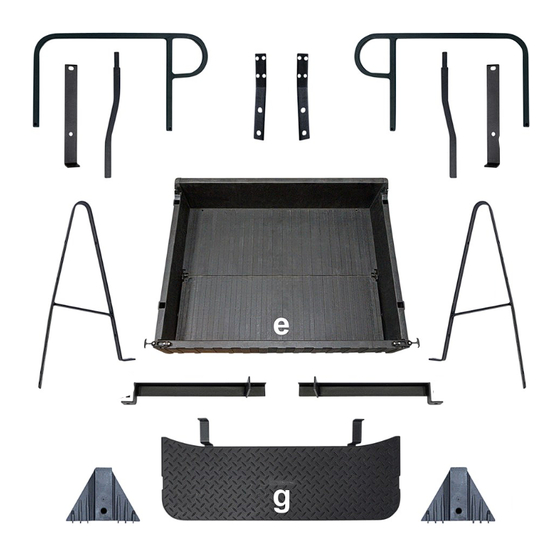
Contents of SEAT-921 Seat Box Kit:
a
b
c
d
e
f
g
h
i
j
k
Caution: Please read through the instructions carefully. Installer is responsible
for damage if instructions are not followed properly. Look behind each drill or
cut location BEFORE YOU DRILL OR CUT. Installer is responsible for damage
(i.e. drilling/cutting into a wiring harness, battery, fuel tank etc.). Extra installers
will be helpful in some parts of the installation. Refer to vehicle's maintenance
manual for torqueing specifications on reused hardware.
SEAT-921
Club Car DS
RHOX 900 Series Seat Box Kit
Installation Instructions
(2 ea.) Front Seat Back Support Brackets
(2 ea.) Vertical Support Brackets
(1 ea.) Horizontal Support Bracket, Passenger Side
(1 ea.) Horizontal Support Bracket, Driver Side
(1 ea.) Utility Box
(2 ea.) Rear Seat Back Brackets
(1 ea.) Footplate
(2 ea.) Handrails
(2 ea.) Handrail Extensions
(2 ea.) Footplate Support Brackets
(1 ea.) Box of Hardware (Contents on Next Page)
Advertisement
Table of Contents

Related Manuals for RHOX 900 Series


Summary of Contents for RHOX 900 Series
-
Page 1: Installation Instructions
SEAT-921 Club Car DS RHOX 900 Series Seat Box Kit Installation Instructions Contents of SEAT-921 Seat Box Kit: (2 ea.) Front Seat Back Support Brackets (2 ea.) Vertical Support Brackets (1 ea.) Horizontal Support Bracket, Passenger Side (1 ea.) Horizontal Support Bracket, Driver Side (1 ea.) Utility Box... - Page 2 Contents of SEAT-921 Hardware Kit Bag #1 #2 #4 #5 a M10 x 80 Hex Head Bolts b M10 x 35 Hex Head Bolts c M10 x 30 Hex Head Bolts d M10 x 60 Phillips Head Countersunk Screws e M10 Flat Washers f M10 Nylock Nuts g M8 x 25 Hex Head Bolts h M8 Flat Washers...
- Page 3 Installation Preparation Engage parking brake. Turn key OFF. Electric Carts Only: Place Tow/Run Switch in Tow. Remove top (black arrows). Remove rear struts (red arrows). DS New Style DS Old Style Rear Strut (Driver Side) Rear Strut (Driver Side) Remove the front seat back cushion(s) by hand. Retain hardware. DS New Style DS Old Style (Driver Side Seat Back)
- Page 4 Remove access panel. Retain hardware. Remove front seat back supports and sweater basket assembly. Retain hardware. (Driver Side, DS New Style) Remove rear bumper. Retain hardware and bumper. Discard mounting plate (blue arrows). Rear Seat Kit Installation Loosely install the vertical support brackets to the bumper mounts and bumper using the Original Bolts, Nuts and (2) 8mm Flat Washers (Bag #1).
- Page 5 Install the new front seat back support brackets where the original brackets were installed. Mount the front most portion using the Original Hardware (black arrows). Place the horizontal supports under the seat back brackets as shown. Fasten them to the vertical support brackets using (2) M10 x 30 Hex Head Bolts (4) Flat Washers and (2) Nylock Nuts (blue arrows, Bag #2).
- Page 6 Loosely fasten the rear seat back brackets to the rear seat back cushion using (4) M6 x 25 Hex Head Bolts, (4) Lock Washers and (4) Flat Washers (black arrows, Bag #5). Loosely fasten the seat back assembly to the front of the utility box using (4) M8 x 25 Hex Head Bolts and (4) Flat Washers (red arrows, Bag #4).
- Page 7 12. Loosely fasten the front portion of the handrails to the box using (2) M10 x 35 Hex Head Bolts and (2) Flat Washers (red arrow, Bag #2). Do not overtighten 13. Loosely fasten the handrail extensions to the handrails and the box using (2) M10 x 60 Phillips Head Countersunk Screws, (2) Flat Washers and (2) Nylock Nuts (blue arrow, Bag #2).
- Page 8 21. Reinstall top using Original Hardware (if applicable). 22. Tighten all hardware. This completes the installation of your RHOX 900 Series Seat Box Kit. Please enjoy safely! Scan QR code or use the link below to view the installation video. https://vimeo.com/user39935056...
Need help?
Do you have a question about the 900 Series and is the answer not in the manual?
Questions and answers