Table of Contents
Advertisement
Advertisement
Table of Contents
Troubleshooting

Related Manuals for QPS Que!Fire

Summary of Contents for QPS Que!Fire
- Page 4 COPYRIGHT PROTECTION NOTICE Duplicating copyrighted material without the permission of the publisher may be unlawful. QPS does not condone, support, or encourage the violation of copyright laws. Please obtain proper authorization prior to duplicating copyright protected material.
-
Page 5: Table Of Contents
TABLE OF CONTENTS Table of Contents....................1 Thank You for Choosing QPS ................2 Chapter 1 Welcome to the CD-Recording World ..............4 What Can the Que! Drive Do for Me? ..............5 Chapter 2 Getting Started ......................8 What You Should Have! ..................9 Package List ......................10 What About Software? ..................11... -
Page 6: Thank You For Choosing Qps
CONGRATULATIONS! THANK YOU for Choosing QPS! Congratulations on your purchase of the Que! Fire CD-ReWritable Drive. In this manual, you’ll find information designed to help you understand the capability of your new drive as well as a step-by-step explanation of how to install your hardware and software. -
Page 8: Welcome To The Cd-Recording World
WELCOME! CHAPTER ONE WELCOME TO THE CD-RECORDING WORLD! If you’re new to CD-Recording, don’t worry; it’s easy to learn. The Que! Fire Drive allows you to store massive amounts of data on one CD. You can fit as much data found on 450 floppies on one CD-R or CD-RW media. Plus, it allows you to record audio, and audio/video applications. -
Page 9: What Can The Que! Drive Do For Me
QUE! FIRE FEATURES WHAT CAN THE QUE! FIRE DRIVE DO FOR ME? With the Que! Fire Drive, you have lots of flexibility and a multitude of options. For instance, you can: 1. Store up to 450 times the volume of a floppy disk onto one removable inexpensive piece of media that can be used over and over again. - Page 10 NOTES...
-
Page 12: Chapter 2 Getting Started
GETTING STARTED CHAPTER TWO GETTING STARTED! Before you start using your Que! Fire Drive, you'll want to make sure you have everything you need. In this chapter, we'll tell you what comes in the package, so you can make sure it's all there. In this chapter we'll tell you about the minimum requirements your system needs to support the Que! Fire Drive. -
Page 13: What You Should Have
GETTING STARTED WHAT YOU SHOULD HAVE! • What’s in the package Refer to the provided package list on the following page and verify that you have received all of the appropriate parts. Okay, if all the right parts were in the package, then you just need to make sure your system will support the Que! Drive. -
Page 14: Package List
PACKING LIST Installation Manual Carrying Bag & Strap Drive Power Cable Universal Power FireWire IEEE Supply Adapter 1394 Cable Software CD-R & CD-RW Media... -
Page 15: What About Software
GETTING STARTED WHAT ABOUT SOFTWARE? The Que! Fire Drive comes with a variety of software applications that will help you get the most from your drive. iMac DV and G3/G4 users should install the following applications: • Que! Fire Extension •... - Page 16 NOTES...
-
Page 18: Chapter 3 Mac Installation
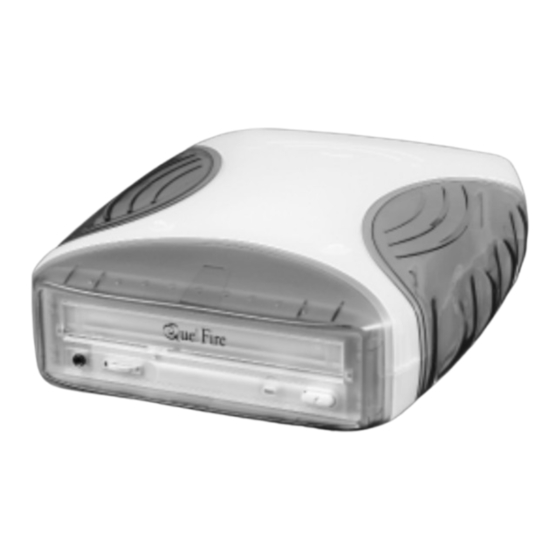
MAC INSTALLATION CHAPTER THREE MACINTOSH INSTALLATION: GETTING PLUGGED IN Now that you know you have everything you need, you're ready to install your Que! Fire Drive hardware and software. This chapter will show you how. The figure below shows the front panel controls and indicators for the Que! Fire Drive. Disc Tray Open the tray and insert/remove the disc Eject Button... - Page 19 MAC INSTALLATION Getting It All Set Up Step 1: iMac DV & G3/G4 Desktop Computers: Attach the FireWire cable to either of the two FireWire connectors on the back or the side of the iMac DV or G3/G4 computer. (Refer to your Mac user manual). iMac DV installation G3/G4 installation...
- Page 20 MAC INSTALLATION Step 2: Attach the other end of the FireWire interface cable to the FireWire port on the back of the Que! Fire Drive. Step 3: Attach the power adapter to the back of the Que! Fire Drive. Plug one end of power cable to the back of the power adapter and the other end to the grounded power outlet.
-
Page 21: And Now For The Software
MAC INSTALLATION AND NOW FOR THE SOFTWARE In this section, we'll explain how to install the recording software packages that came with your Que! Fire Drive. Step 1: Install the Que! Fire Extension • Insert the installation CD into your system's CD-ROM drive •... -
Page 22: Using Your Adaptec Toast Software
MAC INSTALLATION USING YOUR ADAPTEC TOAST SOFTWARE To start Adaptec Toast: • Click twice on the HDD icon and open the “Toast Folder” • Click twice on “Adaptec Toast” icon to launch the program Audio Recording • You are now at the main Toast screen and should see “TOAST” in big yellow letters at the top of the window. - Page 23 MAC INSTALLATION Recording Data • Select the FORMAT menu and select the format you want to use. For example, you can select “Mac files & folders”. NOTE: If you are not sure of the format to use, drag and drop the files onto the main Toast screen and Toast will automatically select the format.
- Page 24 NOTES...
-
Page 26: Chapter 4 Pc Installation
PC INSTALLATION CHAPTER FOUR PC Installation Step 1: Turn off the power on your PC and all other peripherals that are attached to your system. Step 2: Connect the IEEE 1394 cable to the IEEE 1394 port on the back of your PC. - Page 27 PC INSTALLATION Step 3: Attach the other end of the IEEE 1394 interface cable to the IEEE 1394 port on the back of the Que! Fire Drive. Step 4: Attach the power adapter to the back of the Que! Fire Drive. Plug one end of power cable to the back of the power adapter and the other end to the grounded power outlet.
-
Page 28: And Now For The Software
PC INSTALLATION And Now for the Software In this section, we'll explain how to install the recording software packages that came with your Que! Fire Drive. Part 1: Installing Easy CD Creator Step 1: Insert the installation CD in your computer’s CD-ROM drive. The installation wizard "Master Setup"... - Page 29 PC INSTALLATION Part 3: Installing the UDF Reader Step 1: Select UDF Reader. When you do this the "Adaptec Setup Wizard" dialogue box will pop-up and display the following question: "This Setup Wizard installs the Adaptec Direct CD (UDF) Reader for Windows 95/ Windows NT.
- Page 30 NOTES...
-
Page 32: Handling Guidlines: Media Insertion And Removal
HANDLING CHAPTER FOUR HANDLING GUIDELINES Media Insertion and Removal 1. To insert the CD-ROM, CD-R or CD-RW disc, press the EJECT button. 2. Once the disc tray has fully extended, place the CD-ROM, CD-R or CD-RW disc disc into the center of the tray. Note: The disc surface must be clean and the label should be facing upward. - Page 33 HANDLING 4. The busy lamp will light for a few seconds to indicate that a disc has been loaded and the drive has accepted the disc. 5. To eject and insert the disc, press the EJECT button. NOTE: Some software prohibits the use of the EJECT button, so a disc cannot be ejected in this way.
- Page 34 HANDLING The NUMBER ONE cause of premature disc failure with recordable CDs is contami- nation of the recording surface before recording is completed. To minimize disc failure, use the following disc-handling guidelines. • Keep the media in its sealed package until you are ready to record.
-
Page 36: Troubleshooting Guidlines
Having trouble with your Que! Fire Drive. Want to know more about how it works? Check the list of common questions provided in this chapter; you may find the answers you need. If you don’t, or if a problem persists, contact QPS Technical Support. -
Page 38: Mac Troubleshooting
MAC TROUBLESHOOTING Problem 1: Connected the Que! Fire Drive to the iMac DV or G3/G4 computer but the system does not recognize the Que! Fire Drive. Reason 1: The Que! Fire Drive extension may not be installed in your system. Step 1: Verify that you have installed the device driver by looking in the Extensions Manager. - Page 39 MAC TROUBLESHOOTING Step 3: Turn off your QUE! Fire Drive and turn it back on. When you do this the LED on the front of the drive should blink green. Reason 4: The FireWire cable may not be fully or properly installed on the Que! Fire Drive or your MAC Step 1: Verify that you have securely fastened the FireWire cable connector on your Que! Fire Drive and the iMac DV or G3/G4 FireWire port.
- Page 40 MAC TROUBLESHOOTING Reason 3: You may be trying to copy information directly from a CD-ROM drive that can not read data fast enough to keep up with the write speed you are using. Step 1: Verify that the source disk is not scratched or soiled in any way. Poor quality source disc will decrease a CD-ROM drives’...
- Page 41 MAC TROUBLESHOOTING Reason 3: Your source disc may be damaged (scratched or soiled). Step 1: Remove the source disc and visually inspect it for scratches or debris. Step 2: Please follow the handling guidelines mentioned in this manual Problem 4: When attempting to Write to the Que! Fire Drive you get a mes- sage similar to the following: "...
- Page 42 NOTES...
-
Page 44: Pc Troubleshooting
PC TROUBLESHOOTING PC TROUBLESHOOTING Problem 1: After your computer boots up the Que! Fire Drive does not show up as a drive with a unique drive letter. Reason 1: The IEEE 1394 interface on your system may not be enabled. To verify that the IEEE 1394 interface that is built into your system is enabled follow the steps below. - Page 45 PC TROUBLESHOOTING Step 2: If the Que! Fire Drive is not directly connected to your computer please verify all the connection between the other devices. Note: it is highly recommended that you have the Que! Fire Drive connected as the first device in the IEEE 1394 chain. Step 3: If there are other devices between your computer and the Que! Fire Drive, verify that the other devices are powered on.
- Page 46 PC TROUBLESHOOTING Reason 4: The hard disk drive that you are copying the information from may be fragmented. Step 1: Defragment your hard drive with a defragmentation utility. Problem 4: The computer locks up when trying to copy a data or audio CD, from another CD-ROM drive, to your Que! Fire Drive.
-
Page 48: Appendix A Glossary Of Terms
APPENDIX A GLOSSARY OF TERMS Adapter Cards Adapter cards (a.k.a, controller cards, expansion cards, interface cards, etc.) plug into slots of the computer’s main data bus, or bus extensions such as Local Bus. They “adapt” the flow of data and instructions between the CPU and the device (peripheral). - Page 49 APPENDIX A CD-Recordable CD-Recordable technology allows production of CD-ROMs on the desktop (one- offs). It requires a CD-R recorder, appropriate software, a PC, and appropriate media. CD-Recordable involves a special CD, the one-off blank, very different from the mass reproduced or “hot-pressed” CDs. It is sold pre-grooved, in 63 or 74 minute capacities, and it involves a layered structure-with a sensitive chemical recording layer, almost always with a gold reflective layer, and ready for a CD- Recordable drive.
- Page 50 APPENDIX A CD-ReWritable CD-Rewritable technology allows for the CD-Rewritable media to be erased and rewritten over and over again up to 1000 times. Driver In computers, driver refers to a device driver, which is software that, under CPU control, implements device 1/0 functions or other functionality (video, sharing, graphics, printer, mouse, etc.).
- Page 51 APPENDIX A The International Standards Organization, composed of scores of international specialized committees, with main Secretariats worldwide, is the accepted source of standards for electronic and computerized data communications and information processing. ISO 9660 Issued by the International Standards Organization, its formal title is ISO 9660: Information Processing-Volume and File Structure of CD-ROM for Information Exchange (1988).
-
Page 52: Fcc Compliance
APPENDIX B FCC COMPLIANCE This equipment has been tested and found to comply with the limits for a Class B digital device, pursuant to Part 15 of the FCC Rules. These limits are designed to provide reasonable protection against harmful interference in a residential installation. -
Page 53: Appendix C Limited Warranty
Proof of purchase will be required before any warranty consideration by QPS. During the limited warranty period, QPS will repair, or replace, at QPS option any defective parts, or any parts that will not properly operate for its intended use with new or factory rebuilt replacement items. - Page 54 APPENDIX C This limited warranty does not apply if the Product has been damaged by accident, abuse, misuse or misapplication or other acts which are not the fault of QPS or by non-QPS' authorized alterations, modifications and/or repairs. If the Product is returned to the Customer Service Department at QPS during the...
- Page 56 For Customer Use: Enter below the Model Number and Serial Number which are located either on the rear, bottom or side of the unit. QPS Inc. Model No._____________________ 23671 Via Del Rio Serial No._____________________ Yorba Linda, CA 92887 http://www.qps-inc.com...
Need help?
Do you have a question about the Que!Fire and is the answer not in the manual?
Questions and answers