Advertisement
Table of Contents
- 1 Table of Contents
- 2 Introduction
- 3 Nomenclature
- 4 Nomenclature
- 5 Preparation before Use
- 6 Preparation before Use
- 7 Wireless Setting
- 8 Wireless Flash Shooting
- 9 C.fn: Setting Custom Functions
- 10 C.fn: Setting Custom Functions
- 11 Reference
- 12 Reference
- 13 Troubleshooting Guide
- 14 Specifications
- Download this manual
Advertisement
Table of Contents

Related Manuals for Yongnuo YN560-TX PRO


Summary of Contents for Yongnuo YN560-TX PRO
- Page 1 YN560-TX PRO For N 闪光灯信号发射器 Speedlite Transmitter User Manual 用户手册...
-
Page 2: Table Of Contents
Contents Introduction ....1 Nomenclature ....2-3 Preparation Before Use . -
Page 3: Introduction
YN560TX II, with TTL/ high speed sync functions, its radio protocol achieves cross- brand compatibility YN560-TX PRO (For N) can control, trigger YN200/YN862 Ÿ series and the models which have been upgraded to the latest firmware such as YN968N(II)/YN968C(in 560 slave... -
Page 4: Nomenclature
Nomenclature Radio transmission ※The protective flim status lamp can be torn out. Function button 2 Function button 1 LCD panel AF-assist beam emitter button Flash mode button :Test flash button Function button3 Select/Set button Function button4 Batter y compartment Select dial cover Mounting foot lock lever... -
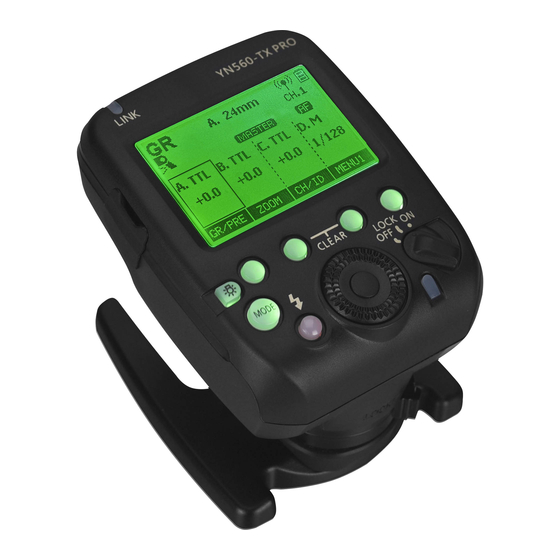
Page 5: Nomenclature
Nomenclature LCD Display ZOOM(Slave unit) Gr : Group flash Custom functions enable Batter y A. 5 0 MM Flash mode Channel Firing group A. TTL B. TTL C. M D. OFF AF lamp enable Flash exposure 0 . 0 0 . 0 or flash output ZOOM GR/ PRE... -
Page 6: Preparation Before Use
Preparation Before Use 1.Install two AA/LR6 batteries. 1.Open the cover :Slide the cover down a s s h o w n a n d o p e n t h e b a t t e r y compartment cover. 2.Install two AA batteries: Install two AA batteries according to the + and - marks, rechargeable batteries of 1.2V can be used. -
Page 7: Preparation Before Use
Preparation Before Use 3.Turning on the Power:Set the power switch to <ON>. The LCD panel illuminates. Ÿ During wireless shooting, press Ÿ the transmitter ’s test flash button to fire a test flash. About the Lock Function By setting the power switch to <LOCK>, you can disable flash’s button and dial operations. -
Page 8: Wireless Setting
Wireless Setting Using a transmitter and a Speedlite compatible with radio transmission wireless shooting makes it easy to shoot with advanced wireless multiple flash lighting, in the same way as normal TTL autoflash shooting. Positioning and Operation Range (Example of wireless flash shooting) Before shooting, perform a Ÿ... -
Page 9: Wireless Flash Shooting
Wireless Flash Shooting 1.Flash Group Setting When <MENU1> is displayed, Ÿ s h o r t p r e s s f u n c t i o n b u t t o n <GR/PRE> to select next flash group, long press this button to s e l e c t p r e v i o u s f l a s h g r o u p . - Page 10 Do not support CH16 the speedlite) support(Need to set RF603(II) Series support (all Do not CH1- Do not the flash out put on support support group can fire) CH16 RF602-RX the speedlite) *Need to upgrade the latest firmware from YONGNUO wedsite.
-
Page 11: C.fn: Setting Custom Functions
C.Fn: Setting Custom Functions Press the function button <C.FN> under MENU2 to enter the custom function. Turn < >or press the < > < > button to select the item to be set, and press < > to enter the setting. Press <SET> button to make a quick setting. -
Page 12: C.fn: Setting Custom Functions
You can change this illumination setting. 0: 12sec 1: OFF 2: ON (Illumination always on) C.Fn-04: (LCD Contrast) 0-9: Select LCD contrast C.Fn-05: (RF Compat) 0:RF602( Please set to this mode when YN560-TX PRO is used with RF602-RX receiver). 1:RF603(default) -
Page 13: Reference
Reference 1.Shutter sync setting You can use front-curtain sync, rear-curtain sync or auto FP high speed sync. Refer to the camera’s setting. Using high-speed sync need to set the camera to“AUTO FP”. The relevant icons will be displayed on the LCD(FP). The maximum sync speed is 1/8000s or 1/4000s (depends on the camera).Some models of camera does not support... -
Page 14: Reference
4.Firmware Update 1.Log in the YONGNUO official website (www.hkyongnuo.com) t o d o w n l o a d t h e f i r m w a r e update software and the latest firmware. -
Page 15: Troubleshooting Guide
Troubleshooting Guide Power does not turn on. Make sure that the batteries are installed in the correct Ÿ orientation. Insert the mounting foot into the camera’s hot shoe all Ÿ the way, slide the lock lever to the right, and secure the transmitter to the camera . -
Page 16: Specifications
The functions of this user manual are based on test conditions of our company.Further notice will not be given if the design and specifications change. The YONGNUO logo in this manual includes the registered trademark or trademark of Shenzhen Yongnuo Photography E q u i p m e n t C o .
Need help?
Do you have a question about the YN560-TX PRO and is the answer not in the manual?
Questions and answers