Table of Contents
Advertisement
Advertisement
Table of Contents
Troubleshooting

Subscribe to Our Youtube Channel
Related Manuals for AGM PVS-14


Summary of Contents for AGM PVS-14
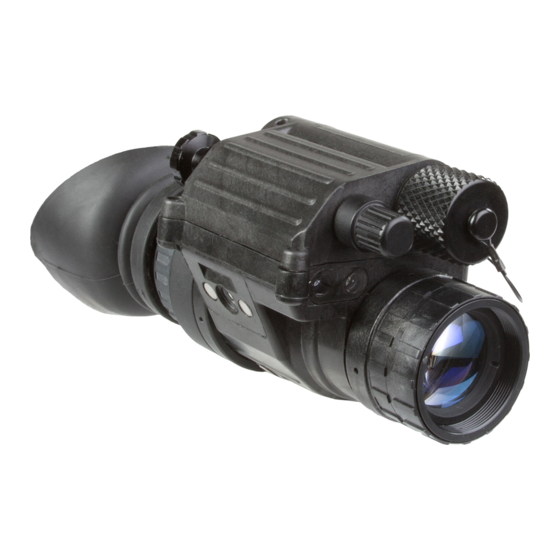
- Page 1 PVS-14 NIGHT VISION MONOCULAR USER MANUAL...
- Page 2 AGM Global Vision. If you have questions that are not covered in this manual, or need service, contact AGM Global Vision customer support for additional information prior to returning a product.
-
Page 3: Table Of Contents
2.2 Assembly and Preparation for Use 2.3 Operating Procedures 2.4 Operation Under Unusual Conditions SECTION 3. MAINTENANCE AND TROUBLESHOOTING 3.1 Maintenance 3.2 Troubleshooting SECTION 4. WARRANTY INFORMATION 4.1 Warranty Information and Registration SECTION 5. SPECIFICATIONS APPENDIX A. Spare Parts List PVS-14 USER MANUAL... -
Page 4: Safety Summary
Do not use contaminated eyecup or eye guard. If contaminated, they must be replaced. • When installing the head mount over the protective mask, be careful not to break the seal of the protective mask around your face. AGM Global Vision... - Page 5 CAUTION: • The PVS-14 is a precision optical instrument. To prevent damage to the unit, it should be handled carefully at all times. • To protect the device from damage, do not direct it at bright light sources such as street lights, headlights, lanterns, fire, etc.
-
Page 6: Section 1. General Information
The PVS-14 is a handheld, head-mounted, helmet mounted, or weapon-mounted night vision system that enables the user to operate the device in moonlit or starlit conditions. The PVS-14 allows hands-free operation (if needed), including walking, use of weapons, short-range surveillance, map reading, vehicle maintenance, and the administration of first aid. - Page 7 To turn the device back on in the event that this function is triggered, flip the switch to RESET/OFF and then back to ON again. PVS-14 USER MANUAL...
-
Page 8: Standard And Optional Equipment
1.3 STANDARD AND OPTIONAL EQUIPMENT The PVS-14 night vision multi-purpose system includes the items shown in Figures 1-2 and 1-3. Major components include the monocular, head mount, and carrying case. HEAD/HELMET MOUNT HEADMOUNT ADAPTER CARRYING CASE LARGE BROWPAD MEDIUM AND... - Page 9 Prevents light from being emitted by eyepiece. If the user’s face is illuminated, they become visible to others in the field, and their position becomes compromised. L. 3x AFOCAL MAGNIFIER LENS ASSEMBLY (P/N: 61023XA1) The 3x magnifier lens assembly can be added to the monocular to extend the operator’s range of observation. PVS-14 USER MANUAL...
- Page 10 Picatinny/Weaver rail. The Picatinny/Weaver Adapter, Rechargeable Battery, and Charger are included. Q. HARD SHIPPING/STORAGE CASE (P/N: 6610HCS1) A protective case used for the shipping/storage of the PVS-14 and its accessories. AGM Global Vision...
-
Page 11: Section 2. Operating Instructions
2.1 CONTROLS AND INDICATORS NOTE: The PVS-14 is a precision electro-optical instrument and must be handled carefully at all times to prevent injury to the user or damage to the device. If the equipment fails to operate, refer to the Troubleshooting Procedures in Chapter 4. - Page 12 Indicators proper orientation of the battery. Some versions have a bubble molded into the top of the battery house that indicates polarity. NOTE: Both the low battery and IR active Indicators are visible in the eyepiece lens. AGM Global Vision...
-
Page 13: Assembly And Preparation For Use
BATTERY FIGURE 2-2. BATTERY, EYECUP AND EYEGUARD INSTALLATION The PVS-14 operates with one AA battery. The battery is not supplied with the PVS-14 and must be purchased separately by the user. At operating temperatures below -20°C (-4°F), AGM does not recommend the use of Alkaline batteries, as the battery life will be severely reduced. - Page 14 To install the battery into the PVS-14 1. Unscrew the battery cap. 2. Align the polarity markings on the battery with those etched onto the battery compartment. 3. Replace the battery cap and tighten it. 2.2.3 INSTALLATION OF THE EYECUPS To install the eyecups (Figure 2-2): 1.
- Page 15 AND SNAP SLIDING BAR BUCKLES HEADMOUNT SOCKET CHINSTRAP EYE RELIEF ADJUSTMENT AND SNAP ADJUSTMENT HEADBAND CHIN CUP FIGURE 2-3. PVS-14 HEADMOUNT ADJUSTMENTS NOTE: After installing the monocular, minor strap adjustments may be necessary to achieve maximum comfort. PVS-14 USER MANUAL...
- Page 16 HELMET MOUNT KEEPER BRACKET CATCH BUCKLE LEVER STRAP REAR REAR MOUNTING SNAP HOLE NAPE STRAP REAR BRACKET FIGURE 2-5. INSTALLATION OF HELMET MOUNT 3. Verify that the strap is laced onto the helmet mount bracket (Figure 2-5). AGM Global Vision...
- Page 17 (Figure 2-7). To release the mount from the helmet bracket, press the release and pull it forward and down. KEEPER TOP EDGE OF MOUNT MOUNT HELMET MOUNT BRACKET RELEASE LATCH FIGURE 2-7. REASSEMBLY OF HELMET MOUNT PVS-14 USER MANUAL...
- Page 18 2.2.10 INSTALLATION OF THE WEAPON MOUNT To install the weapon mount: CAUTION: The PVS-14 is not a weapon sight. However, it can be used in conjunction with a collimated dot sight or laser aiming device. NOTE: If you intend to mount the device to a weapon, AGM recommends replacing the eyecup with an eye guard for additional safety and comfort.
- Page 19 2.2.11 MOUNTING AN IR ILLUMINATOR To mount an IR illuminator to the PVS-14, use the Picatinny/Weaver adapter. Perform the following steps in the order shown below: 1. To install the Picatinny/Weaver Adapter into the monocular, align the adapter’s thumbscrew to the hole and tighten it (Figure 2-9).
- Page 20 The 3x or 5x magnifier can be threaded directly into the objective lens. It can also be threaded into the focus ring adapter and slipped on over the end of the objective lens. Figures 2-12 and 2-13 illustrate these installation procedures. AGM Global Vision...
-
Page 21: Operating Procedures
FIGURE 2-13. 3X MAGNIFIER INSTALLATION WITH FOCUS RING ADAPTER 2.3 OPERATING PROCEDURES This section contains operating procedures for using the PVS-14 as a handheld, head-mounted, helmet-mounted, or weapon-mounted monocular. Before operating the monocular, verify that all steps in Paragraph 2.2 (“Assembly and Preparation for Use”) have been performed. - Page 22 8. To adjust eye relief distance, press down on the eye relief button. Slide the monocular either forward or backward to obtain a full view of the image. Reset the diopter adjustment for the sharpest image. HEADMOUNT SOCKET LATCH EYE RELIEF ADJUST- MENT FIGURE 2-14. HEADMOUNT/HELMET MOUNT ADAPTER OPERATION AGM Global Vision...
- Page 23 NOTE: The helmet mount allows the user to place the PVS-14 in either a flipped up or flipped down position. When flipped down, the device will be directly in front of the eyes. When flipped up, the unit will remain out of the line of sight. Both positions have a definitive stopping point to indicate that the device is positioned correctly.
- Page 24 10. Turn the device ON to resume viewing. 2.3.4 WEAPON-MOUNTED OPERATION NOTE: The PVS-14 can be used in conjunction with a collimated dot aiming device mounted on the forward mounting rail. The brightness control for the aiming device should be set at or near its lowest setting.
- Page 25 North (360°) to South (180°). If the compass is inadvertently magnetized, this could cause an additional 15° error. • The objective lens focus can be fine-tuned after installation, but in order to obtain an accurate reading, the compass must be vertical (e.g., the compass image must be level). PVS-14 USER MANUAL...
- Page 26 2.3.7 OPERATION WITH A MAGNIFIER 1. Install per Paragraph 2.2.13. NOTE: The paired magnifier and objective lens will turn as a unit. 2. While viewing an object, adjust the magnifier focus until the image becomes sharp and clear. AGM Global Vision...
- Page 27 (d) If installed, remove the demist shield or sacrificial window. Replace the objective lens cap. NOTE: • Prior to placing the PVS-14 into the carrying case, verify that the monocular and the case are both clean and free of dirt, dust, or moisture. •...
-
Page 28: Operation Under Unusual Conditions
2. Avoid pointing the monocular into the wind unless it is absolutely necessary. 3. Keep the carrying case closed unless removing or replacing items. 4. Ensure that all dust and sand is removed from the PVS-14 and carrying case after operation. 2.4.2 OPERATION IN RAINY OR HUMID CONDITIONS... -
Page 29: Section 3. Maintenance And Troubleshooting
1. Lift the upper headband strap retention tab (Figure 3-1) to make space for the neck pad strap to be inserted underneath. NECK PAD STRAP UPPER STRAP RETENTION TAB LOWER STRAP RETENTION TAB FIGURE 3-1. RE-INSTALLING THE NECK PAD PVS-14 USER MANUAL... -
Page 30: Troubleshooting
This table does not list all the malfunctions that may occur with your device, nor does it include all tests, inspections, or corrective actions that may be necessary to correct them. If you identify an equipment malfunction that is not listed, or the suggested corrective actions do not correct the issue, please contact Customer Support. AGM Global Vision... - Page 31 Place the cap over the objective lens. Turn the monocular ON and observe that it cuts off within 30- 70 seconds after powered on. Turn the monocular OFF and then ON to power up the monocular. PVS-14 USER MANUAL...
-
Page 32: Section 4. Warranty Information
Customer. AGM Global Vision’s liability hereunder for damages, regardless of the form or action, shall not exceed the fees or other charges paid to AGM Global Vision by the customer or customer’s dealer. AGM Global Vision shall not, in any event, be liable for special,... - Page 33 4.1.3 PRODUCT REGISTRATION In order to validate the warranty on your product, the customer must complete and submit AGM Global Vision PRODUCT REGISTRATION FORM on our website (www.agmglobalvision.com/ customer-support). 4.1.4...
-
Page 34: Section 5. Specifications
Size: 4.5 x 2.0 x 2.2 in / 114 x 51 x 57 mm Monocular (see Note) Weight: 12.4 oz / 0.35 kg NOTE: The size of the monocular does not include lens cap and eyecup. The weight of the monocular does not include accessories. AGM Global Vision... - Page 35 Operating Temperature -60°F to 120°F / -51°C to +49°C Storage Temperature -60°F to 185°F / -51°C to +85°C Submersible 66 ft / 20 m Illumination Required Overcast starlight to moonlight NOTE: All data subject to change without notice. PVS-14 USER MANUAL...
-
Page 36: Appendix
The PART NO. Column indicates the primary number used by the manufacturer to identify an item; this number controls the design and characteristics of the item, including standards, engineering specifications, and inspection requirements. The NSN column indicates the National Stock Number. FIGURE A-1. PVS-14 SPARE PARTS AGM Global Vision... - Page 37 TABLE A-1. PVS-14 SPARE PARTS LIST ITEM NO. DESCRIPTION PART NO. Objective Lens Assembly 6650-01-444-1212 Lens Cap 6650-01-444-1212 Eyepiece Assembly 5855-01-444-1224 Eyecup 5855-01-246-8273 Battery Cap 6160-01-569-6331 O-Ring (not shown) 5330-01-444-1227 Variable Gain Knob Assembly 5355-01-444-1232 Switch Knob Assembly 5930-01-509-8264 Head Mount Assembly...
- Page 38 NOTES AGM Global Vision...
- Page 39 PVS-14 USER MANUAL...
- Page 40 AGM Global Vision 173 West Main Street PO Box 962 Springerville, AZ 85938 Tel. 928.333.4300 Fax 480.393.4882 info@agmglobalvision.com www.agmglobalvision.com AGMglobalvision.com...
Need help?
Do you have a question about the PVS-14 and is the answer not in the manual?
Questions and answers