Beretta ALPHA 7D Installation And User Instruction
Weekly room thermostat
Hide thumbs
Also See for ALPHA 7D:
- Installation and user instructions manual (53 pages) ,
- Installer and user manual (17 pages) ,
- Installation and user instruction (28 pages)
Table of Contents

Subscribe to Our Youtube Channel
Related Manuals for Beretta ALPHA 7D


Summary of Contents for Beretta ALPHA 7D
- Page 1 EEKLY ROOM THERMOSTAT Installation and user instruction……………page 2 RONOTERMOSTATO SETTIMANALE Manuale di installazione e uso………….…pag. 8 WIRED - manual issue 12/2012 rev. 00...
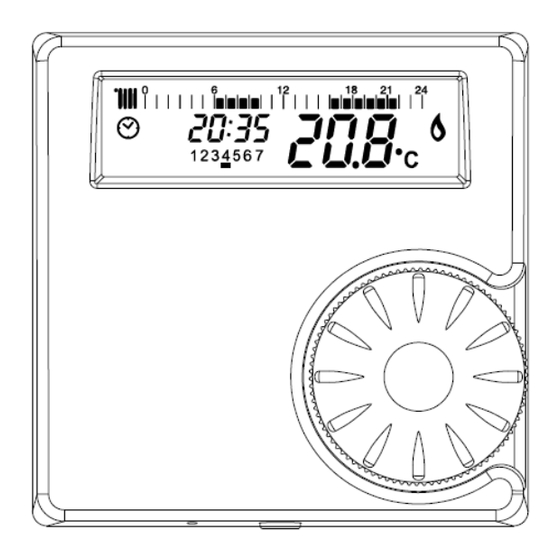
- Page 2 Encoder movements: HIS INSTRUCTIONS TO BE RETAINED BY THE USER NCODER KNOB clockwise and anticlockwise rotation, push to Thank you for choosing this thermostat. This central heating select. control device is easy to fit, and with correct use, will deliver Encoder clockwise and anticlockwise improved comfort levels in your home whilst saving you rotation: increase or decrease the room...
- Page 3 other icons inside the main menu YMBOL ESCRIPTION UNCTION Heating mode is active (winter mode) YMBOL ESCRIPTION UNCTION AUTO: thermostat uses Economy temperature selection programmed heating pattern (default or Technical menu selection (only user defined) to switch the heating ON & expertise) OFF at preselected times.
-
Page 4: Packing List
1. Rotate to select the desired temperature and press to enter. NSTALLATION AND OPERATING INSTRUCTIONS 2. Press once to activate or deactivate the ADVANCE function. Use to “advance” the heating to an ON or OFF period. is a wall-mounted THERMOSTAT 3. -
Page 5: Installation Of Thermostat
: This thermostat is designed to be used only with ! Do not touch the printed circuit board of the MPORTANT ARNING heating controls system with a maximum switching load of 2A transmitter contains electrostatically sensitive at 30VDC or 0,25A at 230VAC. components. - Page 6 OW BATTERIES PERATING INSTRUCTIONS The two supplied batteries will last for approximately 2 years At the first installation the thermostat, the time and the day of under a normal usage. When the batteries are low, the relative the week needs to be set (see encoder paragraph). After this, icon will appear on the display.
-
Page 7: Technical Specifications
OFF when the room temperature reaches the ESCRIPTION room target temperature plus the hysteresis OFF It is possible to calibrate the ALIBRATION value. transmitter temperature sensor by entering the 02 parameter. On the display will appear only the ON The value selected with this YSTERESIS temperature. -
Page 8: Display Lcd
Rotazione in senso orario e antiorario: UESTE ISTRUZIONI DEVONO ESSERE CONSERVATE DA PARTE ’ aumenta diminuisce temperatura DELL UTENTE Grazie per aver scelto questo cronotermostato settimanale. “comfort” della stanza; premere Questo dispositivo di controllo dell’impianto riscaldamento è di confermare il valore. facile installazione e, se propriamente utilizzato, offre una Ruotare di uno scatto per verificare il migliore qualità... - Page 9 IMBOLO ESCRIZIONE UNZIONE Batterie scariche Modalità riscaldamento attiva Richiesta di calore verso la caldaia attiva (funzionamento invernale) (riscaldamento acceso) AUTO: il termostato utilizza le fasce programmate di attivazione o spegnimento Sono inoltre presenti, all’interno del menù utente, altre icone di del riscaldamento (predefinite da fabbrica o seguito descritte.
- Page 10 seconda della temperatura comfort selezionata Ora del giorno: ruotare per modificare le ore, premere per modificabile direttamente l’encoder (premere salvare e passare ai minuti, ruotare per modificare i minuti, confermare il valore). premere per salvare. Giorno della settimana: ruotare per cambiare il giorno, NCODER L'encoder ha tre funzioni: selezione della temperatura premere per salvare.
- Page 11 NSTALLAZIONE E USO può essere L CRONOTERMOSTATO posizionato ovunque come qualsiasi termostato ambiente convenzionale. È necessario collegamento mediante due fili tra la connessione termostato ambiente della caldaia e il cronotermostato. Non è necessaria alcuna alimentazione elettrica in quanto il cronotermostato è installazione tipica.
- Page 12 • Allarme toccare circuito stampato mancante comunicazione radio TTENZIONE cronotermostato in quanto contiene componenti sensibili alle cronotermostato e ricevitore. Allarme visibile solo sul scariche elettrostatiche. ricevitore. • Calibratura del sensore temperatura ambiente UNZIONI Il cronotermostato settimanale senza fili fornisce le seguenti funzionalità: •...
- Page 13 ATTERIE SCARICHE STRUZIONI PER L Le due batterie in dotazione sono garantite per durare almeno Alla prima installazione del cronotermostato è necessario 2 anni per un normale utilizzo dell’apparecchio. Quando le impostare l'ora e il giorno della settimana (vedi paragrafo batterie sono scariche la relativa icona apparirà...
-
Page 14: Specifiche Tecniche
di calore rispetto al set point. Il valore pre-impostato di ESCRIZIONE fabbrica è 0,2° C. Parametro selezionabile tra 0,0° C e È possibile calibrare sensore ARATURA 2,0° C. La richiesta di calore inizia q uando la temperatura del cronotermostato agendo su questo temperatura ambiente scende sotto il valore di set point parametro.
Need help?
Do you have a question about the ALPHA 7D and is the answer not in the manual?
Questions and answers