Table of Contents
Advertisement
Available languages
Available languages
Advertisement
Table of Contents

Subscribe to Our Youtube Channel
Related Manuals for AEG RMB96716CX


Summary of Contents for AEG RMB96716CX
- Page 1 RMB96716CX User manual دليل المستخدم عربي RMB96726VX USER MANUAL...
-
Page 2: Table Of Contents
17. TECHNICAL DATA ....................32 FOR PERFECT RESULTS Thank you for choosing this AEG product. We have created it to give you impeccable performance for many years, with innovative technologies that help make life simpler features you might not find on ordinary appliances. Please spend a few minutes reading to get the very best from it. -
Page 3: Safety Information
ENGLISH SAFETY INFORMATION Before the installation and use of the appliance, carefully read the supplied instructions. The manufacturer is not responsible if an incorrect installation and use causes injuries and damages. Always keep the instructions with the appliance for future reference. 1.1 Children and vulnerable people safety •... -
Page 4: Safety Instructions
• Clean the appliance with a moist soft cloth. Only use neutral detergents. Do not use abrasive products, abrasive cleaning pads, solvents or metal objects. • Do not store explosive substances such as aerosol cans with a flammable propellant in this appliance. -
Page 5: Environment Concerns
ENGLISH 2.3 Use 2.4 Internal light • The type of lamp used for this appliance WARNING! is not suitable for household room Risk of injury, burns, electrical illumination. shock or fire. Do not change the specification of this appliance. 2.5 Care and cleaning •... -
Page 6: Description Of The Appliance
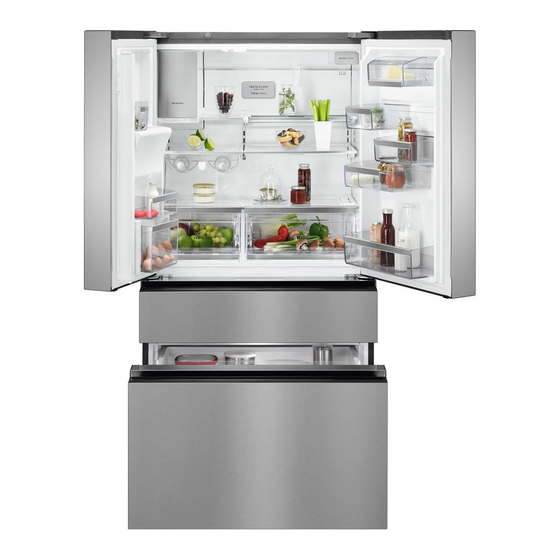
4. DESCRIPTION OF THE APPLIANCE Ice Maker Mulitifow Air Filter Water Filter Flip Up Shelf Slide Under Shelf Left Glass Shelf Right Glass Shelf Crisper Cover Shelf Left Crisper Right Crisper Left Snack Zone Right Snack Zone Left Superior Fixed Bin... -
Page 7: Installing Your New Appliance
ENGLISH 5. INSTALLING YOUR NEW APPLIANCE This section explains the installation of 3. Tilt back the top backwards for about the new appliance before using it for the 10-15 mm by turning the feet 1~2 first time. We recommend reading the turn further. -
Page 8: Display Controls
Suggestion: to ensure a proper functioning of the appliance keep the distances shown on the graphic above. Ventilation of appliance In order to improve efficiency of the cooling system and save energy, it is necessary to maintain proper ventilation around the appliance for heat dissipation. - Page 9 ENGLISH CAUTION! Ice Maker When you set a temperature, Press and hold for 3 seconds to turn on/ you set an average temperature off ice maker. When indicator is lit, ice for the whole refrigerator cabinet. maker is on. When indicator is not lit, Temperatures inside each ice maker is in the OFF state and will compartment may vary from the...
- Page 10 • The display shows the highest Replace Air Filter temperature reached for 10 seconds. Display illuminates every 6 months or Then show again the set temperature. when filter needs replacing. Replace filter After 60 minutes, if the high temperature and then press and hold ‘Reset Air Filter’...
- Page 11 ENGLISH WARNING! Freezer: Do not use the MultiSwitch To change the drawer temperature Drawer to store fresh prodoce when in the freezer temp setting, as these Items may freeze ahd use the control panel display on ause damage to the fruits and the front door.
-
Page 12: Using The Dispenser
WARNING! Refrigerator: Do not use the MultiSwitch Choosing Meat and Fish will set Drawer to store fresh prodoce drawer temperature to -2°C. A tone as these Items may freeze ahd will sound to confirm choice. Use this ause damage to the fruits and setting for short term storage. - Page 13 ENGLISH 7.5 Turning the fresh food 3. Continue dispensing water for about four minutes to flush the system ice maker on and off and plumbing connections of any IMPORTANT impurities (stopping to empty the The ice maker is turned on at the glass as necessary).
- Page 14 • Ice dispenser is used infrequently. Ice ice maker. cubes will freeze together in the bin, jamming the dispenser mechanism. 7.6 Ice maker/dispenser tips • If refrigerator is not connected to a water supply or the water supply is turned off, turn off the ice maker as described in the previous section.
-
Page 15: Storage Features
ENGLISH 8. STORAGE FEATURES To adjust flip shelf: CAUTION To avoid personal injury or 1. Remove food from shelf. property damage, handle tempered glass shelves 2. Lift the right side edge of shelf carefully. Shelves may break upwards and push to the left towards suddenly if nicked, scratched, or ice maker. - Page 16 Producer does not recommend replacing the auto-humidity membrane unless it becomes damaged or ruined. Replacement membranes can be found on www.aeg.com To remove the Ultra Fresh drawer for cleaning: 8.2 Drawers 1. Pull the drawer out until it stops. The refrigerator includes a variety 2.
- Page 17 ENGLISH 8.3 Freezer Features To open: slide back the cover to allow (varies by model) access to the drawers. To move door bin along a rail: To remove upper freezer 1. Tilt bin up so the back of the bin is off drawer: the door but the hook is still engaged.
-
Page 18: Connecting The Water Supply
9. CONNECTING THE WATER SUPPLY Water supply kit 4. The filter life depends on the amount of use. We recommend you replace Check the parts below for installing water the filter at least once every 6 supply. months, (look at “changing the filter”). -
Page 19: Changing The Filter
ENGLISH 8. After installation of refrigerator and water line system, select “WATER” on your control panel and press it for 1‐2 minutes to supply water into the water tank and dispenser water. 10. CHANGING THE FILTER 10.1 Air Filter (select models) seconds. - Page 20 The 3. Remove the old filter by rotating water filter is located at the top right side it counter-clockwise (to the left) of the fresh food compartment. 90 degrees to release it.
-
Page 21: Installation
ENGLISH 11. INSTALLATION 11.2 Installation This User Manual provides general installation and operating instructions for Allow the following clearances for ease this model. We recommend using a service of installation, proper air circulation, and or kitchen contracting professional to plumbing and electrical connections: install the refrigerator. - Page 22 11.4 Cabinet Leveling & To make final door height adjustments: Refrigerator Door 1. Open freezer drawer to make lower Alignment (if necessary) hinge visible. 2. Insert 6mm Allen wrench into the Guidelines for final positioning shaft of the lower hinge.
-
Page 23: Door Removal Instructions
ENGLISH 12. DOOR REMOVAL INSTRUCTIONS 12.1 Getting through narrow 5. Disconnect electrical harness running from door to hinge cover. spaces If refrigerator will not fit through an entrance area, doors can be removed. Check first by measuring the entrance. To prepare for removing the doors: 1. - Page 24 7. Remove three 8mm bolts from both NOTE top hinges. When reinserting the water tube and replacing the top hinge cover, use care to be sure the tube does not kink. Once both doors are in place, ensure they are aligned with each other and...
-
Page 25: Helpful Hints And Tips
ENGLISH 12.4 Re-installing Freezer Drawer 1. Place drawer with brackets and sliders inside the cabinet and click into place. 2. Replace the basket. NOTE For additional instructions, see Storage Features section. 13. HELPFUL HINTS AND TIPS Energy saving tips • Do cover or wrap the food, particularly if it has a strong flavor. -
Page 26: Cleaning And Care
• Once defrosted, food will deteriorate subsequently thaw only the quantity rapidly and should not be re-frozen. required. Do not exceed the storage period indicated by the food manufacturer. • Wrap up the food in aluminum foil... -
Page 27: Before Calling
ENGLISH Door seals cleaning • Although this appliance automatically defrosts, a layer of frost may occur Take care to keep door seals clean. on the freezer compartment’s interior Sticky food and drinks can cause seals walls if the freezer door is opened to stick to the cabinet and tear when you frequently or kept open too long. - Page 28 Concern Potential Cause Common Solution Ice maker is not • Ice maker is producing less • The ice maker will produce making enough ice. ice than expected. approximately 1 kg of ice (fresh food ice maker) every 24 hours depending on usage conditions.
- Page 29 ENGLISH Concern Potential Cause Common Solution Ice dispenser • Ice has melted and frozen • Remove ice container, thaw, is jammed. around auger due to and empty the contents. infrequent use, temperature Clean container, wipe fluctuations, and/or power dry, and replace in proper outages.
- Page 30 Concern Potential Cause Common Solution Opening/Closing Of Doors/Drawers • Door was closed too hard, • Close both doors gently. Door(s) will not close. causing other door to open slightly. • Refrigerator is not level. • Ensure floor is level and...
- Page 31 ENGLISH Concern Potential Cause Common Solution Digital Temperature Setting Display • Electronic control system • Contact Electrolux Customer Digital temperature displays an error. has detected a performance Care for assistance. problem. Water/Moisture/Frost Inside Refrigerator Moisture collects • Weather is hot and humid. •...
-
Page 32: Disposal Of The Appliance
16. DISPOSAL OF THE APPLIANCE The refrigerator is built from reusable appliance. Please cut off the power cord materials. It must be disposed of to make the refrigerator unusable and in compliance with current local waste remove the door seal and lock. Please disposal regulations. - Page 33 ENGLISH 18. NOISES There are some sounds during normal running (compressor, refrigerant circulation).
- Page 34 www.aeg.com...
- Page 35 للحصول على أفضل النتائج . لقد صنعنا الجهاز لكي يمنحكم أدا ء ً خال ي ًا منAEG شكرًا لكم على شرائكم هذا المنتج من منتجات العيوب لسنوات عديدة، مع تقنيات مبتكرة تساعد على جعل الحياة أسهل، األمر الذي قد ال تجدوه في...
- Page 36 معلومات السالمة .قبل تركيب الجهاز واستخدامه، يرجى قراءة التعليمات الواردة بعناية الشركة المصنعة غير مسؤولة في حالة التركيب واالستخدام غير الصحيح، والذي قد يؤدي إلى حدوث إصابات وتلف الجهاز. احتفظ .دائ م ًا بالتعليمات الواردة مع الجهاز للرجوع إليها الح ق ًا...
- Page 37 37 عربي في حالة تلف كابل اإلمداد الكهربي، يجب استبداله من قبل الشركة • ال م ُصنعة أو وكيل الصيانة التابع لها أو غيره من األشخاص .المؤهلين لتفادي التعرض للخطر إذا كان الجهاز مزو د ًا بآلة صنع الثلج أو بموزع الماء، امألهما بماء •...
- Page 38 يحتوي هذا الجهاز على مواد هيدروكربونية في إذا وقع تلف في دائرة التبريد الكهربائية، تأكد • وحدة التبريد. يجب أن يقوم بالصيانة وإعادة أنه ال توجد ألسنة لهب ومصادر لالشتعال في .شحن الوحدة فني مؤهل فقط .الغرفة. قم بتهوية الغرفة...
- Page 39 39 عربي 4. وصف الجهاز آلة صنع الثلج Mulitifow فلتر الهواء فلتر الماء رف الطي ألعلي رف الطي ألسفل رف زجاجي أيسر رف زجاجي أيمن رف غطاء درج الخضروات والفواكه الدرج األيسر للخضروات والفواكه الدرج األيمن للخضروات والفواكه الجزء األيسر للوجبات الخفيفة الجزء...
- Page 40 5. تركيب جهازك الجديد يشرح هذا القسم طريقة تركيب الجهاز الجديد قبل استخدامه للمرة األولى. نوصي بقراءة ما يلي من .نصائح !تحذير للتركيب الصحيح، ال بد من وضع هذه الثالجة على سطح مست و ٍ لمادة صلبة تكون بنفس ارتفاع بقية األرضية. يجب...
- Page 41 41 عربي تهوية الجهاز اقتراح: لضمان العمل المالئم للجهاز، اترك .المسافات الموضحة في الرسم أعاله لتحسين كفاءة نظام التبريد وتوفير الطاقة، من الضروري ضمان وجود تهوية مالئمة حول الجهاز لتبديد الحرارة. لهذا السبب، يجب توفير مساحة كافية حول الثالجة ويجب إخالء المنطقة من أي .عوائق...
- Page 42 .وتنير شاشة العرض حتى يتم إغالق األبواب !تنبيه .إليقاف صوت اإلنذار مؤق ت ًا، اضغط على أي زر عندما تقوم بضبط درجة الحرارة، فإنك .تأكد من عدم إعاقة أي أطعمة لمجرى الباب تقوم بإعداد متوسط درجة الحرارة بالكامل داخل الثالجة. وقد تختلف...
- Page 43 43 عربي على شاشة العرض. يمكن إيقاف تشغيل اإلنذار في شاشة عرضHI وميض حرارة مرتفعة .عن طريق إغالق الباب أو الضغط على أي زر الحجيرة ذات الصلة تعود لوحة التحكم إلى عملها العادي بعد إغالق سماع إنذار كل 01 ثوا ن ٍ حتى تتم معرفة .الباب...
- Page 44 :المجمد Cold Drinks إذا اخترت المشروبات الباردة سيتم ضبط درجة حرارة الدرج على 0 درجة لتغيير درجة حرارة الدرج عند ضبط إعدادات .مئوية°سيصدر صوت صافرة لتأكيد االختيار درجة حرارة المجمد، استخدم شاشة لوحة التحكم الموجودة على الباب األمامي. تغيير...
- Page 45 45 عربي 7. استخدام الموزع 1.7 استخدام آلة صنع الثلج بعد تركيبها ساعة. تملء آلة صنع الثلج حاوية مكعبات الثلج من الخلف. وزع بعض مكعبات الثلج لوضع الثلج قبل صنع الثلج ألول مرة، تأكد من تشغيل نظام .في السلة. ويسمح هذا بملء السلة بالكامل اإلمداد...
- Page 46 قم بإزالة وتفريغ حاوية مكعبات الثلج تكرا ر ً ا إذا كانت مياه الشرب المنزلية ذات .جودة ردئية :في حالة تنبيه حدوث انقطاع للطاقة لفترة طويلة )لمدة • في حالة توصيل جهاز تيسير )إزالة ساعة أو أكثر( يؤدي إلى ذوبان مكعبات...
- Page 47 47 عربي 8. خصائص التخزين تنبيه لتجنب حدوث إصابة شخصية أو إلحاق ضرر بالجهاز، تعامل مع أرفف الزجاج المقسى بحرص. قد تنكسر األرفف فجأة إذا تم حكها أو خدشها أو إذا تعرضت لتغير مفاجئ في درجات الحرارة. اسمح لألرفف الزجاجية بالتوازن...
- Page 48 مالحظة ال يوصي المنتج باستبدال غشاء الرطوبة 2.8 األدراج التلقائي ما لم يتلف أو يفسد. توجد أغشية www.aeg.com بديلة على موقعنا .تحتوي الثالجة على العديد من أدراج التخزين : للتنظيفUltra Fresh إلخراج درج Auto أدراج الفواكه والخضروات (التي تتحكم تلقائ ي ًا فيUltra Fresh .اسحب...
- Page 49 49 عربي 3.8 خصائص المجمد (تختلف باختالف )الطراز :لنقل سلة الباب على طول القضيب قم بإمالة السلة ألعلى لكي يكون ظهر السلة بعي د ًا عن الباب لكن مع استمرار وجود :إلخراج درج المجمد العلوي .الخطاف مرر السلة على طول القضيب إلى الموضع .افتح...
- Page 50 9. توصيل نظام اإلمداد بالماء أدوات نظام اإلمداد بالماء /استخدم شري ط ًا عازال ً عند توصيل المواسير .األنابيب لضمان عدم تسريب الماء تحقق من األجزاء الواردة أدناه لتركيب نظام .يجب توصيل أنبوب الماء بخط الماء البارد اإلمداد بالماء...
- Page 51 51 عربي بعد تركيب الثالجة ونظام اإلمداد بالماء، اختر ”الماء“ في لوحة التحكم واضغط عليها لمدة 2-1 دقيقة لتوصيل الماء إلى خزان الماء .والموزع 01. تغيير الفلتر )1.01 فلتر الهواء (اختر الطرازات يكون فلتر الهواء في المركز العلوي لحجيرة .األطعمة الطازجة 2.01 استبدال...
- Page 52 5.01 استبدال فلتر الماء قم بإخراج خرطوشة الفلتر القديم مباشرة .من القاعدة وتخلص منها ثم بتغيير فلتر الماء كل ستة أشهر لضمان أفرغ محتويات خرطوشة الفلتر الجديد. قم .الحصول على أعلى جودة ممكنة من الماء بإمالتها نحو قاعدة الفلتر طالما كانت تسير...
- Page 53 53 عربي 11. التركيب مالحظة يقدم دليل المستخدم هذا تعليمات تركيب وتشغيل في حالة وضع الثالجة مع جانب مفصلة عامة لهذا الطراز. نوصي باالستعانة بإخصائي الباب مقابل الحائط، اسمح بوجود خدمات أو فني مطابخ لتركيب الثالجة. استخدم مساحة إضافية لكي يمكن فتح الباب الثالجة...
- Page 54 .ً افتح درج المجمد قليال اخفض األرجل المعاكسة لألطراف حتى تالمس كالهما األرض. بمجرد وصولها إلى .األرض، استخدم زو ج ًا من األعمدة لتعديلها لرفع الوحدة: قم بلف األرجل باتجاه عقارب .الساعة لخفض الوحدة: قم بلف األرجل عكس اتجاه...
- Page 55 55 عربي 21. تعليمات إزالة األبواب 1.21 الوجود في أماكن ضيقة في حالة تعذر تمرير الثالجة من المدخل، يمكن إزالة األبواب. تأكد أوال ً من خالل قياس منطقة .المدخل :للتجهيز إلخراج األبواب تأكد من فصل كابل الكهرباء من منفذ .الحائط أخرج...
- Page 56 للوصول إلى المفصلة السفلية، يجب سحب الدرج. فك براغي المفصلة السفلية الثالثة وقم بإمالة المفصلة للداخل وارفع الباب .وأزله من المفصلة السفلية 3.21 إزالة درج المجمد إزالة المفصلة السفلية !تنبيه !تنبيه .الدرج ثقيل. احترس عند الرفع تأكد من وضع األبواب بعي د ًا في مكان...
- Page 57 57 عربي 31. نصائح وأفكار مفيدة نصائح للتجميد نصائح لتوفير الطاقة عند أول تشغيل للجهاز أو بعد فترة من عدم • .نوصي باتباع ما يلي من نصائح لتوفير الطاقة استخدامه، اتركه يعمل لمدة ساعتين على لتوفير الطاقة، حاول تجنب ترك الباب مفتو ح ًا •...
- Page 58 41. التنظيف والعناية أخرج جميع األطعمة وسالت الملحقات ألسباب صحية، يجب تنظيف الجهاز )يشمل ذلك الموجودة وافصل قابس كهرباء الجهاز الملحقات الخارجية والداخلية باستمرار مرة كل عن المقبس الرئيسي واترك األبواب .(شهرين على األقل مفتوحة. قم بتهوية الغرفة جي د ًا لإلسراع...
- Page 59 59 عربي :51. قبل االتصال الحل الشائع السبب المحتمل المخاوف آلة صنع الثلج األوتوماتيكية قم بتشغيل آلة صنع الثلج. لصنع • آلة صنع الثلج في وضع إيقاف • ال تنتج آلة صنع الثلج أي الثلج لألطعمة الطازجة، اضغط .التشغيل مكعبات ثلج على...
- Page 60 الحل الشائع السبب المحتمل المخاوف يحدث هذا بوجه عام عندما ال يصل • مكعبات الثلج فارغة )قواقع من • .آللة صنع الثلج ما يكفي من الماء الثلج بداخلها ماء(. تنكسر مكعبات يكون هذا بسبب انسداد فلتر الماء فارغة وهي مفتوحة في السلة...
- Page 61 61 عربي الحل الشائع السبب المحتمل المخاوف اسحب وتخلص من 21-01 كوب • لم يتم توزيع الماء لفترة زمنية • للماء مذاق أو رائحة غريبة أو كال األمرين .ماء لتنشيط خط اإلمداد .طويلة .م ع ًا قم بتوصيل الوحدة بخط الماء •...
- Page 62 الحل الشائع السبب المحتمل المخاوف من الطبيعي أن يعمل الضاغط • تم تصميم ضاغط السرعات • يبدو أن الثالجة تعمل .كثي ر ًا أو لمدة طويلة باستمرار باستثناء المدة التي يتم المتغير للتشغيل بنسبة %001 من .خاللها إذابة الثلج...
- Page 63 63 عربي 61. التخلص من الجهاز إزالة مانع التسرب من الباب وخلع القفل. يرجى .الثالجة مصنعة من مواد قابلة إلعادة االستخدام توخي الحذر عند استخدام نظام التبريد وعدم ال بد من التخلص من المنتج بطريقة تتوافق مع إتالفه عن طريق ثقب حاوية التبريد أو ثني .لوائح...
- Page 64 81. صوت الضوضاء تصدر بعض األصوات أثناء التشغيل العادي .()الضاغط، دورة التبريد...
- Page 65 65 عربي...
- Page 66 www.aeg.com...
- Page 67 67 عربي...
- Page 68 www.aeg.com/shop...
Need help?
Do you have a question about the RMB96716CX and is the answer not in the manual?
Questions and answers
I pulled it forward and a long white plastic strip has fallen out of bottom of the freezer section