Advertisement
Quick Links
Specifications
Power
2 x 25W @ 8 Ohms
Frequency Response
20Hz ~ 20KHz
Distortion
< 10 %
S/N Ratio
>85 dB
Operating Temperature
−20°C <TA < 55°C
Max Gain
> 25dB
IC Efficiency
> 80%
BT Output
> 500 mV
BT Distance
> = 20m
Recommended PSU
24V d.c. 2.5A
Audio Input
BT VERS 4.1+EDR, 3.5mm Stereo LINE IN
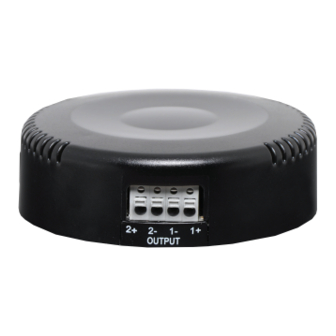
Connection Diagram
Distributed by Altronic Distributors Pty. Ltd.
Phone: 1300 780 999 Fax: 1300 790 999
altronics.com.au
• The paired name for Bluetooth
is: REDBACK BT
• Uses ordinary speaker wire to
connects to any pair of monitors
(speakers)
A 1116
INSTRUCTION MANUAL
Bluetooth Amplifier
with Line Input
Amplifier RMS: 25W x 2
Bluetooth V4.1+EDR
Distance 20M
Instructions
1. When powering up, the indicator blue light will light.
2. When pairing with unit, search for REDBACK BT in your bluetooth
enabled device.
3. When the unit is successfully paired with your bluetooth device,
there will be an audible confirmation upon a successful connection.
4. When the unit is not paired via bluetooth, the line input will be
available to any connected source.
5. If bluetooth is paired and you pause or stop playing the music from
your bluetooth device, the unit will automatically switch to play the
music from your LINE input source.
Advertisement

Related Manuals for Redback A 1116


Summary of Contents for Redback A 1116
-
Page 1: Specifications
Distance 20M Instructions 1. When powering up, the indicator blue light will light. 2. When pairing with unit, search for REDBACK BT in your bluetooth enabled device. • The paired name for Bluetooth 3. When the unit is successfully paired with your bluetooth device, is: REDBACK BT there will be an audible confirmation upon a successful connection. -
Page 2: Installation Instructions
INSTALLATION INSTRUCTIONS Install on the wall Install on the speaker STEP 1: Remove paper and adhere to wall STEP 2: Rotate counterclockwise STEP 1: Remove paper WALL WALL SHEET IRO N STEP 3: Install screws STEP 4: Rotate clockwise STEP 2: Adhere to the speaker WALL WALL SHEET IRO N...
Need help?
Do you have a question about the A 1116 and is the answer not in the manual?
Questions and answers