Table of Contents
Advertisement
Advertisement
Table of Contents

Related Manuals for Italkero Poster PE t1 70


Summary of Contents for Italkero Poster PE t1 70
- Page 2 COMPLIANCE O u r a p p l i a n c e s a r e c o m p l i a n c e a t : G a s d i r e c t i v e 2 0 0 9 / 1 4 2 / C E ( e x . 9 0 / 3 9 6 / C E E ) E l e c t r o m a g n e t i c d i r e c t i v e c o m p a t i b l e 2 0 0 4 / 1 0 8 / C E 0694 L o w - t e n s i o n d i r e c t i v e 2 0 0 6 / 9 5 / C E...
- Page 3 Kind Technical We thank you for choosing the convector. We can assure you its performance will be long lasting, reliable when it is installed and used properly (manufacturerʼs guidelines are followed). Good work and thanks The Manufacturer. WARRANTY Provided that it is fitted in accordance with the Manufacturer's instructions, this appliance benefits from the statutory warranty.
- Page 4 INDEX GENERAL General informations pag.5 Safety rules pag.5 Convector description pag.6 Identification pag.6 Structure pag.7 Technical data pag.8 Accessories pag.8 Electrical scheme pag.9 Control panel pag.10 INSTALLATION Receiving the product pag.11 Weight and dimension pag.13 Installation - Apparatus choice location pag.14 - Intake &...
-
Page 5: General Informations
GENERAL INFORMATIONS Check if there is everything in the packing. In case of If the convector is going to be shut down for a long messing pieces call the Agent that sold you the period of time, the following steps should be taken: apparatus. -
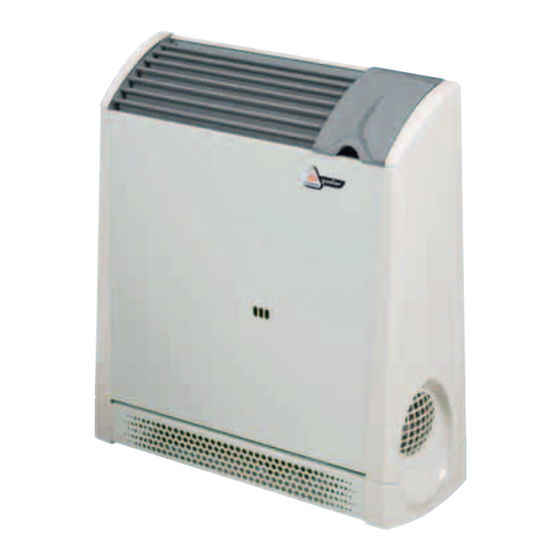
Page 6: Convector Description
CONVECTOR DESCRIPTION Note: At request the apparatus can be furnished The convector is a gas radiator that heat up the already arranged at GPL. atmosphere. It has an intake of air that goes in the combustion It also has an electrical device that allows you to do chamber type C. -
Page 7: Structure
STRUCTURE Water tank (optional) Atmosphere thermostatic Feeler Room Thermostat Line Connector + EMC filter Timer (optional) Centrifugal Fan Reset Tangential Fan Main switch Fuse protection Heat exchanger Processor control box Ignition and detection electrode Technical labels Diode Bridge Heat exchanger Gas valve Safety thermostat GENERAL... -
Page 8: Technical Data
TECHNICAL DATA MODEL Methaan G30/G31 Methaan G30/G31 Methaan G30/G31 Methaan G30/G31 Terminal capacity nomination (qn) Terminal capacity nomination (Pn) 2,91 7,35 9,10 Right efficiency 91,8 29/37 29/37 29/37 29/37 Nominal inlet pressure mbar Nozzle pressure 28,8/36,7 28,5/36,6 28,5/36,5 27,4/34,5 mbar Gas consumption (15∞... -
Page 9: Electrical Scheme
ELECTRICAL SCHEME GENERAL... -
Page 10: Control Panel
CONTROL PANEL Timer Function signal pheric thermostat Function selectors Timer programming fan function Radiator deactivation Radiator function, this button works at seconds the atmospheric temperature thermostat. Unblocking or (trigger) button. Main Switch GENERAL... -
Page 11: Receiving The Product
RECEIVING THE PRODUCT The convector is furnished in a box that contains: - Convector - Stirrup support - Kit gas transformation - Owner book information - Technical service assistance and install tort book - Spare parts book - Warranty certificate - Label Code bar Exhaust &... - Page 12 ParallEl tubE kit with standard tErminal Tube kit Ø 54 mm The kit is compound of Q.ty Description position paper jig for the radiator Inserts of Ø 8 mm for fastening the template to the wall Gas tap with pipefitting Pipe fitting adapter for Ø...
-
Page 13: Weight And Dimension
tErminal dEviation (sPECial) tubE kit Tube kit 0 54 mm The kit is compound of Q.ty Description Inserts of Ø 8 mm for fastening the template to the wall Gas tap with pipefitting Pipe fitting adapter for Ø 32 mm with faste ning screw pressurefusion curves Tube Ø... - Page 14 INSTALLATION GENERAL INFORMATIONS This apparatus is tin respect to the environment; the air is intake from the outside. -When the convector is being installed do not use other pieces that are not give from the manufacturer. -Donʼt let the electrical cable touch heated parts, like the grill or the intake &...
- Page 15 Installation stage The convector installations stages are: - Apparatus choice location - Tube installation - Parallel tube kit Ø 32 mm or Ø 54 mm with unique terminal (standard) - Separated pip kit Ø 32 mm o Ø 54 mm with single terminal (special) - Convector installation - Electrical collegaments...
- Page 16 TEMPLATE AND STIRRUP ASSEMBLAGE To position the template & stirrup use the paper mask then marked, and execute hole B (Ø 8 mm). -Fasten the stirrup with one of the 4 inserts Ø 8 mm furnished -Mark, and execute the other 3 holes (Ø 8 mm) in the corresponding buttonholes present on the stirrup and on the template, fasten with the 3 inserts.
- Page 17 Outside grill assemblage (cod 7000000350) Ø32 To assemble the grill you only need the inserts, and the steeliness steel flange. Ø54 Assemblage SDP protection (cod 7000000365) Ø32 The assembling is execute in the following way: -After you have drilled on the outside wall put the protection with mortar -Assemblage the terminal tube with the equipment Ø54...
- Page 18 How to mount special pipes kit from inside the room to be warmed. Drill the hole on the wall. Shorten the special pipes in order to match the real thickness of the wall (see picture). IMPORTANT: Cutting must be perpendicular to the pipe axis, please handle with care in order not to deform the pipes.
- Page 19 Chances A1/A2 tube assemblage in wall. This solution can be adapted when the wall thick- Before you wall up the tubes, provide to ness consent to execute the trace for the connection insulate the exhaust fume tubes, with strong tubes, and can be realize in two ways: materials resistant at a greater temperature of 200 °C (ex.
- Page 20 Group adapter connection tube The group adapter preparation is effected by two kinds of tubes Ø 32/54 mm -- With Ø 32 mm tubes. - Adapt the length tube; to the wall space so it increases 25 mm, then cut it. - Assemble the tube (1) cute at right measure, and the curve (2) for the adapter connection (3) then fasten with the furnished screws.
- Page 21 Chance A2 with Ø 32/ 54 mm tubes Intake & exhaust fume tube installation. - Trace on the wall the curve and tube setting. - Fasten the template at hole B with an insert Ø 8 mm. - Lean the stirrup on the template, position them at hole C and fasten.
- Page 22 Chance B – inside tube assemblage This system is used when the wall does not permit to realize the proper work to install the tubes. To install the tubes you need the spacing bar (1). M I N 2 0 0 Before you start the work check that there is enough space that permits the convector to do the right function.
-
Page 23: Convector Assemblage
Chimneypot assemblage To assemble the chimneypot on the unloaded intake tubes use the clamp (1) and the (2) safety screw. The chimneypot application has to satisfy the fol- lowing requirement. -The top of the exhaust fume tube has to be out of the ebb zone, to avoid the eventual pressures that will prevent the free exhaust product of the combu- stion in the atmosphere. -
Page 24: Electrical Collegaments
ELECTRICAL COLLEGAMENTS The manufacturer of the appliance cannot be held The appliance must be installed by companies liable for any damage caused by lack of proper earth approved pursuant to Law no. 46 dated 5 March connection. 1990. Upon completing the installation, such compa- For jobs of an electrical nature, always refer to the nies must issue a declaration of installation confor- diagram attached to this booklet. -
Page 25: Preliminary Operations
PRELIMINARY OPERATIONS - The gas connection is correctly realized and the The convector is furnished and preset for the gas gas switch is opened. function (G 20) and regulated in factory. Note: the apparatus can also be requested with the - The electrical connections are properly done. -
Page 26: Controls During The First & After Starting Service
PROCESSOR CONTROL BOX (P.C.B ASSY) MALFUNCTION In the case that you are going to verified processor control box (p.c.b assy) malfunction: - Push the reset button like in the picture. CONTROLS DURING THE FIRST & AFTER STARTING SERVICE -At the start verified that the gas pressures are as under the Table. -
Page 27: Gas Transformation
GAS TRANSFORMATION The convector is preset for the methane gas (G20) following the technical label, but you can change at GPL (G30/G31) with the transformation that is furnished. The transformation has to be done only by Technical Service Assistance, the manufacturer or by authori- zed persons even if convector has been already installed. -
Page 28: Regolation
REGOLATION The convector is furnished with (G20) gas function following the Technical label, and the constructor already regulates it. If you make a new regulation, like exchanging the gas valve, or a gas transforma- tion from Methane to GPL or reversed, this regula- tion has to be done from a Technical service Assistance or by the manufacture Gas methane G 20(20mbr);... -
Page 29: Ordinary Maintenance
Whenever the apparatus is going to be regulated at pure Propane, to avoid heat exchanger overheating, is necessary knowing that you are using the proper gas, but if you use a un proper gas like a mixture of Propane/Butane or pure Butane you might have pro- blems. -
Page 30: Components Replacement
blow next to the injector; it will come out all the resi- dues and the impurity caused from the burner. Check all the injectors if are good. Donʼt use metallic utensil. Cleaning Electrode The ignition electrode (1) and revelation (2) have to be cleaned very carefully, after a period of time they get fragile because of the work they have to perform. - Page 31 Fan replacement Follow the indication to replace the fan - Take off the electrical connectors (1) that are on the fan motor. - Take off the ground connector that is on the fan motor. - Unscrew the 4 screws (2) that fasten the fan to the supports (3) - Replace the fan then after do the assemblage Fuse replacement...
- Page 32 Security thermostat replacement Follow the indication to replace the Security thermo- stat (4) - Disassemble the stirrup (1) unscrew the screw (2) - Take off the electrical connectors from the thermo- stat (4). - Reassembling the thermostat group in the reverse sequence.
- Page 33 Pressure switch replacement Follow the indication to replace the Pressure switch - Extract the pressure switch (1) from support (2) -Take off the tubes (3 & 4) and the electrical connec- tors from the pressure switch. - Unscrew the stirrup support fixing screw (2) separa- ting the pressure switch from the frame.
-
Page 34: Disassembly & Reassembly Of The Skirt
DISASSEMBLY & REASSEMBLY OF THE SKIRT Disassembly cover - Disassembly the skirt - Remove the cup (3) - Unscrew the screw (2) - Remove the outside skirt (1) completely - To replace the skirt do the reversed sequence EVENTUAL ANOMALIES & REMEDIES ANOMALY CAUSE REMEDY... - Page 35 ANOMALY CAUSE REMEDY The Timer fails to trip or Riders in wrong position Adjust riders does not operate Operating switch in wrong position Position on “clock” Power supply switch off Reset and programme Timer The room thermostat fails Adjust thermostat knob Adjust the thermostat knob: to trigger - Towards 7 to increase...
-
Page 36: Useful Information
USEFUL INFORMATION Seller Street tel. Installer Street tel. Technical Service Assistance Street tel. Date Intervention CUSTOMER SERVICE... - Page 37 NOTE NOTE...
- Page 38 NOTE NOTE...
- Page 42 INDEX Basic safety rules General advice. “ Finding out the convector. “ Convector use: -Setting service. “ -Timer and watch regulation. “ -Thermostat environment regulation “ Long periods shut down. “ -Cleaning. “ -Maintenance. “ -Anomalies and solutions. “...
- Page 43 Kind customer Congratulations on your purchase of our convector! We thank you for choosing our convector. This high quality, product will provide you efficiency, comfort, quietness and safety for years to come. An Authorized Technical Service Centre is prepared to maintain this product’s high efficiency, answer any of your questions, as well as provide you with any replacement parts.
- Page 44 The convector · The product you have purchased is covered by a SPECIFIC WARRANTY Provided that it is fitted in accordance with the Manufacturer's instructions, this appliance benefits from the statutory warranty. We invite you to call tempestivly at a Technical authorized Service if you are experiencing any difficulty.
- Page 45 SECURITY RULE When using a product with combustion or -Electrical Hazard: Do not touch the con- electrical energy, always follow basic safety vector with wet feet or other part of your precautions to reduce the risk of injury. body. -Do not touch the grill when hot air is com- Read this manual carefully to learn its use and ing out.
- Page 46 GENERAL CONSIDERATIONS Your Technical service Assistance may The convector has to be installed by a be contacted to replace this manual if it qualified technical for the low of the 5- becomes damaged or is lost. march 1990 n 46 as indicated in this manual. The convector is guaranteed to do the Things to do if the convector is going to work that it has been created for from...
- Page 47 CONVECTOR POSTER Fox PE GAS CONVECTOR TYPE C FOR HEATING.
- Page 48 THE CONVECTOR The convector is a gas radiator with an atmospheric burner assisted by a high efficiency fan. This convector is the series of type C. The fan that is assembled has two velocities. Minimum power-minimum velocity. Max power-max velocity. A transparent cover is provided to avoid damage to the main power con- trol panel.
- Page 49 FOCUS SERVICE The first thing to focus is that the convector has to be installed from Technical Service Assistance. As long as this is being done, the Technical is going to show you the start of the convector and what are the things to do for a long period shut down.
- Page 50 • Positioning the Timer to manual. • After completing the above operations, turn on the main power switch to start the convector. The convector is going to start the phase and it is going to stop when it has reached the atmos- pheric temperature (it turns off the function single on the control panel).
- Page 51 This operation can be repeated only 2 or 3 times. If the convector doesn't start after three attempts, place the main button to “off” and call Technical Service Assistance or the Manufacturer. • When the convector is in function, regulate the watch dial on the exact hour, and the timer”...
- Page 52 TIMER & WATCH REGULATION The first regulation that you have to do on the watch is the minutes and the hours, and subse- quently the function periods or the convector halt. • How to adjust the current time; Rotate only clockwise the clock dial until the right hour is indicated from the present point that is on the control panel.
- Page 53 ATMOSPHERIC THERMOSTAT REGULATION The handle can regulate the atmospheric ther- mostat; if you want to increase the temperature you move the handle rotating clockwise on number 7, to decrease the temperature, counter-clockwise on number 1. After that the new regulation is effect wait that the convector has completed the function cycle, and verified the states obtained.
- Page 54 LONG PERIODS SHUT DOWN If the convector is going to be stopped for a long period of time, is important to follow these sequences. • Positioning the function selector on 0. • Positioning the main switch on the control panel to the “off” position •...
- Page 55 CLEAN OUT SOLUTION AND PROBLEMS The only necessary cleaning by the owner is to • Electrical shortness alimentation. clean the cover. If you have turned the main switch to the“on” position and it does not illuminate the button, be sure that the main electrical cable is insert- Before effecting: ed in the proper way under the convector.
Need help?
Do you have a question about the Poster PE t1 70 and is the answer not in the manual?
Questions and answers