Advertisement
Table of Contents
KVBCN0101BLT
WALL CONTROL INSTALLATION
WARNING
!
ELECTRICAL SHOCK HAZARD
Failure to follow this warning could result in personal
injury or death.
Before installing, modifying, or servicing, main electrical
disconnect switch must be in the OFF position. There
may be more than 1 disconnect switch. Lock out and tag
switch with a suitable warning label.
CAUTION
!
UNIT OPERATION HAZARD
Failure to follow this caution may result in equipment
damage or improper operation.
Never install more than one KVBCN0101BLT wall
control per unit.
Installation Instructions
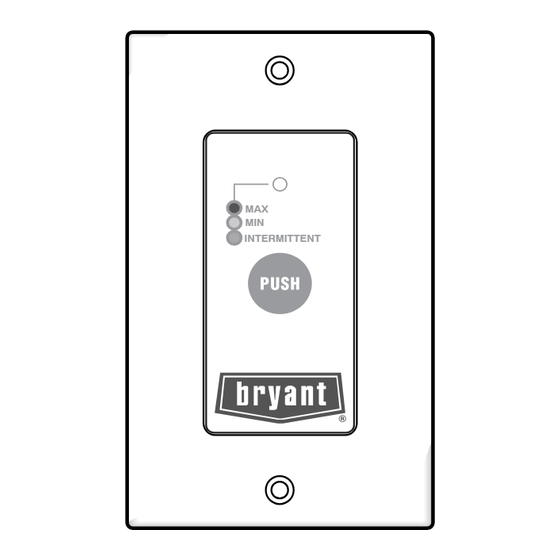
OneTouch Control
MAX
MIN
INTERMITTENT
NOTE: If this wall control is installed with any of the following
Bryant units the integrated control of those units must be turned
OFF; HRVBBSHA1100, HRVBBSVA1100, ERVBBSHA1100,
or ERVBBSVA1100, HRVBBLHA1150, HRVBBLHA1250.
NOTE: To ensure proper operation remove Jumper G on JU1 pin
IF this wall control is installed with another ERV or HRV Bryant
unit.
!
UNIT OPERATION HAZARD
Failure to follow this caution may result in equipment
damage or improper operation.
Ensure that the wires do not short-circuit between
themselves or by touching any other components on the
wall control. Avoid poor wiring connections. To reduce
electrical interference (noise) potential, do not run wall
control wiring next to another control contactor or near
light
dimming
dwelling/business power or lighting wires, or power
distribution panels.
1
CAUTION
circuits,
electrical
motors,
Advertisement
Table of Contents

Subscribe to Our Youtube Channel
Related Manuals for Bryant KVBCN0101BLT


Summary of Contents for Bryant KVBCN0101BLT
- Page 1 Failure to follow this warning could result in personal NOTE: To ensure proper operation remove Jumper G on JU1 pin injury or death. IF this wall control is installed with another ERV or HRV Bryant Before installing, modifying, or servicing, main electrical unit.
- Page 2 Step 4—Using Fig. 2 as a guide, connect the electrical wiring. Fig. 1 - - Wall Control Installation Step 5—Finish mounting KVBCN0101BLT wall control. Plug the unit in and test the wall control operation. NO C NC I OC OL Y R G B...
Need help?
Do you have a question about the KVBCN0101BLT and is the answer not in the manual?
Questions and answers