Table of Contents
Advertisement
Advertisement
Table of Contents

Related Manuals for Fast & Fluid Management TM300


Summary of Contents for Fast & Fluid Management TM300
- Page 1 Fast & Fluid Management Manual TM300 English version 11-2014...
-
Page 2: Table Of Contents
Table of contents Record of Changes Introduction Warrenty Regulations Explanation of images Safety Instructions Installation Installing the computer and the software Operation Agitation timer Fill the brush tray (nozzle cleaning system) Fill the canisters with colourant Dispensing Punch hole in Lid - Manual (optional) Daily Maintenance Weekly Maintenance Monthly Maintenance... -
Page 3: Record Of Changes
Record of changes Editor Date Change description 11-2011 17-11 First release 11-2014 11-11 Add Power consumption and IP value... -
Page 4: Introduction
Introduction By selecting a Fast & Fluid Management Color Dispenser you have opted for a product which is the result of intensive research. Top-quality components, craftsmanship and a modern ergonomic design all serve to guarantee a long service life and a high degree of user friendliness. The machine complies with Council Directives on machines, on electromagnetic compatibility, and on electrical equipment intended for use within given voltage limits, as enacted by the Council of Ministers of the European Community. -
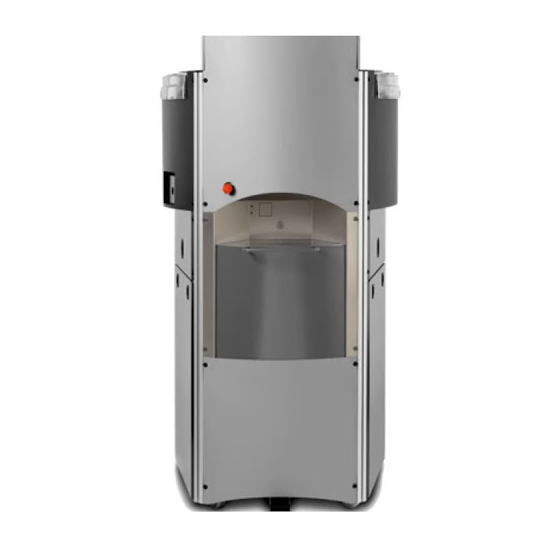
Page 5: Explanation Of Images
Explanation of images Top lids PowerBoard Pump/canister assembly Pump gripper spindle & spindle stepper motor Emergency stop Valve gripper actuator Computer cavity Disc grip Pump tube Nozzle wiper Nozzle... -
Page 6: Safety Instructions
Safety Instructions Attention! Before installing the equipment and setting it in operation, please read the instructions for use carefully. This is safer for yourself and prevents unnecessary damage to the machine. The manufacturer accepts no liability if the instructions below are not followed: 1. -
Page 7: Installation
Installation Step 1 - Detach the dispenser from its transport skid > Place the transport pallet near the defi nitive Remove one of either side panels. location of the machine. Remove cardboard box, plastic wrapping and accessory parts. > Unscrew transport the transport screws Move the machine off the pallet. -
Page 8: Installing The Computer And The Software
Installing the computer and the software Step 1 - Place the computer > Connect the dispenser as indicated in the image Place the computer in cavity. above. Step 2 - Install the dispensing software Install all necessary software provided by software supplier. Use software to test basic functions of dispenser before fi... -
Page 9: Operation
Operation Switching ON: Unlock the emergency stop button on the front of the machine by turning clockwise. The machine is automatically switched on when the power con- nector at the back of the dispenser is plugged into a 220V or 110V wall socket. Please be aware that the TintMaster series dispensers are fi... -
Page 10: Fill The Brush Tray (Nozzle Cleaning System)
Fill the brush tray (nozzle cleaning system) > Remove the brush tray at the left side of the Fill the container with water or an alternative dispenser. liquid proposed by your paint supplier. Replace the brush tray in its original position. Cleaning fl... -
Page 11: Dispensing
Dispensing > Place the can at the center of the can table cross hair. Lift the can table upward (unlock by pressing Choose desired formula as shown in software down the foot pedal) *dispensers with optional manual. The turntable will subsequently rotate to can lift only. -
Page 12: Daily Maintenance
Daily Maintenance Clean the brush tray, refi ll canisters and run morning program > Remove the brush tray and empty the container. Fill canisters if level is low and update levels in Clean the brush with water and refi ll the container software. -
Page 13: Weekly Maintenance
Weekly Maintenance Remove spilt paint & colorant and refi ll canisters > Clean can table and outside parts with diluted Check canister content and refi ll if necessary. detergent. Always close canisters and machine lids after refi lling. Monthly Maintenance Check and clean important functional parts >... -
Page 14: Troubleshooting
Troubleshooting Before calling your supplier or the service department, please check if you can solve the problem yourself. If that does not work, you can call the service department for advice. Have the serial number and dispenser type ready (these can be found on the silver CE sticker at the behind the service panel at the front of the machine). -
Page 15: Service And Support
Service and Support If necessary, you can get in touch with your supplier or the local service department, or contact the manufacturer directly. If you contact the manufacturer, make sure that you have the model number and serial number to hand. They can be found on the nameplate on the machine. Fast &... -
Page 16: Specifi Cations
Specifi cations Number of canisters 12/14/16/18/20/24 Canister content 1.75, 3.5 [L] EasyClick canister/stirrer (material) molded polymeric Valves molded polymeric Pump type piston pump Pump sizes 1.64 [ounce] Min. dispense 1/384 [fl .oz] Accuracy 0.005 [ml/step] Flow rate 0.4 [L/min] Nozzle closures integrated Maximal can height 45 [cm]... -
Page 17: Electrical Wiring Diagram
Electrical scheme... -
Page 18: Weee
WEEE Packaging material The packaging protects the machine against damage during transport. The packaging material was chosen based on its limited impact on the environment and its inherent possibilities for waste-disposal. The reuse of packaging material saves raw materials and produces less waste material. Generally speaking,your supplier will take the packaging off your hands.
Need help?
Do you have a question about the TM300 and is the answer not in the manual?
Questions and answers