Table of Contents
Advertisement
Quick Links
Download this manual
See also:
Instruction Manual
DENVER CRP-717
ENGLISH
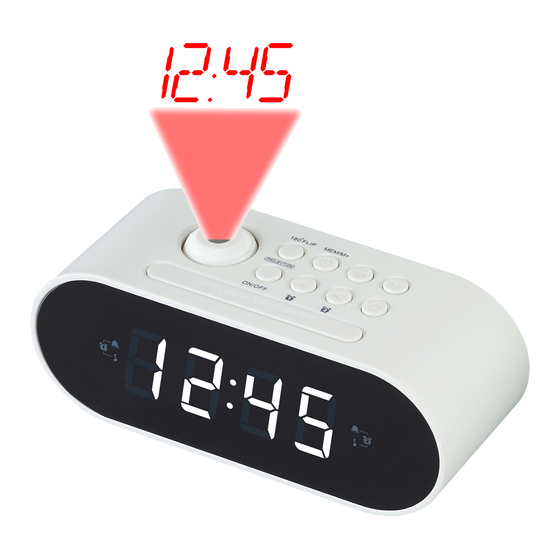
LOCATION OF CONTROLS
FUNCTION AND CONTROLS
1. ANGLE / SHARPNESS CONTROLLER
2. PROJECTION TIME 180° FLIP
3. CLK.ADJ./ MEMORY / M+
4. << TUNE DOWN / HOUR
5. >> TUNE UP / MIN
6. SNOOZE / SLEEP / DIMMER
7. PROJECTI ON ON/OFF
8. VOLUME DOWN / ALARM 1 ON-OFF SET
9. VOLUME UP / ALARM 2 ON-OFF SET
10. POWER ON – OFF / ALARM OFF
11. ALARM 1 BUZZER INDICATION
12. ALARM 1 RADIO INDICATION
13. ALARM 2 BUZZER INDICATION
14. ALARM 2 RADIO INDICATION
15. RATING LABEL (BOTTOM OF UNIT)
16. LED DISPLAY
17. AC POWER CORD
18. BATTERY COMPARTMENT COVER
19. FM ANTENNA
20. SPEAKER
ENG-1
Advertisement
Table of Contents

Subscribe to Our Youtube Channel
Related Manuals for Denver CRP-717


Summary of Contents for Denver CRP-717
- Page 1 DENVER CRP-717 ENGLISH LOCATION OF CONTROLS FUNCTION AND CONTROLS 1. ANGLE / SHARPNESS CONTROLLER 2. PROJECTION TIME 180° FLIP 3. CLK.ADJ./ MEMORY / M+ 4. << TUNE DOWN / HOUR 5. >> TUNE UP / MIN 6. SNOOZE / SLEEP / DIMMER 7.
-
Page 2: Power Connection
POWER CONNECTION 1. This product operates on AC230V~ 50Hz power supply. Plug the AC power cord into a household outlet AC source. 2. Clock display will flash 0:00 until set to correct time. INSTALLING/REPLACING THE BACK-UP BATTERY This unit is equipped with a battery back-up system, requiring one DC3V CR2032 lithium battery (not included) to maintain the time settings and radio presets during AC power outage. -
Page 3: Time Manual Setting
WARNING DO NOT INGEST BATTERY, CHEMICAL BURN HAZARD This product contains a coin/button cell battery. If the coin/button cell battery is swallowed, it can cause severe internal burns in just 2 hours and can lead to death. Keep new and used batteries away from children. If the battery compartment does not close securely, stop using the product and keep it away from children. - Page 4 SETTING ALARM 1 1. Please ensure the radio is OFF. 2. Press and hold the VOLUME DOWN / ALARM 1 ON-OFF SET button to set ALARM. The alarm time will flash on the display. 3. Press the << TUNE DOWN / HOUR button to increase the HOUR.
-
Page 5: Snooze Function
SNOOZE FUNCTION 1. When the alarm (buzzer or radio) is triggered, press the SNOOZE/SLEEP/DIMMER button. The alarm will turn off for approximately 9 minutes. 2. To cancel the SNOOZE function, press the POWER ON – OFF / ALARM OFF button. LISTENING TO THE RADIO HINTS FOR BEST RECEPTION FM - To insure maximum FM tuner reception, unwrap and fully... -
Page 6: Sleep Timer Operation
SLEEP TIMER OPERATION The sleep timer allows you to play music for a preset amount of time ranging from 90 minutes to 10 minutes. It is commonly used by people who prefer to go to sleep to music. 1. In radio mode, Press the SNOOZE/SLEEP/DIMMER button. The display will show 90 minutes, your clock radio will turn off in 90 minutes. -
Page 7: Resetting The Unit
RESETTING THE UNIT If the system does not respond or exhibits erratic or intermittent operation, you may have experienced an electrostatic discharge (ESD) or a power surge that triggered the internal microcontroller to shut down automatically. If this occurs, disconnect the AC POWER CORD from the wall and remove the backup battery from the compartment. - Page 8 WARNING 1. No naked flame sources, such as lighted candles, should be placed on the apparatus. 2. Do not place the product in closed bookcases or racks without proper ventilation. 3. The mains plug is used as the disconnect device, the disconnect device shall remain readily operable.
- Page 9 ALL RIGHTS RESERVED, COPYRIGHT DENVER ELECTRONICS A/S www.denver-electrionics.com Electric and electronic equipment contains materials, components and substances that can be hazardous to your health and the environment, if the waste material (discarded electric and electronic equipment) is not handled correctly.
Need help?
Do you have a question about the CRP-717 and is the answer not in the manual?
Questions and answers