Table of Contents

Related Manuals for Girard Systems G-Link G-1500


Summary of Contents for Girard Systems G-Link G-1500
- Page 1 Girard Systems RV Awnings Products Girard Link System: Motors and Controls (G-LINK) MANUAL Owners Operation, Adjustment, Repair and Installation Rev.111413-1 1361 Calle Avanzado, San Clemente, CA 92673 (949) 259-4000 Fax (949) 276-5500...
-
Page 2: Return Policy
Girard Systems- Warranty and Freight Procedures Return Policy Authorization must be obtained from Girard prior to the return of any merchandise for repair, replacement or DCedit. The purchaser should obtain "Return Goods Authorization" (RGA) number for tracing and warranty claim purposes. All freight for return merchandise shall be pre- paid by the purchaser. - Page 3 It is not applicable to the arms, interior and/or attachment components. The painted finish is warranted for five (5) years and is only applicable to Girard Systems factory “powder coated” finishes (Black or White). Girard Systems does not warrant any OEM/Aftermarket custom paint or finish modifications.
- Page 4 However, this Warranty shall not apply and Girard Systems shall not be responsible to repair or replace the Awning or any part thereof because of damage caused by misuse or neglect of the Awning or by failure to adhere to the written operating and installation instructions.
- Page 5 TABLE OF CONTENTS ELECTRONIC CONTROLS MANUAL Overview……………………………………………………………………………. System Motors..…………………………………………………………………….. Control Modules..…………………………………………………………………… Model GC 136 (Motor Control – 1M)……………………………………………… Model GC 274A (AC Motor Controller with Optional LED)……………………… Model GC 732 G (DC Motor Control)……………………………………………… Model GC 779G (Remote Motion Sensor)………………………………………… . Model GC 946G (Remote Retract All)………………………………………………...
- Page 6 The Standard Motors require a motor control module to operate with a Remote Control, while the Receivers Motors have a built in Receiver and do not require a motor control module. The variety of motors is used in Girard Systems awnings and we give here a list of the most commonly used units.
- Page 7 STANDARD W/MO AMPS 97DM45M-30 2.42 97DM45M-50 97DM45M-60 97DM59M-60 2.41 97DM59M-80 2.94 97DM59M-100 2.94 REMOTE MOTORS AMPS 97DM35R-6 97DM35R-13 97DM45R-30 2.42 97DM59R-60 2.41 97DM59R-80 2.94 97DM59R-100 2.94 REMOTE MTRS W/MO AMPS 97DM45RM-30 2.42 97DM45RM-50 2.20 97DM45RM-60 97DM59RM-60 2.41 97DM59RM-80 2.94 97DM59RM-100 2.94...
- Page 8 CONTROL MODULES Model Description Radio Part # 1. GC 136 AC Motor Control Receiver 98GC136 2. GC 274A AC Motor Controller with LED Receiver 98GC274A 3. GC732G DC Motor Control with LED Receiver 98GC732G 4. GC1146C DC Motor Control with LED Receiver 98GC1146C 5.
- Page 9 AC Motor Control – 1M Model GC 136 (Receiver) The model GC136 Girard Control is a single awning control unit that can be remotely operated with a Girard Remote Control. The GC136 may be programmed simultaneously with up to 20 Remote Controls or other remote units. If an additional unit is programmed it will replace the last unit programmed and the previous 19 units will remain unchanged.
- Page 10 Programming steps for Manual Remote Control NOTE: Before starting this procedure the Receiver must be without power (OFF) for at least 10 seconds. During the programming function the interval between each step required must be less than 10 seconds Programming the GC136 to a Remote Turn ON the power to the GC136 Press the program button (Fig.
- Page 12 AC Motor Controller with Optional LED Model: 98GC274A Figure 1 Description: The GC274A AC Motor Controller with optional LED is designed to cover some customer needs. This unit is able to control Standard AC Motor UP to 8 Amps; it can also provide 12 volts DC power for an optional LED strip. It can be remotely operated with all Girard Remote Controls.
- Page 13 The Awning may be operated directly from the GC274A using the UP/STOP/DOWN buttons (see figure 1.). The direction of travel of the motor can be reversed without the need of changing the wiring by press the UP and DOWN button at the controller at the same time for least 5 seconds. The GC274A has a quick connector for an easy installation …...
- Page 14 4. Cancel one Remote from the GC274A Turn on the power to the GC274A Press the program button (Fig. 2): the Green LED will start blinking Press STOP (Fig. 1): The Green LED will stop blinking and stay on solid Press the DOWN button on the REMOTE (Unit): The Green LED will turn off.
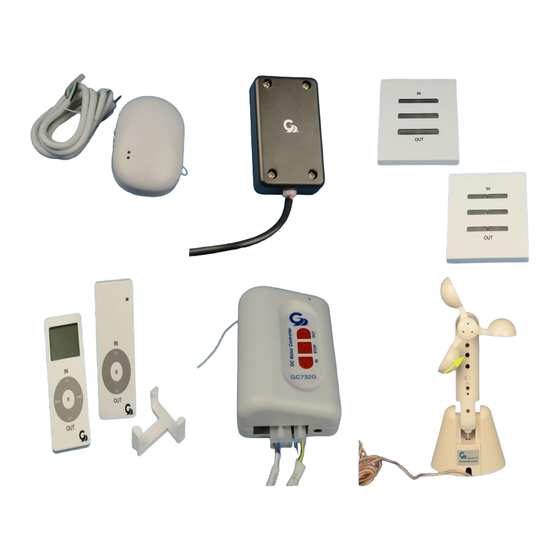
- Page 15 DC Motor Control (with optional LED Controller) Model GC732G (Receiver) Figure 1 The GC732G Motor Controls is used to control DC motors with Current requirements up to 10A. The unit operates with all G-Link controls and is housed in a small box and the unit comes with a mounting bracket. See Picture 1.
- Page 16 Note: This Unit has an optional connector to control Led Light (On/Off) . (See picture 4). To open the controller box and have access to the connector grasp and squeeze the lid along the top and bottom edges. In order to control the optional LED strips Press the light Arrow on the Remote control. The GC-732G must be installed on a fuse protected circuit (15A).
- Page 17 Programming steps NOTE: Before starting this procedure the Receiver must be without power (OFF) for at least 10 seconds. During the programming function the interval between each step required must be less than 10 seconds Programming the GC 732G to a Transmitter (Remote) Turn on the power to the GC 732G: The unit will start beeping for least 5 seconds.
- Page 18 DC Motor Control (with optional LED Controller) Model GC1146C (Receiver) Figure 1 The GC1146C DC Motor Control is used to control DC motors with Current requirements up to 12A. The unit operates with all G-Link controls and is housed in a small box. See Figure 1. The GC1146C DC Motor Controller came with an external 25A fuse protection.
- Page 19 Figure 2 Note: LED Light and Motion Sensor connections Diagram on Figure 2 In order to control the optional LED’s on the GC1146C, there are a special Remotes or wall switches, with part numbers: 98GC1063 (single Channel), 98GC1029 (Five Channels), 98GC660B (single Channel Wall SW) or 98GC661B (Five Channel Wall SW).
- Page 20 Programming steps to hand held remote NOTE: Before starting this procedure the Receiver must be without power (OFF) for at least 10 seconds. During the programming function the interval between each step required must be less than 10 seconds Programming the GC1146C to a Hand Held Remote Turn on the power to the GC1146C: by the RF receiver in the unit will emit a soft beep.
- Page 21 Programming steps to Wall switch NOTE: Before starting this procedure the Receiver must be without power (OFF) for at least 10 seconds. During the programming function the interval between each step required must be less than 10 seconds. GC229 GC230 To Program GC229 OR GC230 to the GC1146C...
- Page 22 Programming steps to Remote Motion Sensor NOTE: PLEASE REVIEW THESE STEPS PRIOR TO PROGRAMMING THE MOTION SENSOR. ALL PROGRAMMING SEQUENCES MUST BE DONE WITHIN A 10 SECOND PERIOD. a) Remove the four (4) screws that retain the Motion Sensor cover. These screws will have an O-Ring attached.
- Page 23 Figure 4 Figure 5...
- Page 24 Remote Motion Sensor Part No. 98GC779G ( Transmitter) The Remote Motion Sensor is designed to prevent structural damage to an awning when it is subjected to high stress induced by wind or other causes: In the past this was done using an Anemometer that measured the wind speed and made the awning retract if the speed was greater than a preset value (Typically 18 mph).
- Page 25 PROGRAMMING THE MOTION SENSORS: Locate and identify the Awning Controller in the coach: 120V AC awnings will have the GC136 (Figure 1). 12V DC awnings will use the GC732G (Figure 4). Figure 1 AWNINGS USING GC136 AC MOTOR CONTROL: NOTE: PLEASE REVIEW THESE STEPS PRIOR TO PROGRAMMING THE MOTION SENSOR. ALL PROGRAMMING SEQUENCES MUST BE DONE WITHIN A 10 SECOND PERIOD.
- Page 26 Figure 3 c) Locate the Sensitivity Dial and carefully adjust to the #5 Position (Figure 2). d) Place the Motion Sensor cover upside down and back onto the base (Figure 3). The reed switch must be located directly over the magnet to operate the Motion Sensor. e) Apply a 12V Power Source to the 12V Motion Sensor.
- Page 27 Figure 4 AWNINGS USING GC732G DC MOTOR CONTROL: NOTE: PLEASE REVIEW THESE STEPS PRIOR TO PROGRAMMING THE MOTION SENSOR. ALL PROGRAMMING SEQUENCES MUST BE DONE WITHIN A 10 SECOND PERIOD. Identify the GC732G Controller that the Motion Sensor will be programmed to (Figure 4). You can identify the controller by extending or retracting the awning using the IN/OUT Buttons located on the top of the Controller.
- Page 28 Ignition Lockout Model 98GC1102 (Transmitter) The Model GC1102 Ignition Lockout is designed to send a retract signal to the G-Link controls of Girard Systems. Whenever the engine of the Recreational Vehicle is turned on the GC1102 will send a retract signal 3 times within 5 seconds, this will insure that all Awnings are retracted and are in the closed position.
- Page 29 Programming Functions Program 98GC1102 Transmitter to the 98GC136 Receiver NOTES: During the programming function the time interval between each “button press” required must be less than 10 seconds Before starting the programming procedure open the corresponding Awning. Using more than one units(DC1102) in the same coach: ...
- Page 30 d) Make sure that the ignition circuit of the coach is not powered (Off). Connect the 12V wires of the 98GC1102 to the 12 volt wires coming from the ignition circuit of the coach . e) Press the “program” button on the Receiver 98GC136: the Green LED of the Receiver will start blinking f) Press STOP on the Receiver 98GC136: The Green LED will stop blinking and stay on solid.
- Page 31 Remote Anemometer Model GC 116I (Transmitter) The model GC 83-A Anemometer Remote is a unit that operates in conjunction with a Girard Product and provides a wireless anemometer function by sending an All Channels Retract signal whenever the wind speed is exceeds a pre-settable value for longer than 3 seconds.
- Page 32 Programming steps NOTE: Before starting this procedure the Receiver must be without power (OFF) for at least 10 seconds. During the programming function the interval between each step required must be less than 10 seconds. The Motion Sensor can only be programmed to a REMOTE that is already programmed to the Receiver. To Program GC116I to a GC-136 Receiver a) Turn on the GC-136 and the GC116I(Leave them on if already on) b) Press the PROGRAM button on the GC-136 (the LED will start blinking)
- Page 33 Remote Controls Model GC 104, GC 105A, GC 106, GC 107 (Transmitters) The GC106 is the 9 channels Remote control for Girard Receivers and Wireless Motors. Its operation is identical for all of the units in the family with varying number of channels. These units are powered by a 3V battery (DC2430) that will last over two years of normal operation.
- Page 34 Programming steps NOTE: Before starting this procedure the Receiver must be without power (OFF) for at least 10 seconds. During the programming function the interval between each step required must be less than 10 seconds PROGRAMMING THE REMOTE CONTROL TO A RECEIVER Select on the GC106 the desired Channel Make sure that the Receiver is powered on Press the program button on the Receiver: the Green LED of the Receiver will start blinking...
- Page 35 Remote Wall Switches Model GC 229 – 1C and Model GC230 – 2C (Transmitters) The models GC229 and GC230 Remote Wall Switches perform the same functions as the Remote Controls, use the same battery and are programmed in the same way. These units are powered by a 3V battery (DC2430) that will last over two years of normal operation.
- Page 36 GC229 GC230 Programming steps NOTE: Before starting this procedure the Receiver must be without power (OFF) for at least 10 seconds. During the programming function the interval between each step required must be less than 10 seconds. The Motion Sensor can only be programmed to a REMOTE that is already programmed to the Receiver.
Need help?
Do you have a question about the G-Link G-1500 and is the answer not in the manual?
Questions and answers