Table of Contents
Advertisement
Advertisement
Table of Contents

Related Manuals for Z-EDGE T4


Summary of Contents for Z-EDGE T4
- Page 1 Model: T4...
-
Page 3: Table Of Contents
TABLE OF CONTENTS 1 INTRODUCTION ........................... 2 1.1 Features ..........................2 1.2 What's in the Box ......................2 1.3 Product Overview ......................3 2 GETTING STARTED ........................4 2.1 Inserting the TF/Micro SD card ................. 4 2.2 Front Lens Installation ....................4 2.3 Adjust Device Position .................... -
Page 4: Introduction
1 INTRODUCTION Thank you for purchasing the T4 High Definition Car DVR / dash cam by Z-Edge ®. Featuring a 4-inch touchscreen display and dual lenses for simultaneous recording, front, and back. Please read this manual carefully before using this product. We hope you enjoy using this product. -
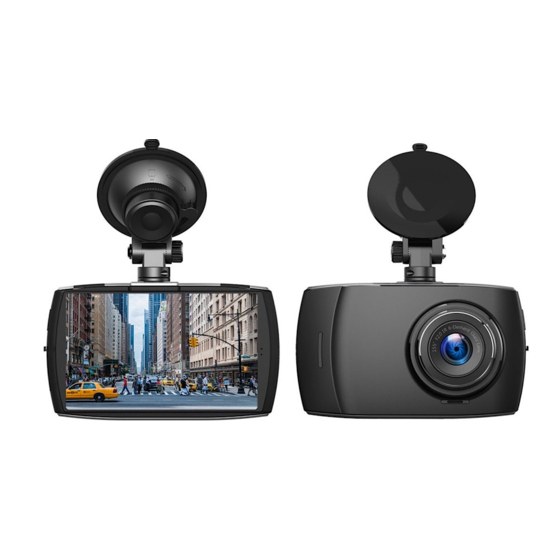
Page 5: Product Overview
1.3 Product Overview Micro USB Connector (Charging) Car Mount Slot Mini USB Connector (Rear Camera) Power Button Speaker TF/Micro SD Card Slot Display Screen Microphone Adhesive Mount Front Camera Mini USB Connector Indicator Light Rear Camera... -
Page 6: Getting Started
2 GETTING STARTED 2.1 Inserting the TF/Micro SD card • Insert a TF/Micro SD card into the TF/Micro SD Card Slot (5), with the pins facing towards the back of the device, until it clicks into place. • To remove, push the edge of the TF/Micro SD card inward until you feel it click, then allow it to push out until you can remove it from the slot. -
Page 7: Adjust Device Position
c. This position should be close to the cigarette lighter (power) in the car to ensure charging whilst recording. 3. Having found a suitable location on your windshield, peel off the protective plastic backing from the suction-cup. 4. Press the suction-cup firmly against your windshield, and rotate the lever clockwise (12 o'clock) to secure. -
Page 8: Connecting To Power
2.4 Connecting to Power 1. Plug one end of the Micro USB charging cable into the Micro USB Connector (1) on the dash camera. 2. Plug the other end into the car charger, and insert that into your vehicles lighter socket. WARNING: •... -
Page 9: Rear Lens Installation
2.6 Rear Camera Installation 1. Connect one end of the Mini USB cable into the Mini USB Connector (3) on the dash camera. Connect the other end into the Mini USB Connector (12) on the rear camera. 2. Turn the camera on. The rear-lens view will automatically appear on the display screen (10) in Dual (PiP) format. -
Page 10: Navigation
3 NAVIGATION 3.1 Home Screen 3 4 5 The Home Screen is the default screen after powering on the dash camera, 00:28 2018/01/01 01:28:52 for recording video and capturing snapshots. Item Description A flashing red dot indicates the camcorder is Recording currently recording. -
Page 11: Main Menu
Item Description Switch between Drive, Scenic , Park and WDR Mode modes (see 4.3 for more details). Play/Pause Play or pause video recording. Protect the currently recorded video file from Video Protect being overwritten (see 4.7 for more details). Microphone On/Off Switch audio recording on/off. -
Page 12: Settings
Item Description Switch between 1, 3 or 5-mins recording intervals Loop Recording (see 4.5 for more details). Settings View the full list of settings that can be customized. Playback Playback 'Normal' and 'Emergency' video recordings. Photo Capture Preview saved photos. Exit Main Menu to Home Screen (starts recording). -
Page 13: Recording Videos
1. Tap anywhere on the Home Screen to reveal the Shortcuts. 2. Tap on the Main Menu icon (E), and select Settings (K) from the menu. 3. Search and tap on the Date & Time option to customize. 4. Select a field to customize, then tap above or below it (on the arrows) to increase or decrease the number. -
Page 14: Adjusting The Settings
Normal High G-Sensor 3 mins 5 mins 1 min Loop Recording Parking Mode 1 min 1 min Screen Auto Off Note: • After selecting a mode, you can still customize any of the four settings inside the Main Menu or Setup menus. •... -
Page 15: Emergency Video Protection
4.7 Emergency Video Protection If G-Sensor is enabled and senses an unusual impact or collision the dash cam will automatically protect the currently recorded video file from being overwritten. A lock icon appears top left to signify the current recording is protected. -
Page 16: Common Functions
5 COMMON FUNCTIONS 5.1 Playback Videos 1. Tap anywhere on the Home Screen to reveal the Shortcuts. 2. Tap on the Main Menu icon (E), and select Playback from the menu. 3. Select either 'Normal' or 'Emergency' to preview relevant video files. 4. -
Page 17: Managing Video & Photo Files
Item Description Back Return to browse other snapshots. Previous Tap to view previous saved snapshot. Next Tap to view next saved snapshot. Delete Delete current file. 5.3 Managing Video & Photo Files Connecting to a computer Connect the device to a computer using the micro USB cable. The dash cam will automatically power on and a USB icon will be displayed on the display screen. -
Page 18: Settings Overview
6 SETTINGS OVERVIEW Menu Feature Description Available option Front camera and rear camera connected: 1920x1080P 30FPS + 1920x1080P 30FPS Front camera only: Video Set the resolution of the 2560x1440P 30FPS Resolution videos to be recorded. Main 2304x1296P 30FPS Menu 1920x1080P 60FPS 1920x1080P 30FPS 1280x720P 60FPS 1280x720P 30FPS... - Page 19 Menu Feature Description Available option Exposure Set the exposure levels. -2.0 to +2.0 Format the TF/Micro SD card. Warning: ALL content on Format SD Card OK / Cancel the TF/Micro SD card will be deleted and CANNOT be restored or recovered. Adjust the sensitivity of Off / High / Normal / G-Sensor...
-
Page 20: Faqs
7 FAQs Where should I place the Camcorder? • We recommend that you mount the dash camera as close to the center of the windshield as possible. This should neither distract the driver nor block the drivers view (see 2.2). Why does the dash cam stop recording after some time? •... -
Page 21: Technical Specifications
8 TECHNICAL SPECIFICATIONS Item Description Image Sensor CMOS sensor Effective Pixels 2560x1440P (Front camera only) Storage Media Supports up to 128GB Class 10 or above LED Display 4.0” TFT LCD Touch Panel Lens Viewing angle 155°, F2.0 ; Focus Range 1.5m~Infinity Movie Clip WQHD 1440P (2560 x 1440);... -
Page 22: Customer Support
9 CUSTOMER SUPPORT For customer support inquiries please contact: support@zeroedgetechnology.com Or visit our website: www.zeroedgetechnology.com 10 WARRANTY We provide a 30-day money-back guarantee and an 18-month replacement warranty for our products, except for certain products with specified different warranty policies. -20-... - Page 24 T4Z18UM-01...
Need help?
Do you have a question about the T4 and is the answer not in the manual?
Questions and answers
While my unit is connected to power in my truck (this issue just came up about 4 days ago), the unit will give an alarm, saying low battery, and shuts off. Now, when l start my truck, the video system won't even turn on.
The Z-EDGE T4 dashcam could give a low battery alarm and not turn on when connected to power in a truck due to the following reasons:
1. Faulty Wiring or Poor Installation – If the power connection is not properly installed, the dashcam may not receive sufficient power.
2. Defective Fuses – A blown fuse in the truck’s power system could prevent the dashcam from getting power.
3. Parasitic Drain – If other devices are drawing excessive power, the dashcam may not receive enough to function properly.
4. Faulty Charging System – If the truck’s charging system is malfunctioning, it may not supply adequate power to the dashcam.
5. Defective Alternator – A bad alternator or diode issue could lead to inconsistent power delivery, preventing the dashcam from staying on.
6. Extreme Temperature Conditions – Very hot or cold temperatures could affect the power delivery or the dashcam’s internal battery performance.
Checking the truck’s power source, wiring, fuses, and alternator could help resolve the issue.
This answer is automatically generated
how does the window mount come out of the camers