Table of Contents
Advertisement
Advertisement
Table of Contents

Subscribe to Our Youtube Channel
Related Manuals for RAIMONDI PIKUS 105


Summary of Contents for RAIMONDI PIKUS 105
-
Page 3: Table Of Contents
ENGLISH PIKUS 105/105DL – PIKUS 75/75DL CE DECLARATION OF CONFORMITY Raimondi S.p.A. declares that its machines “PIKUS 105”, “PIKUS 105DL”, “PIKUS 75” and “PIKUS 75DL” meet the essential requirements laid out in the following Directives: EC Directive 98/37 (Machine Directive) EEC Directive 73/23/ (Low Voltage Directive). -
Page 4: Use
D301 MARBLE, BRICK, NATURAL STONE Limitations The PIKUS 105/105DL – 75/75DL saws are designed to be used only with the disks described above and must be water-cooled. Never use the machine with disks for wood-working machines. Modifications that alter the original characteristics of the machine, the type of disk used, disk r.p.m. or the safety devices can only be performed by the manufacturer, checking that the machine complies with the safety standards. -
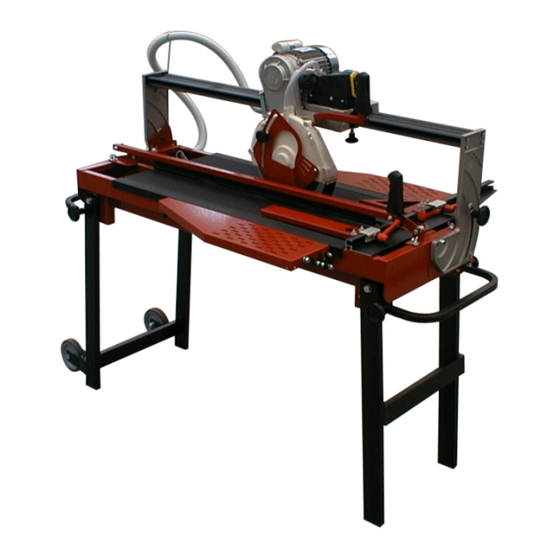
Page 5: The Machine Units
ENGLISH PIKUS 105/105DL – PIKUS 75/75DL The machine units Main units: G D C A L F A) Motor assembly B) Half-plates for support; C) Slide bar D) Cooling unit E) Frame F) Square assembly G) Handles for transport H) Wheels for transport... -
Page 6: Noise
PIKUS 105/105DL – PIKUS 75/75DL ENGLISH Noise The machine noise output is measured on production samples in compliance with ISO 3754-77 and ISO CD 11201-91. PIKUS 105/105DL PIKUS 75/75DL 103,5 [dBw(A)] 10,2[mW(A)] 103,5 [dBw(A)] 10,2[mW(A)] 101,0 [dB(A)] 111,5 [mW(A)] 101,0 [dB(A)] 111,5 [mW(A)]... -
Page 7: Electrical Power Supply
ENGLISH PIKUS 105/105DL – PIKUS 75/75DL Electrical Power Supply The “PIKUS” saws must be powered at the voltage indicated on the "TECHNICAL DATA" label. Always use an effectively grounded cable to hook up the machine. When in doubt, do not plug the machine in. -
Page 8: Assembling/Disassembling The Machine
PIKUS 105/105DL – PIKUS 75/75DL ENGLISH Assembling/Disassembling the machine BEFORE PERFORMING ANY OPERATION, MAKE SURE THAT THE MACHINE IS UNPLUGGED. TWO PERSONS ARE NEEDED TO ASSEMBLE THE MACHINE Assembly: • Take the machine off the pallet and check for broken or damaged parts. -
Page 9: Positioning The Square
ENGLISH PIKUS 105/105DL – PIKUS 75/75DL Positioning the square BEFORE PERFORMING ANY OPERATION, MAKE SURE THAT THE MACHINE IS UNPLUGGED. ATTENTION: CHECK THAT THE SQUARE (A) IS RESTING ON THE BLOCK (H) AND THAT THE LEVER (C) IS LOCKED. NORMAL CUTS •... -
Page 10: Cutting
PIKUS 105/105DL – PIKUS 75/75DL ENGLISH Cutting BEFORE TURNING ON THE MACHINE, ADJUST THE DISK GUARD SO THAT IT IS TOUCHING THE TILE TO CUT AND TIGHTEN THE ADJUSTMENT KNOB IMPORTANT: BEFORE CUTTING, MAKE CERTAIN THAT THE COLUMN LOCK (A) AND THE MOTOR HOIST KNOBS (B) ARE FIRMLY TIGHTENED. -
Page 11: Jolly 45° Operation
ENGLISH PIKUS 105/105DL – PIKUS 75/75DL Jolly 45° Operation BEFORE PERFORMING ANY OPERATION, MAKE SURE THAT THE MACHINE IS UNPLUGGED. As far as the DeLux version is concerned, remove the tile-holder device from the left-hand side of the machine, by means of the wing nuts, and fix it to the right-hand side;... -
Page 12: Maintenance
PIKUS 105/105DL – PIKUS 75/75DL ENGLISH Maintenance BEFORE PERFORMING ANY OPERATION, MAKE SURE THAT THE MACHINE IS UNPLUGGED. CLEANING ALWAYS CLEAN WITH A DAMP SPONGE. NEVER SPRAY WATER. KEEP THE SLIDE BAR CLEAN (DO NOT GREASE). LUBRICATION REGULARLY GREASE THE CHUCK BEARINGS IN THE POINT OF CONTACT WITH THE DISK HOLDER FLANGE. -
Page 13: Replacing The Diamond Disk
ENGLISH PIKUS 105/105DL – PIKUS 75/75DL Replacing the diamond disk • Remove the plastic spray guard. • Loosen the screws and remove the disk guard. • Insert an Allen wrench into the hollow on the flange-holder shaft. • Loosen the disk securing nut with the supplied 22 mm Allen wrench, turning it clockwise. -
Page 14: Repairs
PIKUS 105/105DL – PIKUS 75/75DL ENGLISH Repairs BEFORE PERFORMING ANY OPERATION, MAKE SURE THAT THE MACHINE IS UNPLUGGED AND EMPTY THE TANK. REPLACING THE PUMP • Remove the table (A). • Empty the tank. • Loosen the wing nut (B) and remove the pump. -
Page 15: Disposal
ENGLISH PIKUS 105/105DL – PIKUS 75/75DL Disposal WHEN THE MACHINE, OR PARTS, ARE TO BE DEMOLISHED, FOLLOW THE INDICATIONS OUTLINED IN THE CURRENT LEGISLATION. SWITCH HOLDER ABS "ABS" MACHINE BODY STEEL "AC" ALUMINIUM "AL" POLYAMIDE "PA" DISK GUARD ALUMINIUM "AL"... - Page 16 PIKUS 105/105DL – PIKUS 75/75DL ENGLISH...
- Page 17 ENGLISH PIKUS 105/105DL – PIKUS 75/75DL POS. CODE PART NAME POS. CODE PART NAME 22 179CC250Q DIAMOND DISK, Ø250 F25.4 SMOOTH CROWN 423BL75 TILE HOLDER DEVICE (PIKUS 75) 423BL105 TILE HOLDER DEVICE (PIKUS 105) 23 191GE02D GUIDE FOR SQUARE, LL450mm...
- Page 18 PIKUS 105/105DL – PIKUS 75/75DL ENGLISH 230 V ∼ 50 Hz 230 V ∼ 60 Hz 115 V ∼ 50 Hz 115 V ∼ 60 Hz 3G 1,5 H 07 RNF 3G 1,5 H 07 RNF 3G 2,5 H 07 RNF...
- Page 20 PIKUS PIKUS Date of manufacture Serial n° RAIMONDI S.p.A MODENA 2003 developed by TECNO DINAMICA S.n.c.
Need help?
Do you have a question about the PIKUS 105 and is the answer not in the manual?
Questions and answers