Table of Contents
Advertisement
Advertisement
Table of Contents

Subscribe to Our Youtube Channel
Related Manuals for Tysso BCP-8000


Summary of Contents for Tysso BCP-8000
- Page 1 User’s Manual BCP-8000 Data Collector Ver.1.1 2012.10...
-
Page 2: Table Of Contents
Contents 1. Introduction ............................ 2 1.1. Features ..........................2 1.2. Unpack ............................ 2 1.3. Overview ..........................3 2. Keypad ............................4 2.1. Function Keys ......................... 4 2.2. FN Key + Numeric Key ......................6 2.3. Numeric and Alphabetic Keys ....................5 3. - Page 3 Appendix..............................28 Upload a Custom Logo (Start Image) ....................28 Auto Upload Data (USB Type Only) ...................... 31...
-
Page 4: Introduction
The ergonomic-built body offers comfortable grab to guaranty BCP-8000 ideal for long-time work. The vividly bright LCD display, tactile keypad (21 key), and small foot-print cradle furnish convenient operations and data processing: key-in, editing, navigation, communication and battery-charging. -
Page 5: Overview
1.3. Overview FRONT VIEW SIDE VIEW REAR VIEW FRONT VIEW SIDE VIEW REAR VIEW... -
Page 6: Keypad
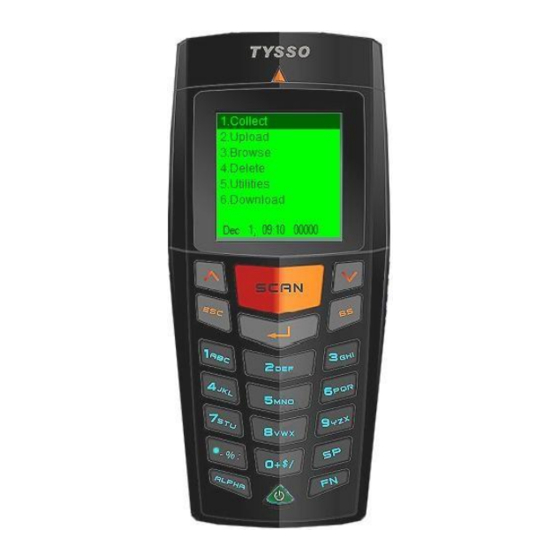
2. Keypad The terminal equips with 21 rubber keys. All the keys’ details/functions are described at Section 2.1, 2.2 and 2.3. 2.1. Keys Descriptions Scan Press to scan a barcode. : : Down Press to cursor down. : Press to cursor up. :... -
Page 7: Numeric And Alphabetic Keys
2.2. Numeric and Alphabetic Keys 1 (ABC)(abc) Numeric 1 or Alpha A,B,C or (a,b,c) 2 (DEF)(def) Numeric 2 or Alpha (D,E,F) or (d,e,f) 3 (GHI)(ghi) Numeric 3 or Alpha (G,H,I) or (g,h,i) 4 (JKL)(jkl) Numeric 4 or Alpha (J,K,L) or (j,k,l) 5 (MNO)(mno) Numeric 5 or Alpha (M,N,O) or (m,n,o) 6 (PQR) (pqr) -
Page 8: Fn Key + Numeric Key
2.3. FN Key + Numeric Key FN+0 (Backlight Switch): When operating under a low-light environment, press “FN” key then press “0” key; it would turn on the LCD backlight so as to acquire better images. Press “Fn” key then press “0” key again to turn off the backlight. FN+9 (Scan Mode): Press “FN”... - Page 9 1. Collect FN+1 (Copy Last Record): This function allows user to copy the last scanned record and append to the end of the records. FN+2 (Exit to Main Menu): This function will terminate the process and return to Main Menu. 3.
-
Page 10: Connecting To Your Pc
When the battery is charged completely, the battery status icon will turn to static and indicated the battery is full (dark icon). The terminal RED LED turns off. * To install USB driver of BCP-8000, please refer to “4. Communication / Utility” for further information. -
Page 11: Connecting To Pc By The Cradle With Rs-232 Interface Cable
3.1.2. Connecting to PC by the cradle with RS-232 interface cable DB9F Connector to RS-232 Turn off computer before connection. Connect the DC plug of the power adapter to the power jack which located at the DB9F connector. ... -
Page 12: Auxiliary Battery
3.1.4. Auxiliary Battery The terminal is equipped with an auxiliary rechargeable battery to furnish the power supply to SRAM. The auxiliary battery can work at least one month since the main battery removed from the terminal or the main battery stores no power. Note: The maintenance or replacement of Auxiliary Battery is for qualified service personnel only. -
Page 13: Communication/Utility
When you plug in the USB interface cable to your host PC for the first time, you will be prompted to install a device driver for the newly detected hardware. Please download the latest driver from TYSSO official website. Extract the compressed file and open the folder to install the driver(s). Specify the path to the USB Driver folder and complete the driver installation. -
Page 14: Communication
4.2. Communication: You can configure your terminal and perform data management via the bundled cradle. Uploading: You can upload the data collected by your terminal unit to your PC. You may hear a beep sound when the terminal is placed onto the cradle. When uploading the data to your PC, the terminal would show “Uploading….”... -
Page 15: Getting Started
5. Getting Started 5.1. Turn On Press and hold the power key for over 1.5 second to turn on the terminal. The terminal might give a beep sound if the SETTING item “Key Click” is set to on. 5.2. Turn Off Press and hold the power key for over 1.5 second to turn off the terminal. -
Page 16: Collect
Note: This indicates the terminal is communicating with PC for data uploading. Auto Upload Data (For USB Type Only) The USB type BCP-8000 supports Auto Upload Data function through a Terminate and Stay Resident program (TSR). Please refer to the Appendix: Auto Upload Data (USB Type Only) (page 31) for further... -
Page 17: Browse
5.3.3. Browse This function of the item is that allowing user to browse all the data which keep in the SRAM. Figure 5.3.3 Execute the selected item or press “ESC” key to return to MAIN MENU. The example is that executing the “Data File”... -
Page 18: Delete
5.3.4. Delete: The function allows user to delete the collected data. Figure 5.3.4 1. All Data: all the data would be deleted. 2. Last Record: last record would be deleted. 3. Cancel: all the data would be saved and return to Main Menu Figure 5.3.4.1 Select “1. -
Page 19: Utilities
5.3.5. Utilities: The function of this item is that allowing user to set necessary parameters or some features that can help to enforce the terminal to meet application requirements. Figure 5.3.5. 5.3.5.1. Memory: The item provides information of memory capacity and RAM Test function. Figure 5.3.5.1. - Page 20 5.3.5.2. Setting: The function can configure the terminal parameters (auto power off, LCD backlight...) to optimize the convenient of the operation. Figure 5.3.5.2 1. Buzzer Pitch: The span between 000-255 Hz can be set. 2. Record Prompt: The span between 0000-9999 ms can be set. This is the time span to display the collected “record number”...
- Page 21 5.3.5.3. Reader: This item provides a test function to read barcodes. Press SCAN button, a red scan light beam will be emitted (for the safety reason, please DO NOT stare at aperture directly where the light come from). A beep with a flashing GREEN LED indicates a successful scan.
- Page 22 Figure 5.3.5.4.1 Figure 5.3.5.4.1 shows that executing the keypad test, and key-in lower case of “apple” characters. Note: To alter states between upper case, lower case character and number, press “ALPHA” key to switch the type of characters or numbers. 5.3.5.5.
-
Page 23: Download
5.3.6. Download: This download function provides selections of downloading the applications, lookup file, setting to the terminal. Figure 5.3.6 This item provides the function of downloading the application which developed 1. Program: under the Job Generator Utility. 2. Setting: This item provides the function of downloading the setting file which programmed under the Job Generator Utility. -
Page 24: Memory
6. Memory 6.1. Memory Arrangement: The terminal is equipped with 2MB SRAM and it is divided into two portions with 1MB each for data and look-up file storages. A record is composed of FORM(s) or/and MENU(s). Each record can contain upto 10 FORM(s) or/and MENU(s). -
Page 25: Example
The example is an applicable data collecting application which illustrates user with a circumstance of taking data in the file, checking inventory on site, browse the collected data. Please find the file of tysso.apg under the EXAMPLE folder from TYSSO official website. The example includes Employee ID, Location, Item No., Item, Qty variables. -
Page 26: Collecting Data
7.1. Collecting data Press “1” key to enable the collect function at MAIN MENU. Figure 7.1.1 Use Arrow Up/Down keys to move the cursor to “Check Stock” and press “ENTER” key. Figure 7.1.2 Input the Employee ID “100” and press “ENTER” key. Figure 7.1.3... - Page 27 Input data to the fields. The sequnce of the data input is from Location :-> Item No :-> Item :-> Qty :-> Location… Figure 7.1.4 When “ESC” key is pressed the figure 7.1.5 would appear at the display. Figure 7.1.5 When “ESC”...
-
Page 28: Lookup
7.2. Lookup When user perform Check Stock Job (repeating the procedure of 7.1.4), the lookup function will help user to locate the other inventory data when the Item No. data matches the lookup file data. Follow the steps as follows: ... -
Page 29: Browse
7.3. Browse The browse function provides nevigation, edit or delete collected data. Press “3” key to enable the browse function at MAIN MENU. In sequence, the last saved record would be appeared at the display. The last saved record (as shown figure 7.3.2) would appear at the display. You can use Arrow Up/Down keys to navigate all the data or press “FN+1”... - Page 30 Appendix Upload a Custom Logo (Start Image) User can upload a 128 x 128 pixel bmp image to the BCP-8000 as the start image (e.g.: company logo, group/department mark…etc.). Download the latest driver from TYSSO official website. Access the folder and browse the folder “BMPLogo”.
- Page 31 Image is loaded. Set the proper COM port and baud rate to establish the communication to the BCP-8000. Make sure the BCP-8000 is installed to the cradle properly. Select “6. Download” and press key to access the sub menu. Select “Program” and press...
- Page 32 Click the button “Upload Logo” to upload the custom start image to the BCP-8000. Now you can turn off the BCP-8000 and turn on again to see the custom logo (start image). Tips: Enable/Disable Custome Logo User can press keys to enable/disable custom logo function.
- Page 33 Auto Upload Data (USB Type Only) BCP-8000 with USB Type interface cradle supports the Auto Upload Data function immediately as the users install the BCP unit onto the cradle. This function can reduce the operating time especially for the time-limited data collecting tasks.
- Page 34 Click “Start” to activate the function. Set the BCP-8000 unit (or units) to the “Auto Upload Data Mode”: Return the BCP unit to the Main Menu. Press keys to enter the Menu. Move the cursor to “2. Automatically” and press to complete.
- Page 35 After user finished the data collecting task: Place the BCP unit to the cradle and the BCP unit will upload the data automatically. As the data is uploaded, there is a two-beep sound to notice user that the data is successfully uploaded.
- Page 36 Function Key...
Need help?
Do you have a question about the BCP-8000 and is the answer not in the manual?
Questions and answers