Table of Contents
Advertisement
Quick Links
R a d i o 1
Dear Customer,
Quality has always been our driving force and founding Argon Audio is
a natural extension of this philosophy.
We have 20 years' experience in creating and specifying high quality products,
manufacturing them and selling them on to end users with Value-for-Money as the
primary aim. And Argon Audio is a brand fully compliant with these values.
Design, and engineering is done in Denmark and manufacturing takes place in the Far
East, where quality vendors are highly competitive - and as a result supply outstanding
Value-for-Money products.
- To the delight of both ourselves and our customers!
Congratulations with your RADIO1, may it bring years of enjoyment.
1
w w w . a r g o n a u d i o . c o m
Advertisement
Table of Contents

Related Manuals for argon audio Radio1


Summary of Contents for argon audio Radio1
- Page 1 Value-for-Money as the primary aim. And Argon Audio is a brand fully compliant with these values. Design, and engineering is done in Denmark and manufacturing takes place in the Far East, where quality vendors are highly competitive - and as a result supply outstanding Value-for-Money products.
-
Page 2: Table Of Contents
3 1.1 Safety page 3 1.2 Contents of the box page 3 2 Usage, controls and connections page 4 3 Using Your Argon RADIO1 page 5 3.1 Quick Start page 5 3.2 DAB mode page 5-7 3.3 FM mode page 7-8 3.4 AUX mode... -
Page 3: Introduction
DC12V 1,5A Power adapter • Bass port foam plug o Inserted into the bass port on the back of the RADIO1 it will lower the bass level – this can be useful if you place the RADIO1 close to a wall. •... -
Page 4: Usage, Controls And Connections
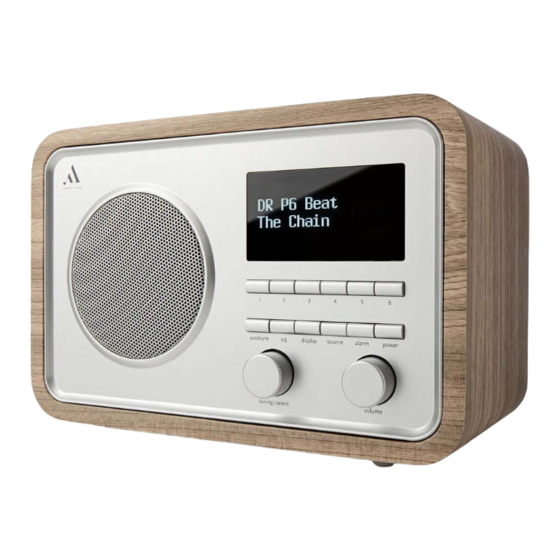
R a d i o 1 2. Usage, controls and connections This chapter describes and shows you the location of the various controls and connections on your Argon RADIO1 Usage, controls, connections Function 1. Preset buttons Press to recall a stored radio station. -
Page 5: Using Your Argon Radio1
Mode. 6. To tune stations in FM Mode press and hold the “Autotune” (2) button for 3 sec. and the RADIO1 will scan to the next available station. You can store FM stations like mentioned in point 3. - Page 6 R a d i o 1 To do a manual scan 1. Press and hold the Display (5) button for three seconds until the text in the display changes. 2. Turn the Tuning/select (3) button/knob until the display shows <Manual Tune>. 3.
-
Page 7: Fm Mode
R a d i o 1 <Prune> This function removes all invalid stations, indicated in the station list with a ‘?’ in front of the station name. 1. Choose “Yes” or “No” using the Tuning/select (3) button/knob 2. Confirm your choice by pressing the Tuning/select (3) button/knob. <System>... -
Page 8: Aux Mode
R a d i o 1 3.3.4 Additional Menu functions in FM mode 1. Pressing and holding the Display (5) button for 3 seconds, will bring you into the FM Menu. In the Menu you will find these options by turning/using the Tuning/select (3) button/knob. -
Page 9: Using Basic Functions
This function gives you the choice to optimize the sound to your specific needs. Ex. If you use the RADIO1 mainly for talk-radio you will get optimal sound performance by choosing “Speech” setting in EQ. EQ setting can be changed at any time. -
Page 10: Using Of The Snooze Function
R a d i o 1 6. Next Date will start blinking, choose the date by turning the Tuning/select (3) button/knob and after you choose day, month and year remember to press the Tuning/select (3) button/knob to confirm each step. 7. - Page 11 R a d i o 1 4.2.1 Checking the sleep timer setting 1. Sleep time will show in the top right corner of the display if 15 minutes has been chosen it will show “S15” and it will count down 2.
-
Page 12: Specifications
R a d i o 1 4.5.7 Software version (SW version) 1. Access Software version information by pressing the Tuning/select (3) button/knob when <SW version> is shown in the display. 2. Press the Tuning/select (3) button/knob to confirm. The display now shows the software version of your Radio. 5.
Need help?
Do you have a question about the Radio1 and is the answer not in the manual?
Questions and answers