
Subscribe to Our Youtube Channel
Related Manuals for Clarke Strong-Arm CH2500B


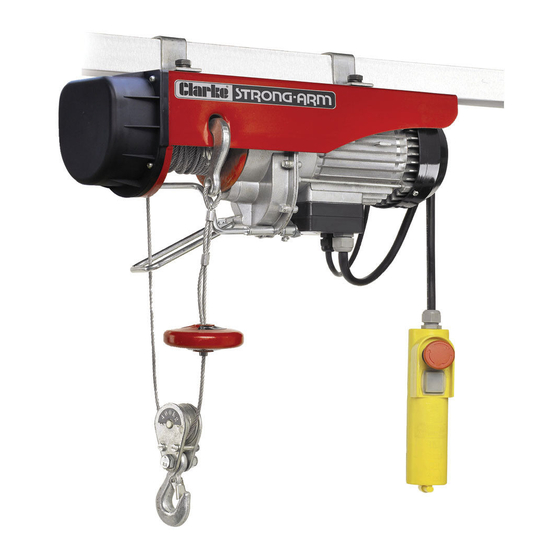
Summary of Contents for Clarke Strong-Arm CH2500B
- Page 1 ELECTRIC HOIST MODEL NO: CH2500B, CH4000B PART NO: 7630386, 7630391 OPERATION & MAINTENANCE INSTRUCTIONS LS1010...
-
Page 2: Introduction
INTRODUCTION Thank you for purchasing this CLARKE Electric Hoist. Before attempting to use this product, please read this manual thoroughly and follow the instructions carefully. In doing so you will ensure the safety of yourself and that of others around you, and you can look forward to your purchase giving you long and satisfactory service. -
Page 3: Table Of Contents
CONTENTS Introduction ................2 Guarantee .................. 2 Contents..................3 General safety rules ..............4 Electrical connections ............... 5 Unpacking and assembly ............6 Installation ................... 6 Operation ................... 7 Maintenance................8 Troubleshooting................9 Parts and servicing..............9 Specifications ................10 Exploded diagram &... -
Page 4: General Safety Rules
10. Make sure the load is balanced, stable and that personnel stand clear of the raised load. 11. Contact your CLARKE dealer or the CLARKE Interational Service Department for any spare parts relating to this product. 12. Ensure that the switches are kept in good condition. -
Page 5: Electrical Connections
ELECTRICAL CONNECTIONS Connect the mains lead to a standard, 230 Volt (50Hz) electrical supply through an approved 13 amp BS 1363 plug, or a suitably fused isolator switch. WARNING: THIS APPLIANCE MUST BE EARTHED IMPORTANT: The wires in the mains lead are coloured in accordance with the following code: Green &... -
Page 6: Unpacking And Assembly
UNPACKING AND ASSEMBLY Unpack your hoist and make sure that the following items are present. Should there be any damage caused during transit contact your Clarke dealer immediately. • 1 x Hoist Assembly • 1 x Hook / Pulley Assembly •... -
Page 7: Operation
OPERATION HOIST CONTROL UP/DOWN BUTTONS 1. Press the Raise button to raise the EMERGENCY STOP hoist or the Lower button to lower the hoist as shown on the right. RAISE 2. To stop motion release the button. LOWER CAUTION: MAKE SURE THE HOIST STOPS COMPLETELY BEFORE REVERSING DIRECTION. -
Page 8: Maintenance
• When lowering a load, the load will not stop immediately when the lower button is released, It may continue for a few more millimeters whilst the brake takes effect. HOIST CAPACITY When the hoist is used in its basic configuration as shown on the right, the rated lifting capacity is 125 Kg (200 Kg for the CH4000B) -
Page 9: Troubleshooting
Cable stored unwound or in Replace cable. kinked poor conditions. If this does not solve your problem, please contact the Clarke service department. See below PARTS AND SERVICING For Parts & Servicing, please contact your nearest dealer, or CLARKE International, on one of the following numbers. -
Page 10: Specifications
SPECIFICATIONS CH2500 CH4000 Load Capacity (Single Cable) 125 kg 200 kg Lifting Speed (Single Cable) 10 m/min 10 m/min Lifting Height (Single Cable) 12 m 12 m Load Capacity (Double Cable) 250 kg 400 kg Lifting Speed (Double Cable) 5 m/min 5 m/min Lifting Height (Double Cable) Cable Length... -
Page 11: Exploded Diagram & Parts List
EXPLODED DIAGRAM & PARTS LIST... - Page 12 EXPLODED DIAGRAM & PARTS LIST Description Description Description Hexagon Bolt Gear Case Handle Switch -Up Spring Washer Spring Washer Rise & Fall Switch Flat Washer Flat Washer 3-Prong Plug Fixing Ring 2nd Gear Wheel Hook Locknut Support Frame Cushion Board Hook Washer Support Panel Front Cover...
-
Page 13: Declaration Of Conformity
DECLARATION OF CONFORMITY... -
Page 14: Notes
NOTES... - Page 15 NOTES...
Need help?
Do you have a question about the Strong-Arm CH2500B and is the answer not in the manual?
Questions and answers